How To Do Exhaust Manifolds On 2005 Ford: Proven Guide
Replacing the exhaust manifolds on your 2005 Ford is manageable with the right approach. This guide breaks down how to do exhaust manifolds on a 2005 Ford step-by-step, focusing on safety, preparation, and overcoming common stuck bolt issues to ensure a successful, leak-free repair.
Dealing with a noisy or leaking exhaust on your 2005 Ford can be frustrating. Often, the culprit is a cracked or leaking exhaust manifold, usually accompanied by those dreaded ticking noises. You might worry that this job is too tough for a home mechanic, but I’m here to tell you it is totally achievable! With clear instructions and a little patience, you can tackle this repair yourself. We will walk through every stage, from gathering the right tools to securing the final bolts, ensuring your Ford runs quietly and efficiently again. Let’s get your truck back in top shape!
Why Do 2005 Ford Exhaust Manifolds Fail?
The exhaust manifold is an engine workhorse. It collects hot exhaust gases from each cylinder and channels them into the exhaust pipe. These parts handle extreme heat cycles every time you drive. On many 2005 Ford trucks and SUVs (like the F-150 or Expedition, often equipped with the Triton V8 engines), these manifolds can crack over time due to constant heating and cooling. This thermal stress weakens the metal.
When a manifold cracks, you usually hear a ticking or puffing sound, especially when the engine is cold. This isn’t just annoying; it affects performance and fuel economy because exhaust gases are escaping before they reach the oxygen sensors correctly. Early detection allows for a simpler fix before surrounding engine components get damaged by the hot gas leaks.
Common Signs You Need New Manifolds
- Ticking or Puffing Noise: Often loudest when the engine is cold and quiets down slightly as it warms up.
- Exhaust Smell in Cabin: A dangerous sign that exhaust gases are leaking into the passenger area.
- Check Engine Light (CEL): Leaks near the oxygen sensors can throw codes related to inefficient catalytic converter performance (e.g., P0420).
- Visible Cracks: Inspecting the manifolds visually may reveal cracks or broken studs.
Preparation: Tools and Safety First
Before you even think about touching a wrench, preparation is key. Working on exhaust components involves dealing with very hot, often rusty parts. Safety is our number one priority. Gather everything you need beforehand so you aren’t scrambling halfway through the job.
Essential Tools Checklist
Having the correct tools makes the difference between a frustrating afternoon and a successful repair. Since you are working on a 2005 model, expect some corrosion.
| Tool Category | Specific Items Needed | Why It’s Important |
|---|---|---|
| Safety Gear | Safety Glasses, Mechanic Gloves, Face Shield (Optional) | Protect eyes from rust flakes and hot metal debris. |
| Lifting/Access | Hydraulic Jack, Jack Stands (Crucial!), Wheel Chocks | Never work under a vehicle supported only by a jack. See NHTSA guidelines on proper vehicle support. |
| Removal/Installation | Socket Set (Metric & Standard), Torque Wrench, Various Extensions, Swivel Joints | Needed for reaching tight spots around the engine block. Torque wrench ensures proper clamping force. |
| Stubborn Bolts | Penetrating Oil (PB Blaster, Kroil), Breaker Bar, Map Gas Torch or Induction Heater | Heat and chemical action are often required to loosen rusted manifold studs. |
| Gaskets & Hardware | New Exhaust Manifolds (if replacing), New Gaskets, New Studs/Bolts | Always use new hardware; old studs snap easily when reused. |
Safety Precautions for Exhaust Work
- Cool Down: Ensure the engine has been off for several hours. Exhaust components retain heat for a very long time.
- Ventilation: If you need to use heat (like a torch), do so in a very well-ventilated area, away from flammable liquids.
- Secure the Vehicle: Use high-quality jack stands rated for your vehicle’s weight, placed on solid, level ground. Chock the wheels that remain on the ground.
- Eye Protection: Always wear safety glasses. Rust, dirt, and metal shards fly when dealing with old fasteners.
Step-by-Step Guide: How To Do Exhaust Manifolds on 2005 Ford
This guide primarily focuses on the V8 engines common in the 2005 Ford lineup, where manifold access can be notoriously difficult, especially on the passenger side. We will cover removal, cleaning, and reinstallation.
Phase 1: Gaining Access and Disconnection
Access is your biggest hurdle. You often need to work from both underneath the truck (especially for the passenger side) and from the top engine bay.
- Disconnect Battery: For safety, disconnect the negative battery terminal first.
- Identify the Leak: If possible, confirm which side is leaking. Sometimes both sides need replacement, as the heat stress usually affects both manifolds similarly over time.
- Remove Heat Shields: Most manifolds have thin metal heat shields bolted over them. Use a socket wrench to remove these shields. They are often held on by small 8mm or 10mm bolts that rust easily.
- Locate O2 Sensors: The oxygen sensors are threaded into the manifold or the exhaust pipe right next to it. Use a specialized O2 sensor socket (which has a slot for the wire) to carefully unscrew them. Disconnect the wiring harnesses. Tip: Spray penetrating oil on the threads of the O2 sensors beforehand.
- Disconnect Exhaust Pipes: The manifold bolts to the exhaust downpipe (or the catalytic converter pipe). You will need to unbolt the flange connecting these two sections. This connection often requires significant leverage due to rust.
Phase 2: Dealing with the Manifold Bolts (The Hard Part)
This is where most DIY repairs stall. Ford manifolds use studs or bolts that often seize in the cylinder head due to heat cycling and corrosion. Patience is crucial here.
Method 1: Penetrating Oil and Patience
Spray every single manifold bolt or stud thoroughly with a high-quality penetrating oil. Let it soak for several hours, or even overnight, reapplying periodically. Then, try to loosen them using a breaker bar or a 6-point socket for maximum grip. Turn them slowly, trying to tighten slightly before loosening to help break the rust bond.
Method 2: Applying Heat (For Extremely Stuck Bolts)
If oil doesn’t work, controlled heat is the next step. Heat causes the manifold (which expands faster) to separate slightly from the cylinder head, breaking the corrosion seal. If you are using a small MAPP gas torch, focus the heat only on the nuts or the bolt head, not directly on the cylinder head material if possible.
- Apply heat for about 30–60 seconds.
- Immediately attempt to loosen the bolt while it’s still hot (wear heavy gloves!).
- If it moves, work it back and forth slowly. If it resists, apply more penetrating oil (it will smoke off) and let it cool before trying again.
What if the Stud Snaps?
This is common, especially when replacing only the gasket or if the manifold was cracked badly. If a stud shears off flush with the head, you will need an extractor kit or need to drill the broken piece out. This moves the repair into intermediate difficulty. For beginners, if multiple studs break, consider having a professional handle the extraction to prevent drilling into the head material itself, which can cause expensive damage.
If you are replacing the entire manifold, you can sometimes snap the old manifold away from the studs, leaving the studs sticking out, making them easier to grip with vice grips or weld a nut onto for removal.
Phase 3: Manifold Removal and Cleaning
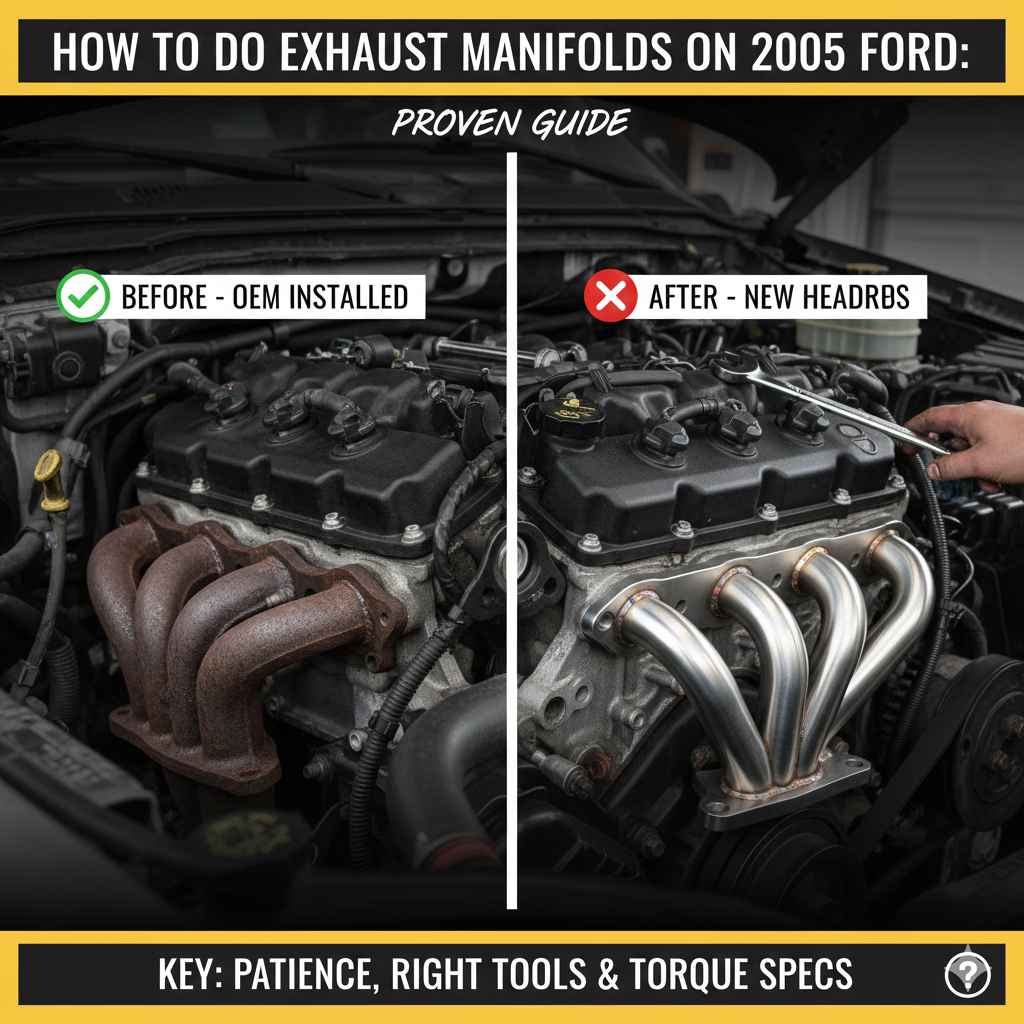
- Remove the Manifold: Once all fasteners are out, carefully wiggle the old manifold free. Be mindful of its position as it comes off, especially if it has an attached catalytic converter component.
- Clean the Mating Surface: This step is non-negotiable for a leak-free seal! Use a plastic scraper or a fine-grit sanding block (like 220 grit sandpaper) to remove every trace of the old gasket material, carbon buildup, and rust from the cylinder head surface. A perfectly flat surface is essential for the new gasket to seal properly. Do not use harsh grinding discs, as they can damage the soft aluminum or iron of the cylinder head.
- Inspect the Head Surface: Look closely at the surface where the manifold bolts on. If you see deep grooves or warping, the new gasket may not seal well. For modern engines, a very light coat of high-temperature RTV sealant on the new gasket (if recommended by the manufacturer) can help, but often, a high-quality graphite or multi-layer steel (MLS) gasket is enough on a clean surface.
Phase 4: Installation of New Manifold
New manifolds often come with new gaskets and sometimes new hardware. If your new hardware is low quality, invest in high-grade, high-temperature hardware (like ARP studs) for maximum reliability.
- Position the Gasket: Place the new gasket onto the cylinder head surface. Ensure it is aligned perfectly with the ports. Some gaskets are specifically designed to only fit one way; check the markings.
- Install New Hardware: If you are using new bolts or studs, apply a light anti-seize compound to the threads that go into the cylinder head. This prevents future headaches!
- Hand-Tighten: Install all the new bolts or studs and hand-tighten them just enough to hold the manifold in place.
- Torque Sequence is Vital: Exhaust manifolds must be torqued in a specific sequence, usually starting from the center bolts and working your way outward in a crisscross pattern. This ensures even pressure across the gasket, preventing leaks and warping the manifold.
Torque Specifications Example (Check Your Specific Engine!)
While specifications vary, here is a general guideline for many Ford V8 heads. Always consult your specific repair manual for the precise torque value for your 2005 Ford model. Failure to torque correctly is the #1 cause of immediate leaks.
| Step | Torque Specification (Approximate) | Pattern |
|---|---|---|
| 1 (Snug) | 10 ft-lbs | Center out |
| 2 (Final Torque) | 18 – 22 ft-lbs | Center out (Crisscross) |
After achieving the final torque, let the engine cool completely, and then re-check the torque settings. Sometimes the gasket compresses slightly, requiring a small final tightening pass.
- Reconnect Exhaust Pipes: Reattach the downpipes or catalytic converter flanges. Use new gaskets here as well if the old ones are crushed.
- Reinstall O2 Sensors: Screw the oxygen sensors back into their ports. Do not overtighten—they can be easily damaged. Reconnect the electrical harnesses securely.
- Reinstall Heat Shields: Put all heat shields back in place. These protect wiring and adjacent components from excessive heat.
- Final Checks: Double-check that all wiring, hoses, and brackets are clear of the new manifold and exhaust pipes. Reconnect the battery.
Post-Installation Checks and Curing
You have successfully installed the manifold! Now, we need to make sure it seals correctly and that everything cures properly.
The First Start-Up
Start the engine and listen carefully. You should immediately notice the ticking or puffing noise is gone. Let the engine idle for about 15 minutes. Watch the manifolds closely for any visible smoke or signs of gas escaping around the gasket lines.
If you smell burning, shut the engine off immediately and check your torque settings, especially if you used any sealant.
Curing Time (If Sealant Was Used)
If you used high-temperature RTV sealant with the gasket, you must follow the sealant’s curing time before running the engine hard. Check the RTV container, but generally, you should let the engine idle gently for 30 minutes to an hour without high RPMs to allow the RTV to fully cure under moderate heat. For more details on automotive sealants, resources like the Society of Automotive Engineers (SAE) provide guidance on material compatibility in high-heat environments.
Test Drive
Take the truck for a short, easy drive. Listen for any remaining noise. Drive it gently for the first day. It is highly recommended to check the manifold torque again after the first 100 miles of driving, as this ensures everything has settled into place.
V8 vs. V6 Considerations for the 2005 Ford
The process outlined above generally applies to both V6 and V8 engines found in 2005 Ford models, but the difficulty changes significantly:
- Passenger Side (Firewall Side): This is almost always the hardest side. On V8 models, the steering shaft often interferes, making access extremely tight. On V6 models, access might be slightly better, but the tight engine bay remains a challenge.
- Driver Side: Usually much easier, as there is typically more room between the manifold and the firewall or fender.
If you are working on a V8, be prepared for the passenger side to take twice as long as the driver side, primarily due to the tight working space required to manipulate wrenches and extensions around the engine cradle.
Troubleshooting Common Exhaust Manifold Mistakes
Even with careful planning, things can go wrong. Here are solutions to the most common issues when replacing an exhaust manifold.
Problem 1: New Gasket Leaks Immediately
Cause: Most likely, the mating surface on the cylinder head was not perfectly clean, or the torque sequence/specifications were incorrect.
Fix: Remove the manifold again. Inspect the old gasket residue—if you see it blown out in one specific area, that points to uneven torque or a high spot on the head surface. Clean the surface meticulously again. If the head surface looks damaged, you might need a very light skim pass with a head resurfacing tool, but proceed with extreme caution.
Problem 2: Oxygen Sensor Won’t Come Out
Cause: Corrosion and heat fusing the sensor threads into the manifold port.
Fix: Apply heavy penetrating oil and let it soak for a full day. If that fails, use a specialized O2 sensor socket and a very long breaker bar. If the sensor begins to twist the wiring harness instead of turning, stop immediately, as you risk tearing the wires. In severe cases, you might have to cut the old manifold off, leaving the sensor stuck in the old piece, and then carefully extract the sensor from the removed part later on a workbench.
Problem 3: Bolts/Studs Snapping During Removal
Cause: High heat corrosion, overtightening during the original installation, or using the wrong tool (e.g., a 12-point socket instead of a 6-point).
Fix: As mentioned earlier, use heat and/or high-quality penetrating oil. If a stud breaks, you must drill it out. Use center punches precisely. Start with a very small drill bit and increase the size gradually. Always use a reverse (left-hand) drill bit if possible, as the drilling action itself might spin the broken stud out. If the broken stud is stubborn, professionals often weld a nut onto the remaining stub, as the heat from welding helps break the rust bond, allowing the welded nut to turn the stub out.
Frequently Asked Questions (FAQ)
Q1: Can I just replace the gasket instead of the whole manifold on my 2005 Ford?
A: You can, but only if the manifold itself is not cracked. If you have a ticking noise, the manifold is usually cracked. Replacing only the gasket on a cracked manifold will not fix the leak, and you risk breaking old studs in the process.
Q2: How long should this job take a beginner?
A: For a beginner tackling this for the first time, plan for 6 to 10 hours total, spread over two days if necessary. The passenger side is often the biggest time sink due to tight access and stubborn bolts.
Q3: What is the most important tool for this job?
A: The most important things are high-quality penetrating oil and a good torque wrench. The torque wrench ensures the new manifold seals correctly and won’t leak right away.
Q4: Do I need to raise the truck very high to do the manifolds?
A: You need enough clearance to comfortably slide under the truck and swing a socket wrench. Usually, lifting the frame high enough to allow the wheels to drop a few inches is sufficient for working underneath, provided you use sturdy jack stands.
Q5: Are aftermarket exhaust manifolds better than OEM for my Ford?
A: Many high-quality aftermarket manifolds are made from thicker stainless steel, which resists cracking better than the original cast iron manifolds. Look for reputable brands known for heavy-duty exhaust components for better long-term results.
Q6: Why do the manifold bolts rust so badly on these Fords?
A: They are constantly exposed to high heat cycling and moisture, especially the lower bolts, which can collect road grime. The constant expansion and contraction weaken the metal structure around the bolts over years of use.
Conclusion
You now have a proven, step-by-step approach to successfully tackling how to do exhaust manifolds on your 2005 Ford. This job tests patience, especially when dealing with rusted fasteners, but by prioritizing safety, using quality penetrating oil, and strictly adhering to the correct torque sequence during reinstallation, you can achieve a professional-level repair.
Remember, the key to success lies in preparation and cleaning that cylinder head surface. Don’t rush the removal of the old bolts; take your time heating, soaking, and working them loose. Once everything is clean and the new manifold is torqued precisely, you will enjoy a quieter engine, restored performance, and the great satisfaction of a job well done right in your own driveway. Happy wrenching!