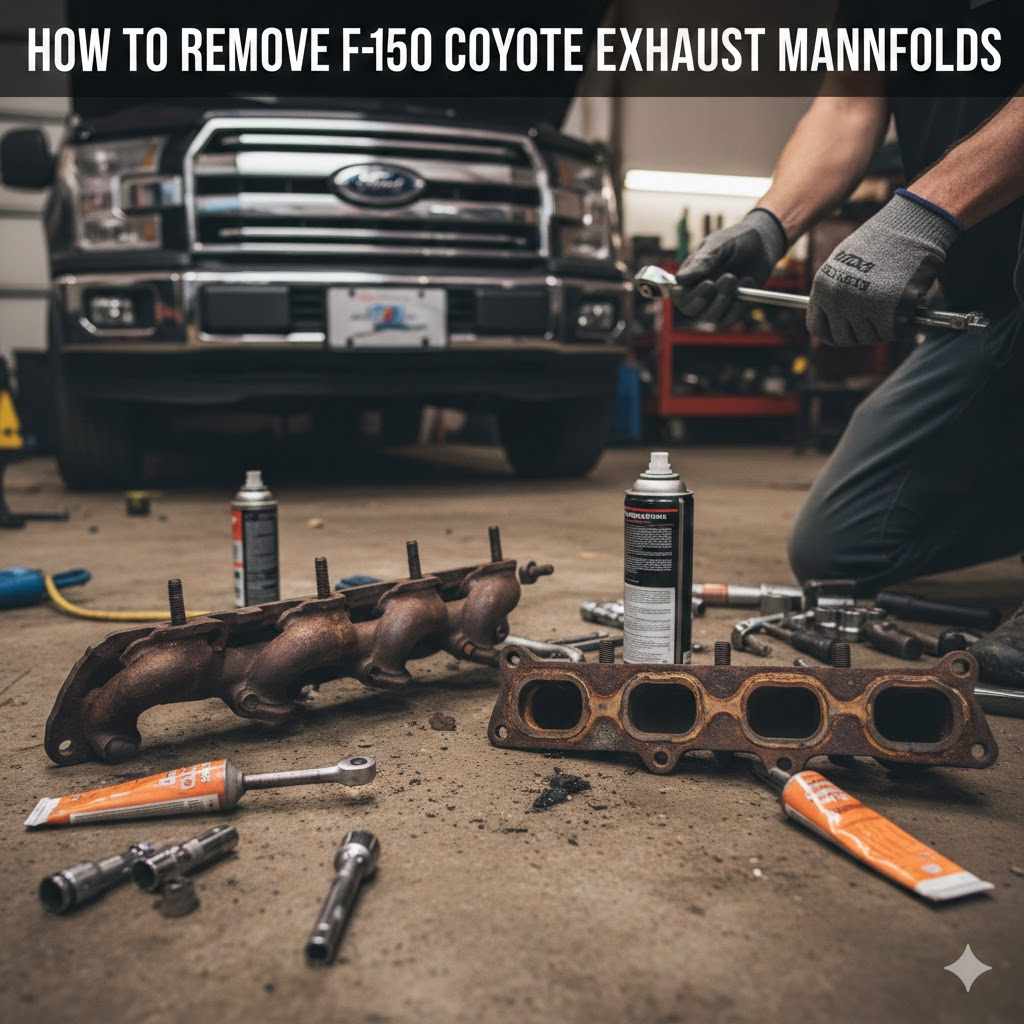
How to Remove F-150 Coyote Exhaust Manifolds
Removing exhaust manifolds on your F-150 with the 5.0 Coyote engine can seem tricky at first. Many folks find seized bolts or tight spaces a real challenge, especially if you’re new to car repairs. But don’t worry, it’s a manageable job with the right steps and a bit of patience.
We’ll walk you through exactly what you need to do, step by step, so you can get this done right.
F-150 5.0 Coyote Exhaust Manifold Removal Guide
This guide focuses on the process of removing exhaust manifolds from a Ford F-150 equipped with the popular 5.0-liter Coyote engine. This task is common for owners looking to upgrade their exhaust system,
Gathering Your Tools and Supplies
Before you start turning any wrenches, having all the necessary tools and supplies is key. This preparation saves time and prevents frustrating pauses mid-job. You’ll want a good set of sockets and wrenches, including extensions and universal joints for those hard-to-reach bolts.
A breaker bar is essential for stubborn fasteners. Safety gear like gloves and eye protection is non-negotiable. You’ll also need some penetrating oil to help loosen rusted bolts.
Having a torque wrench for reinstallation is also important, though we are focusing on removal here.
- Socket Set and Wrenches: A comprehensive set is vital. This includes metric sizes that fit your F-150’s manifold bolts. Sizes often range from 10mm to 15mm for exhaust manifold bolts and nuts. Ensure you have deep sockets for bolts that extend far down.
- Breaker Bar and Extensions: For rusted bolts, a standard ratchet might not provide enough leverage. A breaker bar, with its longer handle, allows for more force application. Various extensions and wobble sockets help you reach bolts located in tight spots, often tucked behind other engine components.
- Penetrating Oil: This is your best friend for dealing with seized exhaust manifold bolts. Applying a quality penetrating oil a day or two before you start, and re-applying it periodically, can significantly ease their removal. Let it soak in to break down rust and corrosion.
- Safety Equipment: Always protect yourself. Safety glasses are crucial to prevent debris from entering your eyes. Heavy-duty work gloves will protect your hands from cuts, abrasions, and heat.
- Wire Brush: After applying penetrating oil, using a wire brush to clean around the bolt heads can help the oil penetrate better and give your socket a cleaner surface to grip.
Preparing Your F-150 for Manifold Removal
Proper preparation makes the entire process smoother and safer. Before you begin, ensure the vehicle is securely lifted and supported. The engine should be cool to avoid burns.
Disconnecting the battery is a critical safety step to prevent electrical shorts. Clearing the immediate work area of any obstructions will give you better access to the manifolds. This might involve removing heat shields or other nearby components that are blocking your path.
- Cool Engine: Never work on a hot exhaust system. Exhaust components can reach extremely high temperatures, causing severe burns. Allow the truck to cool down completely, ideally overnight, before starting any work.
- Secure Lifting: Use a reliable jack and sturdy jack stands to lift the front of your F-150. Ensure the vehicle is stable on the stands. Never work under a vehicle supported only by a jack. A stable platform is crucial for safety.
- Battery Disconnection: Locate your F-150’s battery and disconnect the negative terminal. This prevents any accidental electrical shorts, which could damage your vehicle’s electronics or cause injury. Tuck the cable away from the terminal so it cannot accidentally reconnect.
- Clear the Work Area: Inspect the areas around both exhaust manifolds. You might need to remove plastic engine covers, air intake components, or metal heat shields that obstruct your access. Keep all removed parts organized so reassembly is easier.

How to Remove F-150 5.0 Coyote Exhaust Manifolds Step-by-Step
This section details the core procedure for removing the exhaust manifolds. We will break this down into logical steps, starting with accessing the manifold bolts and proceeding to their actual removal. This will cover common challenges and provide solutions.
The focus is on a methodical approach that minimizes the risk of damage to your truck or yourself.
Accessing the Exhaust Manifold Bolts
Once your F-150 is prepped, the next step is gaining clear access to all the bolts holding the exhaust manifolds to the cylinder heads. On the 5.0 Coyote engine, these manifolds are typically held on by several bolts or studs on each side. Some bolts are easily visible, while others are hidden or tucked away, requiring extensions and universal joints to reach.
Heat shields, if present, may need to be removed first to expose these fasteners. Take your time to identify all fastener locations.
- Locate All Fasteners: Carefully inspect the manifold on each side of the engine. Count the bolts or studs that secure it to the cylinder head. Some may be more visible than others. Note their positions for later.
- Remove Heat Shields: Many F-150 models have metal heat shields surrounding the exhaust manifolds. These are usually held in place by small bolts or nuts. Remove these shields to improve access to the manifold bolts. Keep track of which bolts go where.
- Use Extensions and Swivels: For bolts that are difficult to reach, use socket extensions. A universal joint (swivel socket adapter) is invaluable for angled access to bolts that are not directly accessible from above or below. Experiment with different extension lengths to find what works best.
- Inspect Bolt Condition: Before attempting to loosen any bolts, visually inspect them for rust or damage. Bolts that appear heavily corroded or have damaged heads may require extra attention, such as more penetrating oil or a specialized extraction tool.
Loosening and Removing Stubborn Bolts
This is often the most challenging part. Exhaust manifold bolts on F-150s, especially those in humid or salty environments, are prone to rusting and seizing. The key here is patience and using the right techniques.
Applying penetrating oil generously and allowing it to work is critical. If a bolt feels like it might strip, stop and try a different approach. Sometimes, gently tapping the bolt head can help break the rust bond.
- Apply Penetrating Oil Generously: Spray a liberal amount of penetrating oil onto each bolt head and threads if accessible. Let it soak for at least 15-30 minutes, or ideally, overnight for severely rusted bolts. Reapply if needed.
- Use Proper Socket Fit: Ensure your socket fits snugly onto the bolt head. A loose-fitting socket is more likely to strip the bolt head. A 6-point socket is generally preferred over a 12-point socket for better grip on stubborn fasteners.
- Apply Steady Pressure: When attempting to loosen a bolt, apply steady, consistent pressure. Avoid jerky movements, which can snap a rusted bolt. If it doesn’t budge, try tightening it just a tiny bit before trying to loosen it again. This can sometimes break the rust seal.
- Heat Application (Use with Caution): In some cases, applying heat to the area around the bolt can help expand the metal and break the rust bond. A propane torch can be used carefully. Caution: This should only be done if you are comfortable with its risks, especially fire hazards, and after ensuring there are no flammable materials nearby. Ensure the area is clear of fuel lines and electrical wiring.
Detaching the Exhaust Manifold from the Cylinder Head
Once all the bolts or studs are loosened and removed, the exhaust manifold should be free from the cylinder head. Sometimes, the manifold might still be stuck due to carbon buildup or minor corrosion between the manifold and the head gasket. Gentle persuasion is usually all that’s needed.
A rubber mallet or a pry bar can be used carefully to break the seal without damaging the mating surfaces.
- Remove All Fasteners: Double-check that every single bolt or nut holding the manifold has been successfully removed. Missing even one will prevent the manifold from coming free.
- Gentle Tapping: Once all fasteners are out, use a rubber mallet to gently tap around the edges of the exhaust manifold. This vibration can help dislodge any carbon or rust that’s holding it in place.
- Careful Prying: If tapping doesn’t work, you can use a pry bar. Insert the pry bar carefully between the manifold and the cylinder head in a few strategic locations. Apply light, steady pressure to slowly separate the two surfaces. Avoid prying too hard or in one spot, as this can damage the cylinder head or the manifold.
- Inspect Mating Surfaces: Once the manifold is off, inspect the mating surface on the cylinder head and the manifold itself. Clean off any old gasket material, carbon buildup, or rust. This is crucial for ensuring a proper seal when you reinstall the new manifold or reattach the old one.
Replacing F-150 5.0 Coyote Exhaust Manifolds
This section covers the reinstallation process, which is just as important as the removal. Proper installation ensures no exhaust leaks and a secure fit. We’ll focus on the critical aspects of attaching the new or old manifold back onto the cylinder head.
Installing New Exhaust Manifold Gaskets
The gasket is a vital component that creates a seal between the exhaust manifold and the cylinder head. Using the correct gasket and installing it properly is crucial for preventing exhaust leaks, which can lead to performance issues and noise. Always use new gaskets when replacing exhaust manifolds.
- Choose the Right Gasket: Ensure you have the correct exhaust manifold gasket for your F-150 5.0 Coyote engine. There are often different types of gaskets, and using the wrong one can cause leaks or fitment issues.
- Clean Mating Surfaces: Both the cylinder head surface and the exhaust manifold surface must be perfectly clean and free of old gasket material, carbon deposits, or rust. Use a gasket scraper or razor blade carefully to remove any debris. A clean surface ensures the new gasket can seal properly.
- Position the Gasket Correctly: Most gaskets are designed to fit in a specific orientation. Some may have a slight lip or marking that indicates the correct placement. Ensure the gasket is seated evenly on the studs or over the bolt holes before placing the manifold.
- Avoid Gasket Sealants (Usually): For most F-150 Coyote exhaust manifold applications, gasket sealant is not required or recommended. The gasket itself is designed to handle the heat and pressure. Using sealant can sometimes interfere with proper gasket seating or even cause leaks if applied incorrectly. Always refer to your vehicle’s service manual for specific recommendations.
Torque Specifications and Tightening Sequence
Proper tightening of the exhaust manifold bolts is essential for a good seal and to prevent warping. Each bolt needs to be tightened to a specific torque value, and often in a particular sequence, to distribute the clamping force evenly. This prevents stress on the manifold and the cylinder head.
- Find Torque Specs: Consult a service manual or reliable online resource for the exact torque specifications for your F-150’s 5.0 Coyote exhaust manifold bolts. Overtightening can strip threads or crack the manifold, while undertightening will lead to leaks.
- Tightening Sequence: For a uniform seal, exhaust manifold bolts are typically tightened in a specific pattern, often starting from the center and working outwards in a crisscross pattern. This ensures even pressure across the gasket. Follow the sequence precisely.
- Multi-Stage Tightening: Many manufacturers specify tightening in stages. For example, you might tighten all bolts to a low torque value first, then to a medium value, and finally to the full torque specification. This gradual tightening process helps seat the gasket properly without stressing any one area.
- Use a Torque Wrench: A calibrated torque wrench is a must for this step. It allows you to apply the exact amount of force specified by the manufacturer. Ensure the wrench is set correctly for each stage of tightening.
Final Checks and Starting the Engine
After the manifolds are secured, a few final checks ensure everything is in order before you start the engine. Double-check all connections, ensure no tools are left behind, and then cautiously start the engine to listen for any leaks.
- Review All Work: Visually inspect your work one last time. Ensure all bolts are tightened, all components are reconnected, and no tools or debris are left in the engine bay.
- Reconnect Battery: Reconnect the negative battery terminal that you disconnected earlier.
- Initial Engine Start: Start the engine and listen carefully for any signs of exhaust leaks, such as hissing or puffing sounds, particularly around the manifold area. Let the engine run for a few minutes.
- Check for Leaks: As the exhaust system heats up, any minor leaks will become more apparent. If you hear any abnormal noises, shut off the engine and re-check the manifold bolts and gasket seating.
Troubleshooting Common F-150 5.0 Coyote Exhaust Manifold Issues
Even with the best preparation, you might encounter specific problems during the removal or installation of your F-150 5.0 Coyote exhaust manifolds. Being aware of these common issues and how to address them can save you a lot of frustration. This section covers frequent challenges and offers practical solutions.
Dealing with Stripped Bolt Heads
Stripped bolt heads are a common problem, especially with older or heavily corroded fasteners. If a socket can no longer get a grip, you need alternative methods. These usually involve specialized tools designed to grip damaged fasteners or methods that create a new grip point.
- Bolt Extractor Sets: These kits contain specialized sockets or bits designed to bite into rounded or stripped bolt heads. They work by applying outward force as you turn. Different types exist, including spiral-fluted extractors and internal-cam extractors.
- Locking Pliers (Vise-Grips): For bolts where the head is still partially exposed, high-quality locking pliers can sometimes provide enough grip. Clamp them down tightly onto the bolt head and try to turn slowly. This method is best for less severely damaged bolts.
- Drilling Out the Bolt: If all else fails, the bolt will need to be drilled out. Start with a small drill bit and gradually increase the size until you reach the diameter of the bolt’s shaft. Be extremely careful not to drill into the cylinder head. Once drilled out, you may need to use a tap to re-thread the hole or install a Heli-Coil insert.
- Hammer and Chisel: In some cases, you can use a sharp chisel and a hammer to try and turn the bolt head. Place the chisel at an angle against the edge of the bolt head and tap it to rotate the bolt. This requires precision and can be difficult in tight spaces.
Broken Exhaust Studs
Exhaust studs are bolts that pass through the manifold and into the cylinder head, with a nut on the other side. If a stud breaks off flush with the cylinder head, it presents a similar challenge to a stripped bolt head, but often more difficult to access.
- Stud Extractors: Similar to bolt extractors, there are specific tools for removing broken studs. These can be collet-type extractors that grip the stud’s shank or internal-thread extractors.
- Welding a Nut: A common and effective method for broken studs is to weld a new nut onto the broken stud. The heat from welding helps break the rust bond, and the new nut provides a grip point for removal. This requires welding equipment and skill.
- Drilling and Re-tapping: If welding isn’t an option or doesn’t work, the broken stud must be drilled out. This is a precise process. Once drilled, the hole will likely need to be re-tapped to create new threads, or a thread repair insert like a Heli-Coil can be installed.
- Left-Hand Drill Bits: These drill bits are designed to cut while spinning in reverse (counter-clockwise). Sometimes, as they drill into a stubborn stud, the friction and slight bite can cause the stud to loosen and back out on its own.
Exhaust Manifold Warping
Exhaust manifolds can warp over time due to extreme heat cycles. A warped manifold won’t seal correctly against the cylinder head, leading to exhaust leaks. If you suspect warping, it’s usually best to replace the manifold rather than try to straighten it.
- Visual Inspection: Check the manifold surface for any signs of discoloration or visible distortion. Laying a straight edge across the manifold’s mating surface can help identify low spots or high spots.
- Using a Straight Edge: Place a precision straight edge across the manifold’s mounting surface. If you can slide a feeler gauge of more than 0.010 inches (about 0.25mm) between the straight edge and the manifold surface anywhere, it’s likely warped beyond usable limits.
- Proper Tightening Prevents Warping: During installation, following the correct tightening sequence and torque specifications is crucial to prevent the manifold from warping in the first place. Even torque distribution is key.
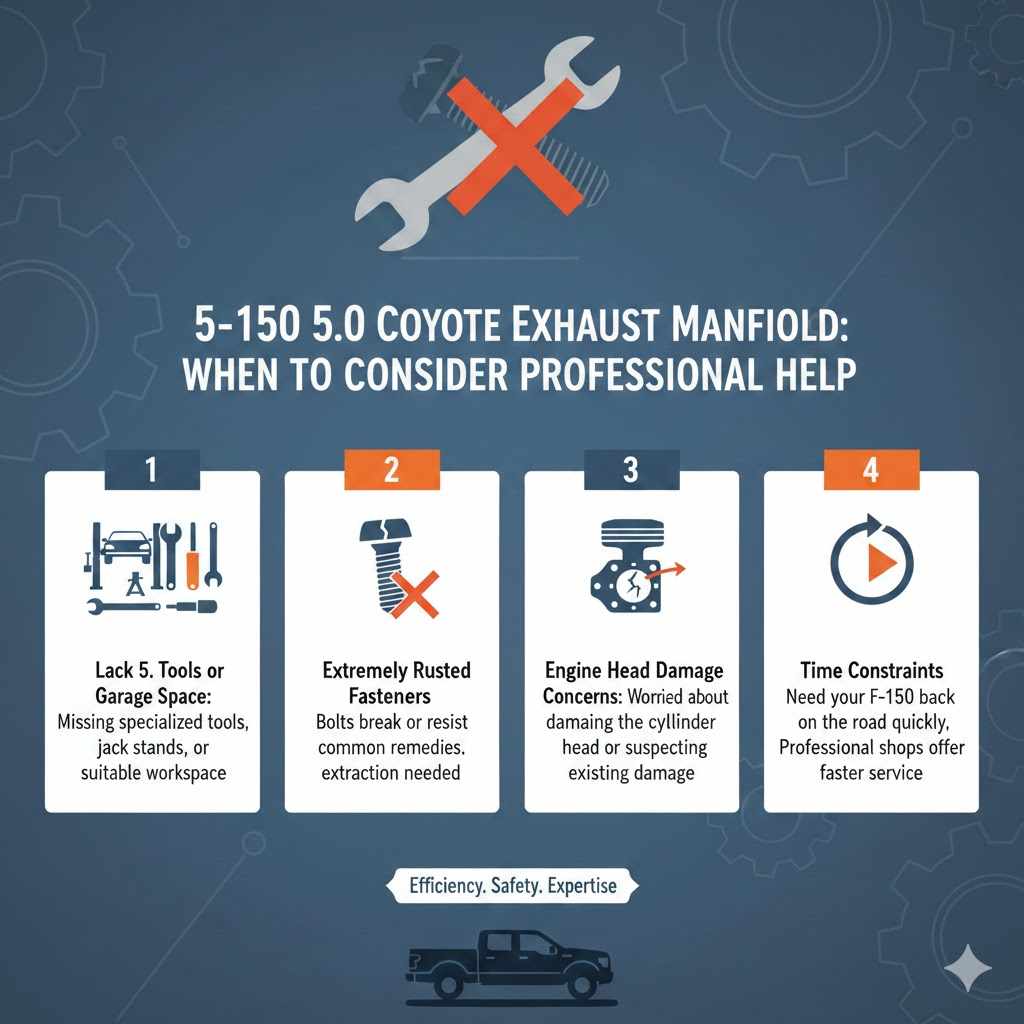
When to Consider Professional Help
While this guide empowers you to tackle the F-150 5.0 Coyote exhaust manifold removal yourself, there are times when seeking professional assistance is the wisest choice. If you lack the necessary tools, experience, or feel uncomfortable with any part of the process, a mechanic can handle it efficiently and safely.
- Lack of Tools or Garage Space: If you don’t have a suitable garage, jack stands, a torque wrench, or specialized extraction tools, the job can become significantly harder and more dangerous. Professionals have these resources readily available.
- Extremely Rusted Fasteners: If bolts are so rusted they break immediately upon trying to loosen them, or if you’ve already tried common remedies without success, a mechanic may have more advanced techniques or equipment to handle them without damaging your engine.
- Engine Head Damage Concerns: If you’re worried about potentially damaging the cylinder head during bolt extraction or if you suspect existing damage to the head itself, it’s best to leave it to experienced hands. They can assess and repair any damage accurately.
- Time Constraints: Sometimes, you might need your F-150 back on the road quickly. A professional shop can often complete the job faster than a DIYer, especially if unexpected issues arise.
Frequently Asked Questions
Question: How long does it typically take to remove exhaust manifolds on a 5.0 Coyote F-150?
Answer: The time can vary greatly depending on your experience and the condition of the bolts. For a DIYer, it might take anywhere from 2-4 hours per side, especially if bolts are seized. Professionals can often do it faster, possibly 1-2 hours per side.
Question: What are the common symptoms of a failing exhaust manifold?
Answer: Common signs include a ticking or puffing sound from the engine, especially when cold, reduced engine performance, a noticeable exhaust smell inside the cabin, and decreased fuel efficiency.
Question: Can I reuse my old exhaust manifold gaskets?
Answer: No, it is strongly recommended to always use new exhaust manifold gaskets. Old gaskets are compressed and can be brittle, making them unlikely to provide a proper seal, which can lead to exhaust leaks.
Question: What is the main difficulty when removing 5.0 Coyote exhaust manifolds?
Answer: The biggest challenge is usually dealing with heavily rusted or seized bolts and studs that can be difficult to remove without stripping or breaking them. Access in tight engine bay areas can also be challenging.
Question: Should I replace both exhaust manifolds at the same time?
Answer: It’s generally a good idea to replace both manifolds at the same time, even if only one side is showing symptoms. This ensures uniform performance and prevents issues from a new manifold on one side and an old, potentially failing one on the other.
Wrap Up
Successfully removing F-150 5.0 Coyote exhaust manifolds involves careful preparation, the right tools, and a patient approach to seized bolts. By following these steps, you can tackle this job yourself. Ensure all fasteners are properly secured and the new gasket is correctly seated for a leak-free result.
You’ve got this.