Proven Answers: Essential V6 Manifolds
A V6 engine typically has two exhaust manifolds, one for each cylinder bank. Understanding these parts is key to better performance and easier repair. We simplify manifold types, installation tips, and common issues so you can confidently maintain your V6 engine’s exhaust flow.
Do you hear a new ticking noise when your car warms up? Maybe you noticed a dip in power or a puff of smoke where there shouldn’t be one? These sounds often point straight to the engine’s exhaust manifolds. For V6 engine owners, figuring out the manifold situation can feel confusing. They hide under a lot of other parts!
Don’t worry; we are going to break down exactly what these vital parts do. We will use simple words to explain the types, why they fail, and how they affect your drive. By the end of this guide, you’ll understand your V6 exhaust system like a pro. Let’s start by finding out how many manifolds your engine actually has!
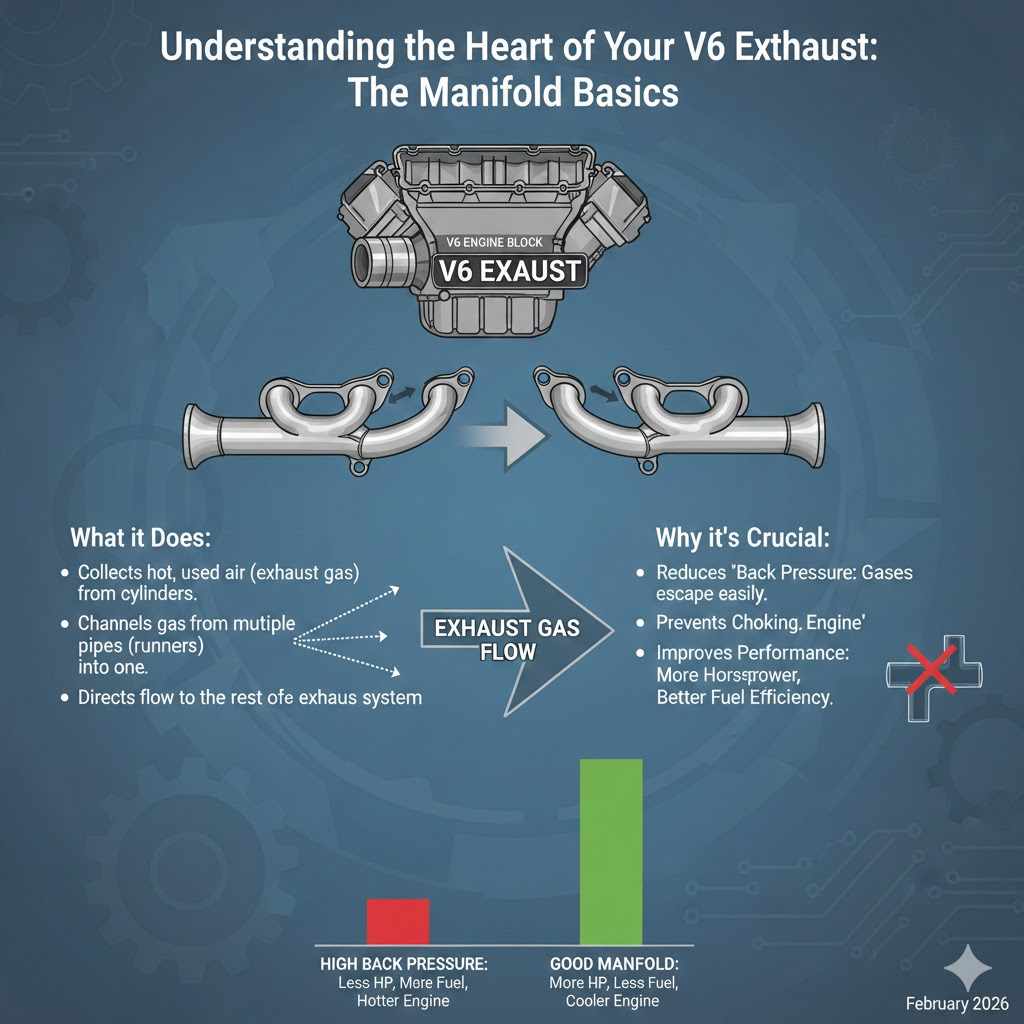
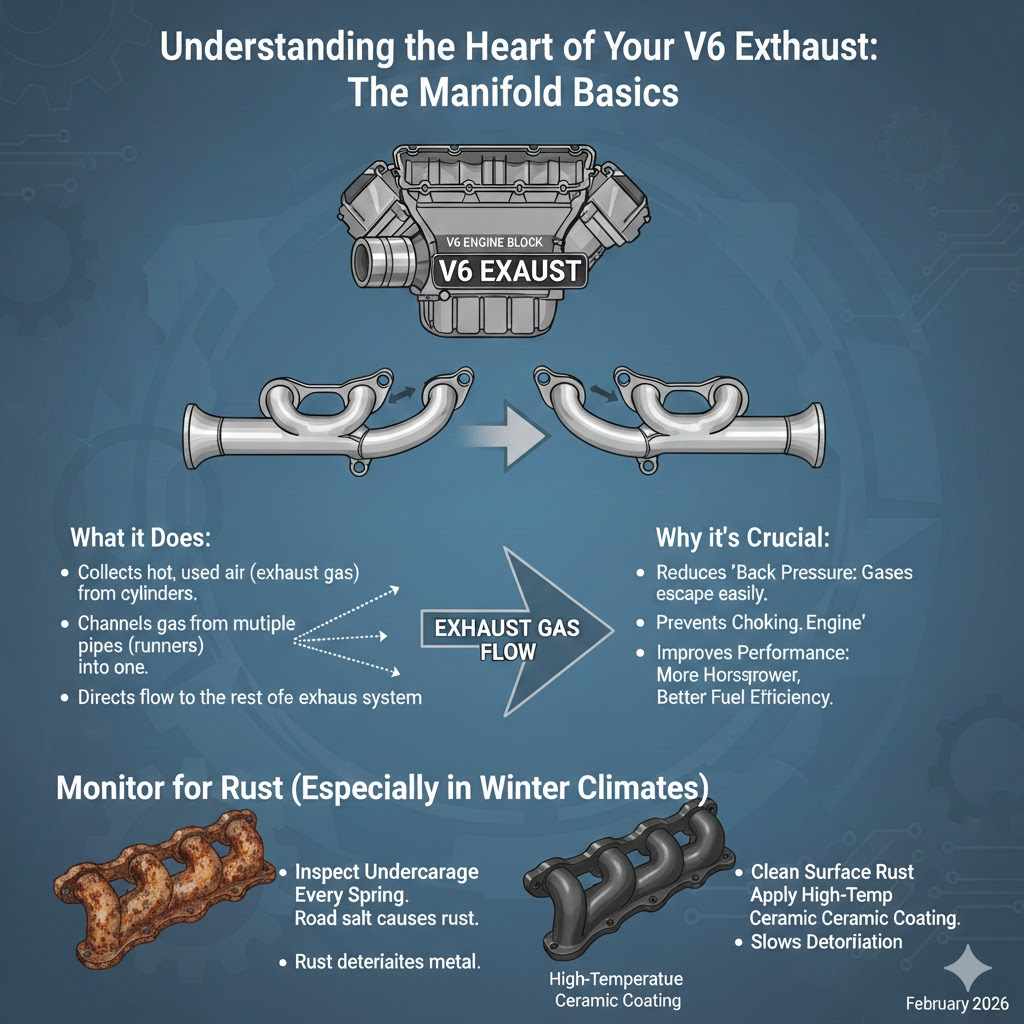
Understanding the Heart of Your V6 Exhaust: The Manifold Basics
The exhaust manifold is one of the first major components your engine’s used air (exhaust gas) meets after leaving the cylinders. Think of it as a collector. It takes the hot, dirty air from several separate pipes (runners) and smoothly channels them into one bigger pipe that leads to the rest of your exhaust system, eventually exiting the tailpipe.
Why is this important? If the exhaust gases can’t escape quickly and smoothly, they fight to get out. This “back pressure” chokes your engine, making it run hotter, use more fuel, and lose horsepower. A good manifold ensures smooth breathing.
How Many Exhaust Manifolds Are There in a V6 Engine?
This is the most common question new V6 owners ask! The answer is usually straightforward, but it depends on how your V6 is built:
- The Standard Answer (Most Common): Two Manifolds. Since a V6 engine has two separate banks of three cylinders each, it needs a dedicated collection point for each bank. Therefore, most V6 engines have two separate exhaust manifolds—one for the left bank and one for the right bank.
- The Exception: Single Manifold (Rare). Some very old or very specific engine designs might use a single, large manifold that attempts to collect gas from all six cylinders, but this severely restricts flow and is rare in modern performance V6s.
- Integrated Headers: On high-performance aftermarket setups, these are often called “headers,” and they function as specialized, high-flow manifolds. They also always come in a pair for a V6.
For the average driver working on a daily commuter, you have two manifolds to inspect.
Why Manifolds Go Bad (And Why You Should Care)
Exhaust manifolds live in a truly harsh environment. They face intense heat cycles—super-hot exhaust gas one minute, and cold outside air hitting them the next, especially after washing your car or driving through rain.
This constant heating and cooling causes metal to expand and contract repeatedly. Over time, this stress leads to failure. The most common failure is cracking or warping the flange where the manifold bolts to the cylinder head.
Common Signs of a Failing V6 Manifold
Pay attention to these warning signs. Catching a leak early is much cheaper than dealing with overheating later!
- Ticking or Tapping Sound: This is the classic sign. The sound is often loudest when the engine is cold and sometimes quiets down slightly once the metal heats up and expands, momentarily sealing the small crack.
- Smell of Exhaust Fumes in the Cabin: If you smell gas inside the car, especially when idling or accelerating, the leak is significant and close to the firewall. This is a serious safety concern due to carbon monoxide.
- Check Engine Light (CEL): A leak near the oxygen (O2) sensors can throw off the readings, leading the engine computer to think the air-fuel mixture is wrong. This often triggers codes related to the upstream O2 sensor readings.
- Reduced Performance: A bad leak ruins exhaust scavenging (the process of pulling gas out), leading to less horsepower and poorer fuel economy.
The Three Main Types of V6 Exhaust Manifolds
When you go shopping for replacement parts, you’ll see different materials and designs. Understanding these helps you choose the right part for your budget and performance goals. The type of manifold affects noise, longevity, and how easily heat escapes.
1. Cast Iron Manifolds (Stock Replacement)
This is what usually came on your car from the factory. They are made from thick, heavy cast iron.
- Pros: Very durable against physical impact, quiet operation because the material absorbs sound well, and generally the cheapest direct replacement option.
- Cons: Heavy, less efficient at flowing exhaust gas than newer designs, and prone to cracking over many years due to weight and heat cycles.
2. Tubular Steel Headers (Performance Upgrade)
These are not technically “manifolds” but “headers.” They use individual, smooth-bent tubes welded together into a collector. They replace the restrictive factory manifold.
- Pros: Significantly improved exhaust flow, resulting in noticeable horsepower and torque gains, and they are usually lighter.
- Cons: More expensive, require more space (sometimes causing clearance issues), and are often louder than stock. They also require more careful installation, especially when dealing with gaskets.
3. Stainless Steel vs. Mild Steel
When looking at headers, you’ll often see material choices:
- Mild Steel: Cheaper headers are often made of mild steel. They need special coatings (like ceramic coating) or they will rust very quickly, especially in snowy or coastal environments.
- Stainless Steel: More expensive, but highly resistant to rust and corrosion. For most drivers, especially those in areas with road salt, stainless steel is a wise long-term investment.
For a reliable daily driver, a high-quality, thick cast iron replacement is often the safest bet. If you want more pep in your step, headers are the way to go, but they require more research to ensure they fit perfectly with your existing exhaust system.
Comparison Table: Manifold Materials
Choosing the right material is crucial for long-term reliability. Here is a quick comparison to help you decide between factory style and performance options:
| Feature | Cast Iron (OEM Style) | Mild Steel Headers | Stainless Steel Headers |
|---|---|---|---|
| Noise Level | Quietest | Moderate to Loud | Moderate to Loud |
| Durability (Rust) | Good (Naturally thick) | Poor (Needs coating) | Excellent |
| Flow Efficiency | Lowest | High | Highest |
| Cost | Low to Medium | Low | High |
Step-by-Step Guide: Replacing a V6 Exhaust Manifold (The Beginner’s Path)
Replacing a manifold can seem intimidating because they are bolted deep into the engine bay, often touching other sensitive components. Safety first! Always work on a cool engine, and use proper lifting equipment.
Tools and Supplies You Will Need
Having the right gear makes this job infinitely easier. Don’t try to force old, rusted bolts!
- New manifold (and associated gaskets)
- Jack and quality jack stands (never rely only on a jack)
- Safety glasses and gloves
- Socket set (metric or standard, depending on your vehicle)
- Breaker bar (for leverage on tight bolts)
- Penetrating oil (like PB Blaster or Kroil)
- Torque wrench (essential for correct tightening)
- Wire brush or scraper
Step 1: Preparation and Safety Checks
You must ensure everything is cool and the car is secure before you start.
- Park the vehicle on a flat, level surface and engage the parking brake.
- Allow the engine to cool completely—this might take several hours if you were just driving. Hot metal expands and can cause severe burns or snap off bolts more easily.
- Disconnect the negative battery cable. This prevents accidental shorts when working near electrical sensors (like the O2 sensors).
- Locate the manifold you are replacing (often the passenger side is easier to access than the driver’s side on front-wheel-drive V6s).
Step 2: Dealing with Sensors and Obstructions
Most modern V6 manifolds have oxygen sensors screwed into them. These must come out before the manifold can be removed.
- Carefully unplug the wiring harness connectors for the O2 sensors. Take a picture of how they route to make reassembly easier.
- Use a specialized O2 sensor socket (which has a slot cut out for the wire) to gently unscrew the sensors. If they are stuck, apply penetrating oil and let it soak for 15 minutes.
- If the manifold is attached to a catalytic converter (it often is), you will need to unbolt the connection where the manifold meets the downpipe or catalytic converter pipe.
Step 3: The Dreaded Bolt Removal
This is often the hardest part. Exhaust manifold bolts are exposed to heat and corrosion for years, making them seize solid.
- Spray every single bolt head and stud liberally with penetrating oil. Allow it to sit.
- Try loosening the bolts using a breaker bar. Turn them slowly, rocking them back and forth (tightening slightly before loosening more) to help break the rust bond.
- If a bolt snaps: This is common. If it snaps flush with the head, you’ll need to drill it out carefully, which moves this job into advanced territory. For beginners, try to loosen all others first. If you encounter a stubborn bolt, consider having a shop remove that one piece rather than risking engine damage.
Step 4: Removing the Old Manifold
Once all bolts are out, the old manifold should lift away. Be careful, as it might be heavy or awkwardly shaped.
- Gently pull the old manifold away from the cylinder head.
- Scrape off the old gasket material using a plastic scraper or a razor blade held at a very shallow angle. You want a perfectly clean, flat surface on the cylinder head for the new gasket to seal against. A dirty surface guarantees a leak!
- Inspect the cylinder head mating surface closely for any deep gouges or cracks. These require professional repair.
Step 5: Installing the New Manifold and Gaskets
Gaskets are critical. Always use a high-quality, multi-layer steel (MLS) gasket designed specifically for your engine when replacing a stock manifold.
- Position the new gasket onto the clean cylinder head surface.
- Carefully place the new manifold over the gasket.
- Start installing the new bolts by hand. You must thread them in gently to ensure they are not cross-threaded.
- Torquing Sequence: This is vital for an even seal. Use your torque wrench and follow the manufacturer’s specific torque sequence (usually starting in the center and working your way out in a crisscross pattern). The final torque specification must be precise; too loose leaks, too tight strips threads. (For general reference, many passenger car manifolds torque around 18–25 ft-lbs, but always verify this number for your specific engine model using a resource like a service manual or a site like Repair Procedures.)
Step 6: Reconnecting Everything
Reverse the removal process carefully.
- If your O2 sensors are old (over 75,000 miles), it is highly recommended to replace them now while they are easy to access. Old sensors cause poor fuel economy.
- Plug in the O2 sensor connectors securely.
- Bolt the manifold outlet pipe/downpipe back to the manifold flange, using new anti-seize compound on the threads to prevent future sticking.
- Reconnect the battery.
Step 7: Testing for Leaks
Start the engine. Listen carefully. Run the engine for 5–10 minutes, then shut it off and listen for any hissing or ticking. Repeat this process a few times to let the metal heat cycle fully. Re-check the torque on the bolts after the first heat cycle if you are using aftermarket headers, as some materials can settle.
Manifolds and Performance: Headers vs. Factory
If you are replacing a cracked factory manifold, you have an opportunity to improve performance by upgrading to headers. For V6 engines, this upgrade can sometimes be more noticeable than on a V8 because of the tighter packaging.
The Science of Exhaust Scavenging
Headers work by optimizing “scavenging.” Imagine trying to clear a crowded room. If everyone rushes out one small door at once, there’s a traffic jam. If they use multiple, perfectly sized paths that open sequentially, the flow is smooth.
Headers use tuned tube lengths. When the exhaust pulse from cylinder #1 leaves, the precisely timed length of the tube allows that pulse to create a slight vacuum effect just as cylinder #2 is ready to expel its gas. This vacuum effectively “sucks” the exhaust out of the next cylinder, improving the volumetric efficiency of the engine.
Choosing the Right Header Design for Your V6
Headers come in two main runner designs:
- Shorty Headers: These are designed to be almost the same length as the factory manifold. They offer moderate flow improvement but usually fit easily into tight engine bays without needing to change the rest of the exhaust pipework. Good for mild power bumps.
- Long Tube Headers: These have much longer, fully tuned runners that feed into a collector. They offer the maximum performance gains but often require modifying or replacing the rest of your exhaust system (the Y-pipe or mid-pipe) to connect properly, as they take up more space. This requires professional welding or purchasing a full header-back system.
| Design | Primary Benefit | Installation Difficulty | Best For |
|---|---|---|---|
| Factory Cast Iron | Reliability & Quiet | Easy (Direct Bolt-on) | Daily Driving, Low Cost Repair |
| Shorty Headers | Good Flow Increase | Moderate (May need O2 sensor extenders) | Mild Street Performance |
| Long Tube Headers | Maximum Power Gain | High (Often requires exhaust modification) | Track Use, Serious Power Upgrades |
Troubleshooting Common V6 Manifold Issues After Replacement
Even when replacing a part correctly, new problems can arise. Here are a few common pitfalls specific to V6 manifold replacement:
Issue 1: Still Ticking After Installation
If the ticking sound is gone, but a lighter ticking remains, it is almost certainly a leak at the gasket surface. This usually means one of two things:
- The cylinder head surface was not perfectly clean, leaving debris under the new gasket.
- The bolts were not torqued evenly or to the correct specification.
Fix: Let the engine cool, re-apply penetrating oil, and re-torque the bolts following the crisscross pattern precisely. If it still leaks, the gasket may be pinched or damaged, and replacement is necessary.
Issue 2: O2 Sensor Codes Returning
You replaced the manifold, but the Check Engine Light is back, pointing at the O2 sensors.
Why? The leak was so bad it was letting fresh, unmetered air into the exhaust stream before the sensor, making the sensor report a lean condition (too much air). Even with the leak fixed, the car’s computer (ECU) might need time to “relearn” the new flow characteristics, or the sensor itself might be worn out.
Fix: Clear the codes using an OBD-II scanner. Drive the car through several warm-up cycles. If the codes persist, invest in new, high-quality (preferably OEM brand) O2 sensors, as they are essential for proper emissions and fuel economy. Learn more about how modern emissions systems work from the U.S. Environmental Protection Agency on Vehicle Pollution Control.
Issue 3: Manifold Hitting Other Components
This usually only happens with aftermarket headers due to their larger diameter tubes.
Fix: If the tube is vibrating against the transmission housing or frame rail, you may need to slightly reposition the connecting pipes or use specialized, high-temperature vibration dampening clamps where contact occurs. Never let tubes touch for long periods, as it will eventually cause a hole.
V6 Manifold Maintenance and Longevity Tips
Preventative care is always cheaper than emergency repairs. A little attention now can save you hundreds later.
Keep the Heat Controlled
Excessive, sudden temperature changes are the enemy of metal. While you can’t control the weather, you can control how you cool your engine down.
- When you pull into the garage after a hard drive, let the car idle for a minute or two before shutting it off. This allows the engine to coast gently rather than immediately stopping super-hot exhaust flow.
- Avoid driving through deep puddles or washing the engine bay immediately after a long, hard run.
Use Quality Gaskets and Hardware
When replacing parts, never try to reuse the old manifold gasket. They are crushed during installation and cannot seal again. If you use cheap, thin gaskets, they will leak within a year.
Always use new bolts or studs designed for high heat, and apply a quality anti-seize compound to the threads before installation. This ensures that if you ever have to remove the manifold again, you won’t be fighting broken bolts.
Monitor for Rust (Especially in Winter Climates)
If you live where road salt is used, inspect the underside of your car every spring. Rust doesn’t just attack the body; it attacks the exhaust system, too. If you see surface rust forming on a cast iron manifold, consider cleaning it and applying a specialized high-temperature ceramic coating spray to slow down future deterioration.
Frequently Asked Questions (FAQ) About V6 Exhaust Manifolds
Q1: Can I run my V6 engine without an exhaust manifold?
A: No. Running an engine without a manifold is extremely dangerous and illegal for road use. The exhaust will shoot directly out of the cylinder head ports, making the car incredibly loud and potentially damaging the engine due to severe back pressure issues and overheating.
Q2: Why is my manifold ticking only when the engine is cold?
A: This is the classic sign of a small exhaust leak, usually a crack in the manifold or a failed gasket. When the metal is cold, the gap is open, allowing exhaust pulses to escape loudly. As the engine heats up, the metal expands and seals the crack slightly, quieting the noise.
Q3: Do I need to replace both manifolds on a V6 at the same time?
A: Not necessarily. If only one side is cracked, you only need to replace that one. However, since they have both endured the same amount of heat cycles, if one has failed, the other is likely to fail soon. Replacing both at once saves labor costs down the road.
Q4: Are aftermarket headers street legal?
A: It depends on your location and the design. In many states, any part that removes or relocates the primary catalytic converter is illegal for on-road use. Shorty headers that retain the factory catalyst location are often legal, but you must always check local vehicle inspection rules before buying.
Q5: How much does it typically cost to replace a V6 exhaust manifold?
A: DIY replacement involving only bolts and gaskets might cost between $100 and $250 for parts. Professional replacement ranges widely, usually from $400 to $800 per side, depending on how rusted the bolts are and if O2 sensors need replacement.
Q6: What is the difference between a manifold and a header?
A: A manifold is typically a thick, cast-iron part designed for noise reduction and cost efficiency. A header is a performance-focused component made of tubular steel, designed specifically to maximize the speed and efficiency of the exhaust gas flow out of the cylinder.
Conclusion: Keeping Your V6 Breathing Smoothly
The exhaust manifolds on your V6 engine are unsung heroes. They manage the toxic, high-energy waste gas created by combustion, turning it into usable, quiet exhaust flow. By understanding that a V6 almost always means two separate manifolds, you start your repair or upgrade journey on the right foot.
Whether you are dealing with a simple ticking noise from a cracked cast iron piece or looking to install performance headers for a power boost, remember that meticulous preparation and careful torquing are your best friends. Take your time, use good penetrating oil on those stubborn bolts, and always prioritize safety when working under the car.
With this knowledge, you are now equipped to diagnose manifold issues confidently. Proper manifold maintenance ensures your V6 runs efficiently, saves fuel, and avoids dangerous fumes inside your cabin. Keep those exhaust paths clear, and enjoy a smoother, healthier engine performance!