How To Straighten Model A Ford Exhaust Manifolds
Fixing up an old Model A Ford can be a lot of fun. Sometimes, parts get a bit bent out of shape over time. The exhaust manifold is one of those parts that might need some attention.
Many folks new to these classic cars wonder about How to Straighten Model A Ford Exhaust Manifolds. It might seem tricky, but it’s really not that hard once you know the simple steps. We’ll walk you through it so you can get your Model A running just right.
Why Model A Ford Exhaust Manifolds Warp
Exhaust manifolds on a Model A Ford, like many older vehicles, can warp over time. This warping happens for a few main reasons. Heat is a big factor.
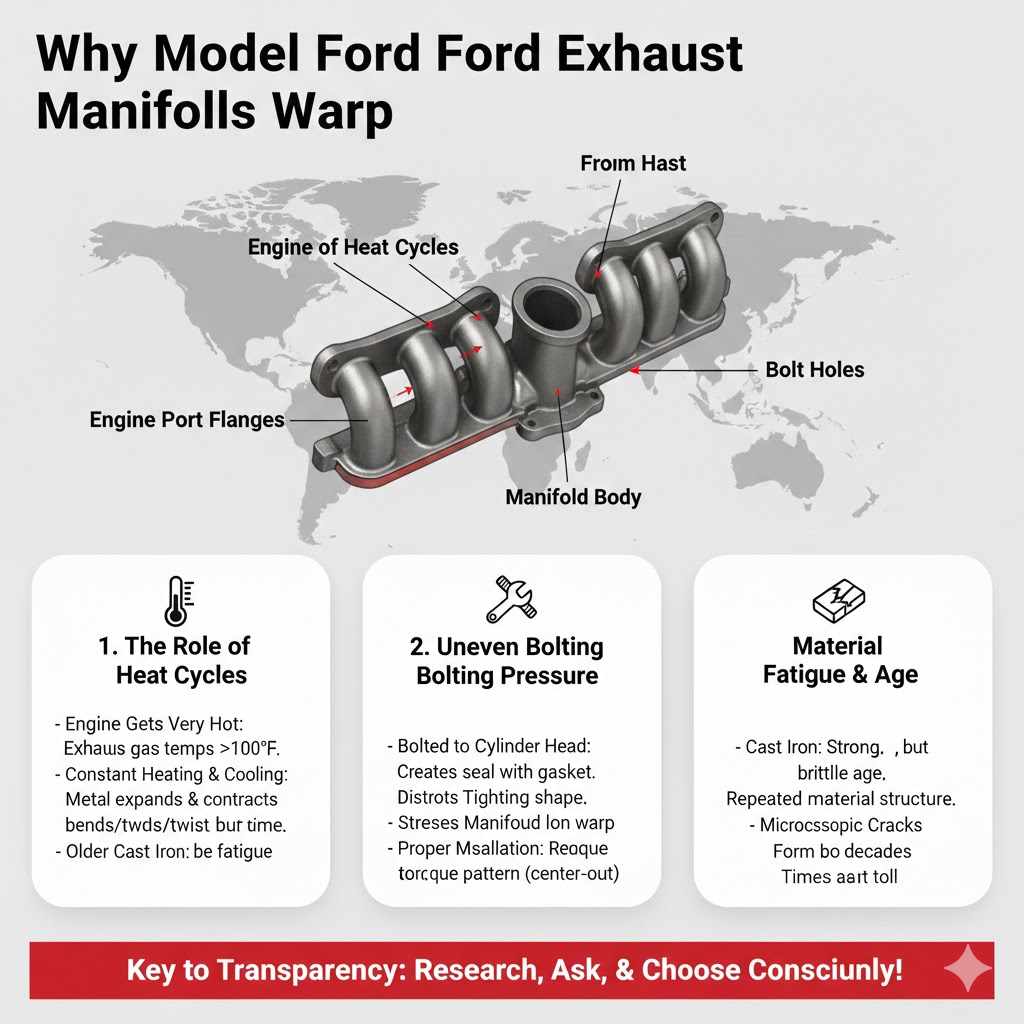
The engine gets very hot, and then it cools down. This constant heating and cooling cycle makes the metal expand and contract. Over many years, this repeated action can cause the manifold to bend or twist.
Another reason is uneven tightening of the bolts that hold it to the engine. If some bolts are tighter than others, it can put stress on the manifold.
When a manifold warps, it can cause problems. You might hear exhaust leaks, which sound like a ticking or puffing noise from the engine. It can also make it harder for the engine to run smoothly.
Sometimes, the gasket between the manifold and the engine block can get damaged by a warped manifold. This leads to leaks and can affect how well the engine performs. For Model A owners, fixing a warped manifold is often necessary to keep their car running safely and efficiently.
The Role of Heat Cycles
Heat is the primary culprit behind most metal warping. Think about a metal ruler. If you heat one end much hotter than the other, it will bend.
The same thing happens inside your Model A’s engine. The exhaust manifold sits right on top of the engine and deals with the hot gases coming out of the cylinders. These gases can be very hot, sometimes over 1000 degrees Fahrenheit.
As the engine runs, the manifold gets hot. When the engine is turned off, the manifold cools down. This cycle of getting hot and then cooling happens every time you drive your car.
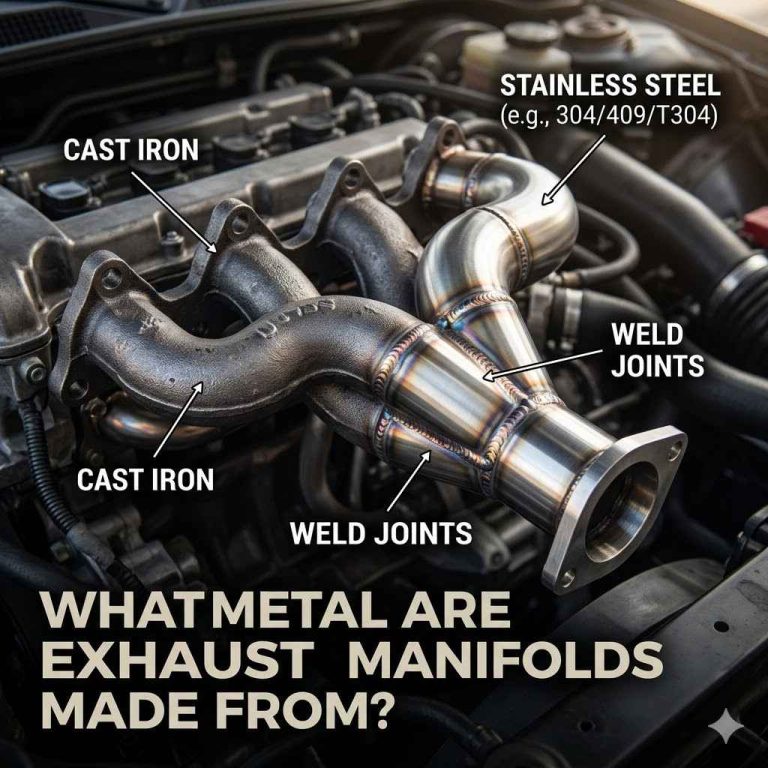
Metal expands when it’s hot and shrinks when it’s cold. If the manifold isn’t perfectly designed to handle this expansion and contraction evenly, it can start to bend or warp. This is especially true for older, cast-iron manifolds.
Over thousands of heat cycles, even a small amount of uneven expansion can lead to a noticeable warp. Imagine a tiny bit of bending happening each time, year after year. Eventually, that tiny bit adds up.
This is why older engines often have warped exhaust manifolds. It’s just a natural consequence of how engines work and the materials used.
Uneven Bolting Pressure
Another major cause of warping is how the exhaust manifold is attached to the engine. The manifold is bolted to the cylinder head of the engine. These bolts are meant to hold the manifold tight against the engine block, creating a seal with a gasket.
However, if these bolts are not tightened evenly, they can put uneven pressure on the manifold.
When you tighten bolts, you’re essentially pulling the manifold down. If you tighten one bolt much more than the others, it pulls that side of the manifold down harder. This uneven pull can distort the shape of the manifold.
It’s like trying to screw a lid onto a jar. If you only tighten one side of the lid, it can go on crooked.
This is especially problematic when a manifold is installed. Mechanics need to tighten the bolts in a specific pattern, often working from the center outwards, and tightening each bolt a little at a time. This ensures even pressure.
If this isn’t done correctly, the manifold can be stressed from the start, making it more likely to warp later, even with normal heat cycles.
Material Fatigue and Age
Cast iron, the material most commonly used for Model A exhaust manifolds, is strong but can become brittle with age and repeated stress. Over many years of service, the metal itself can experience fatigue. This means the material’s internal structure weakens due to constant stress and temperature changes.
Think of bending a paperclip back and forth. Eventually, it will break. While an exhaust manifold won’t typically snap, the repeated expansion and contraction, along with uneven bolting, can cause microscopic cracks to form or existing ones to grow.
This material fatigue makes the manifold more susceptible to warping and can lead to cracks.
The sheer age of Model A Fords means that many original or very old replacement manifolds have been subjected to decades of these stresses. Even if a manifold was perfectly straight when new, time and use can take their toll. This makes the process of straightening them even more important for these classic cars.
Tools and Preparation for Straightening
Before you start trying to straighten your Model A Ford exhaust manifold, it’s important to have the right tools and prepare properly. This will make the job easier and safer. You don’t need a whole professional shop, but a few key items will be very helpful.
Having everything ready means you can work efficiently and avoid frustration.
The process involves heating and applying pressure. You’ll need a way to heat the metal and a way to hold it in place while it cools. Safety is also a big concern when working with hot metal and potentially heavy parts.
Make sure you understand each step before you begin. Having the right setup prevents damage to the manifold or yourself.
Essential Tools You Will Need
To tackle this job, gather these essential tools. You’ll need a propane torch or a MAPP gas torch for heating. A MAPP gas torch burns hotter and faster, which can be beneficial.
You’ll also need a sturdy workbench or a solid, flat surface to work on. A good vise or clamps are crucial for holding the manifold steady.
To apply pressure, you might use a large C-clamp, a hydraulic jack, or even a specialized press if you have access to one. A hammer, preferably a dead blow hammer or a wooden mallet, is useful for persuading the metal. You’ll also need safety glasses, heat-resistant gloves, and long-sleeved clothing to protect yourself from heat and sparks.
A wire brush is good for cleaning off old gasket material and rust.
Don’t forget a measuring tool like a steel ruler or a straight edge. You’ll need this to check how straight the manifold is before, during, and after the process. A small amount of water in a spray bottle can be helpful for rapid cooling in specific spots, but use this with caution as it can cause thermal shock.
Preparing the Exhaust Manifold
The first step is to remove the exhaust manifold from your Model A Ford. This usually involves unbolting it from the engine block and disconnecting the exhaust pipe. Once it’s off the car, clean it thoroughly.
Use a wire brush to remove all rust, carbon buildup, and old gasket material.
A clean surface allows you to see the warp clearly and helps the heat transfer evenly. Inspect the manifold for any existing cracks. If there are significant cracks, straightening might not be possible or advisable, and you might need to consider replacing the manifold.
Small hairline cracks might seal up when the metal expands, but large ones are a problem.
Lay the manifold on a flat surface to get an initial reading of how warped it is. You can use a straight edge across the mating surface that bolts to the engine. Any gaps indicate a warp.
Note which areas are high and which are low. This will help you decide where to apply heat and pressure.
Setting Up Your Workspace
Choose a well-ventilated area for this work, preferably outdoors or in a garage with open doors. Heating metal releases fumes. Make sure your workspace is free of flammable materials.
The manifold will get very hot, and you don’t want any accidents.
Secure your manifold firmly. If you’re using a vise, make sure it’s strong enough to hold the manifold without slipping. If you’re working on a workbench, you might need to bolt down some sturdy blocks or brackets to help hold it.
You need the manifold to be absolutely still when you apply pressure.
Have your heating torch, clamps, hammer, and straight edge all within easy reach. The process requires quick action once the metal is hot. You don’t want to be searching for tools when the manifold is at the right temperature.
A clear, organized workspace is key to a successful repair.
The Process of Straightening Manifolds
Straightening a warped exhaust manifold is a bit like bending a metal ruler back into shape, but with careful control. The key is to heat the metal where it’s high, making it pliable, and then use pressure to bend it back to a flatter position. Once it’s in the desired position, allowing it to cool slowly helps it hold its new shape.
This is not a brute-force job. It requires patience and a good feel for the metal. Overheating can damage the cast iron, and applying too much pressure too quickly can cause it to crack.
You’ll be working with heat, so safety is paramount. Wear your protective gear at all times.
Applying Heat to Warp Points
Once the manifold is cleaned, prepped, and secured, you’ll start applying heat. Focus your heat source, like a propane torch, on the areas that are high or sticking out the most. You want to heat these spots until they glow a dull red or cherry red color.
This indicates the metal is hot enough to be pliable.
Move the torch around the heated area to ensure even heating. Don’t just blast one spot for a long time, as this can create localized hot spots and risk cracking the cast iron. The goal is to make a larger section of the manifold flexible.
The exact temperature isn’t critical, but the color of the glowing metal is a good indicator.
While heating, have your straightening tools ready. You’ll likely need to apply pressure as soon as the metal reaches the right temperature. Some people also use a technique where they heat a convex (high) spot and then quickly spray a small amount of water on it.
This rapid cooling can sometimes help set the metal in a straighter position, but this must be done very carefully to avoid thermal shock and cracking.
Using Pressure to Correct the Warp
As soon as the high spots are glowing red, it’s time to apply pressure. If you’re using a jack, place it under the high part of the manifold and slowly increase the pressure. If you’re using clamps, position them to push the high spot down.
You might need to experiment with where you apply pressure to counteract the warp correctly.
You might need to go back and forth, heating and applying pressure. It’s rare to fix a warp in one go. Heat a bit, apply some pressure, let it cool slightly, check with your straight edge, and repeat.
The manifold will likely try to spring back as it cools, so you might need to overcorrect slightly.
Listen to the metal. Sometimes, you’ll hear creaking or groaning sounds as it bends. If you hear sharp cracking sounds, stop immediately.
You might have applied too much force or heated unevenly. Patience is key here. Work slowly and deliberately.
Cooling and Checking the Straightness
Once you believe you have the manifold reasonably straight, you need to let it cool down slowly. For cast iron, a slow, even cool is best to prevent new stresses from forming. You can let it air cool on your workbench.
Some people cover it loosely with a blanket or rags after it’s no longer glowing red, but ensure it’s not completely sealed to prevent trapping heat.
As it cools, avoid rapid temperature changes. Don’t douse it in cold water. Once it’s cool enough to touch, check its straightness again with your straight edge.
You’ll likely find it’s not perfect, and you may need to repeat the heating and straightening process several times to achieve the desired flatness.
The goal is to get it flat enough so that a gasket can seal properly against the engine block. A slight warp that can be compensated for by a good gasket is acceptable. Perfection might not be achievable or necessary.
Just aim for a surface that will seal well.
Alternative Solutions and Considerations
Sometimes, straightening an exhaust manifold might not be the best or only solution. Depending on the severity of the warp, the condition of the manifold, and your personal preference for originality versus practicality, other options exist. It’s always good to know all your choices before deciding on a course of action for your Model A Ford.
Replacing the manifold is often the most straightforward approach for severe warping or if the manifold is cracked. However, finding a perfectly straight, original Model A exhaust manifold can be challenging and expensive. Aftermarket options are available, but their quality can vary.
For some enthusiasts, preserving original parts is important, making straightening a preferred method.
When to Consider Replacement
If your exhaust manifold has significant cracks, especially near the mounting flanges or in the main body, it’s usually best to replace it. Trying to straighten a cracked manifold can make the cracks worse, leading to more exhaust leaks and potential failure. A broken piece of manifold is much harder to fix than a warp.
Also, if the manifold is so badly warped that even after several attempts at straightening, you still have significant gaps when using a straight edge, replacement is probably the way to go. A warped manifold that cannot be made flat enough will prevent a proper seal, leading to persistent exhaust leaks and poor engine performance. This can damage your engine over time.
The cost of replacement parts should be weighed against the time and effort involved in straightening. If you can find a good used original manifold or a quality reproduction at a reasonable price, it might save you a lot of hassle. Remember to inspect any replacement manifold thoroughly for cracks and warping before installing it.
Aftermarket Replacements
There are companies that produce aftermarket exhaust manifolds for Model A Fords. These can be a good option if you can’t find a suitable original part or if straightening proves too difficult. When choosing an aftermarket manifold, research the manufacturer and read reviews from other Model A owners.
Some aftermarket parts are made to higher specifications than original parts and may even be designed to resist warping better. Others might be of lower quality and could warp more easily than originals. Look for manifolds made from good quality cast iron.
Ensure that the bolt holes and exhaust port dimensions match your specific Model A model.
Installing an aftermarket manifold often requires the same care as installing an original one. Ensure proper tightening procedures are followed to prevent warping the new part. Sometimes, new aftermarket parts may still require minor adjustments for a perfect fit.
Professional Restoration Services
If you’re not comfortable performing the straightening process yourself, or if your manifold is particularly valuable or severely damaged, consider seeking professional help. Many automotive restoration shops specialize in repairing and rebuilding classic car parts, including exhaust manifolds.
These professionals have specialized equipment and extensive experience with these older components. They can often repair cracks that are too extensive for a DIY fix and can straighten manifolds with a high degree of accuracy. While this option can be more expensive, it might be the best choice for preserving a rare or important part.
A professional can assess the manifold’s condition and tell you whether straightening is feasible or if replacement is a better option. They can also perform other necessary repairs, like welding any cracks, ensuring the manifold is in top condition for your Model A.
Installing the Straightened Manifold
Once you have successfully straightened your Model A Ford exhaust manifold, the next crucial step is to install it correctly. Proper installation ensures that the hard work you put into straightening it pays off and that you achieve a good, leak-free seal. This step is just as important as the straightening process itself.
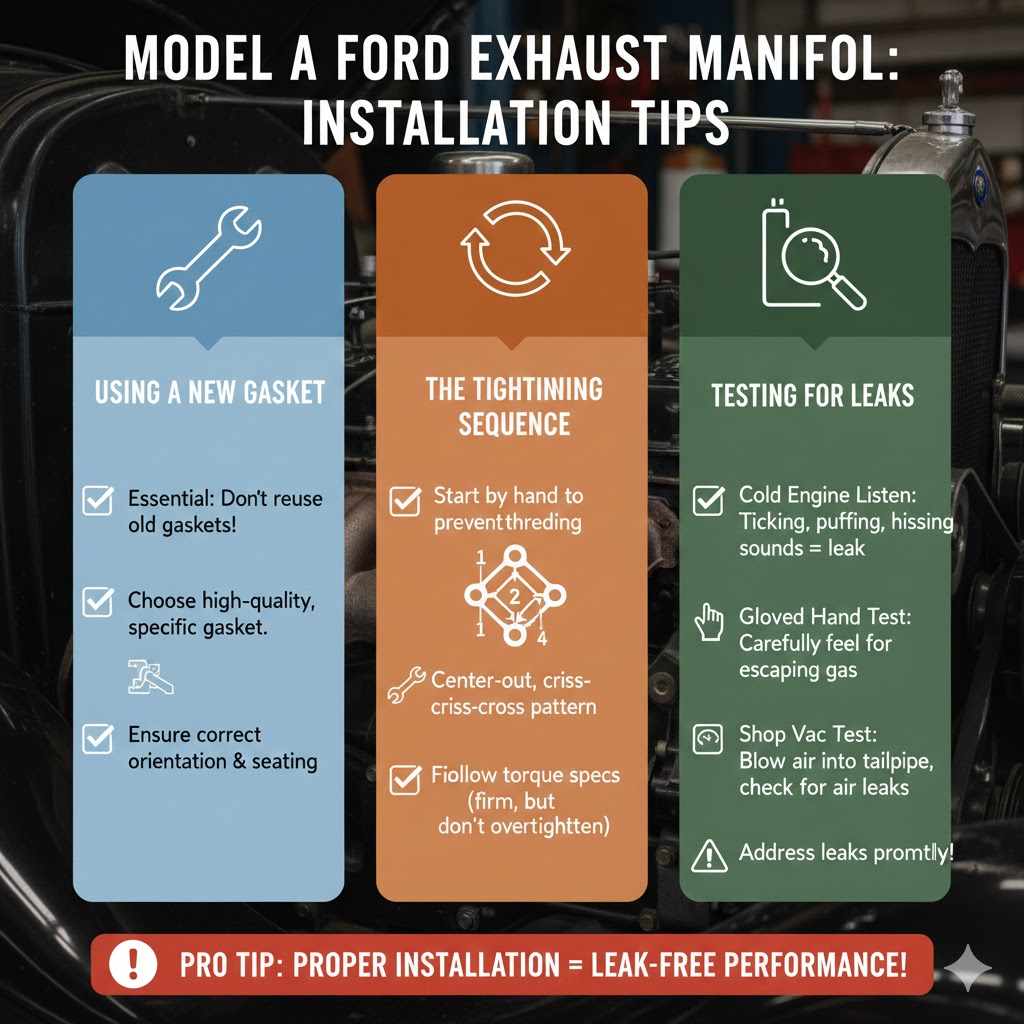
Using a new gasket and following the correct tightening procedure will help prevent future issues. A poorly installed manifold, even if it’s straight, can still lead to problems like exhaust leaks and damage to the gasket or the manifold itself.
Using a New Gasket
It is absolutely essential to use a new exhaust manifold gasket when reinstalling. The old gasket will have been compressed and possibly damaged during the removal and straightening process. Trying to reuse an old gasket will almost certainly result in an exhaust leak, no matter how straight your manifold is.
Choose a good quality gasket designed specifically for Model A Ford exhaust manifolds. The gasket’s job is to fill any tiny imperfections in the mating surfaces of the manifold and the engine block, creating a seal that keeps hot exhaust gases contained within the system.
When placing the gasket, ensure it lines up correctly with the bolt holes and ports. Some gaskets have a specific orientation, so pay attention to any markings or instructions. A properly seated gasket is key to a leak-free exhaust system.
The Tightening Sequence
The sequence in which you tighten the manifold bolts is critical for achieving an even seal and preventing new warping. Ford manuals, and general best practices for cast iron components, recommend tightening bolts gradually and in a specific pattern. This ensures that pressure is distributed evenly across the manifold.
Start by threading all the bolts in by hand to ensure they are not cross-threaded. Then, tighten each bolt a little bit at a time. A common pattern is to work from the center bolts outwards, tightening opposite bolts incrementally.
For a four-bolt manifold, you might tighten one, then the opposite one, then the next, and its opposite. For more bolts, follow a star pattern, always moving across from the bolt you just tightened.
You might snug them all up initially, then go around and tighten them further. The final tightening should be done to the manufacturer’s recommended torque specification if available. If not, tighten them firmly but avoid over-tightening, which can strip the threads or crack the manifold.
The goal is to compress the gasket evenly.
Testing for Leaks
After installation, it’s important to test for exhaust leaks. Start the engine and listen carefully. You should not hear any ticking, puffing, or hissing sounds coming from around the manifold.
These sounds indicate exhaust gases are escaping.
You can sometimes feel for leaks by carefully holding your hand (with a glove on!) near the manifold joints. Be extremely cautious, as the manifold will get hot quickly. Another method is to use a shop vacuum cleaner in reverse (blowing air) connected to the tailpipe with the engine off.
This will create a slight pressure, and you can then look or feel for escaping air around the manifold flanges.
If you detect a leak, the engine may need to be shut off and the bolts tightened slightly more in the correct sequence. Sometimes, if the leak persists, it might indicate that the manifold is still not straight enough, the gasket is faulty, or the engine block surface is damaged. In such cases, you may need to remove the manifold again and reassess the situation.
Frequently Asked Questions
Question: How much warp is too much for a Model A exhaust manifold?
Answer: If you can see a gap of more than about 1/16 of an inch when checking with a straight edge, it is likely too much warp for a gasket to seal properly without significant effort or risk of damage.
Question: Can I use heat without a torch to straighten it?
Answer: No, you generally need a torch to heat the cast iron to a pliable temperature. Other methods are unlikely to generate enough localized heat safely and effectively.
Question: Will straightening affect the strength of the manifold?
Answer: Yes, heating and bending cast iron can weaken it slightly and make it more brittle over time. However, for most Model A applications, a carefully straightened manifold can provide many years of service.
Question: How long does it take to straighten an exhaust manifold?
Answer: It can take anywhere from a couple of hours to a full day, depending on the severity of the warp, your experience, and how many attempts it takes to get it straight enough.
Question: Should I try to straighten if the manifold has visible cracks?
Answer: Generally, no. Straightening can worsen existing cracks and is not a reliable repair for cracked exhaust manifolds. Replacement is usually the better option.
Conclusion
Straightening a warped Model A Ford exhaust manifold is a manageable task with the right tools and patience. By carefully heating the high spots and applying controlled pressure, you can correct the warp. Always use a new gasket and follow a proper tightening sequence during installation.
This process will help ensure your Model A runs smoothly and efficiently.