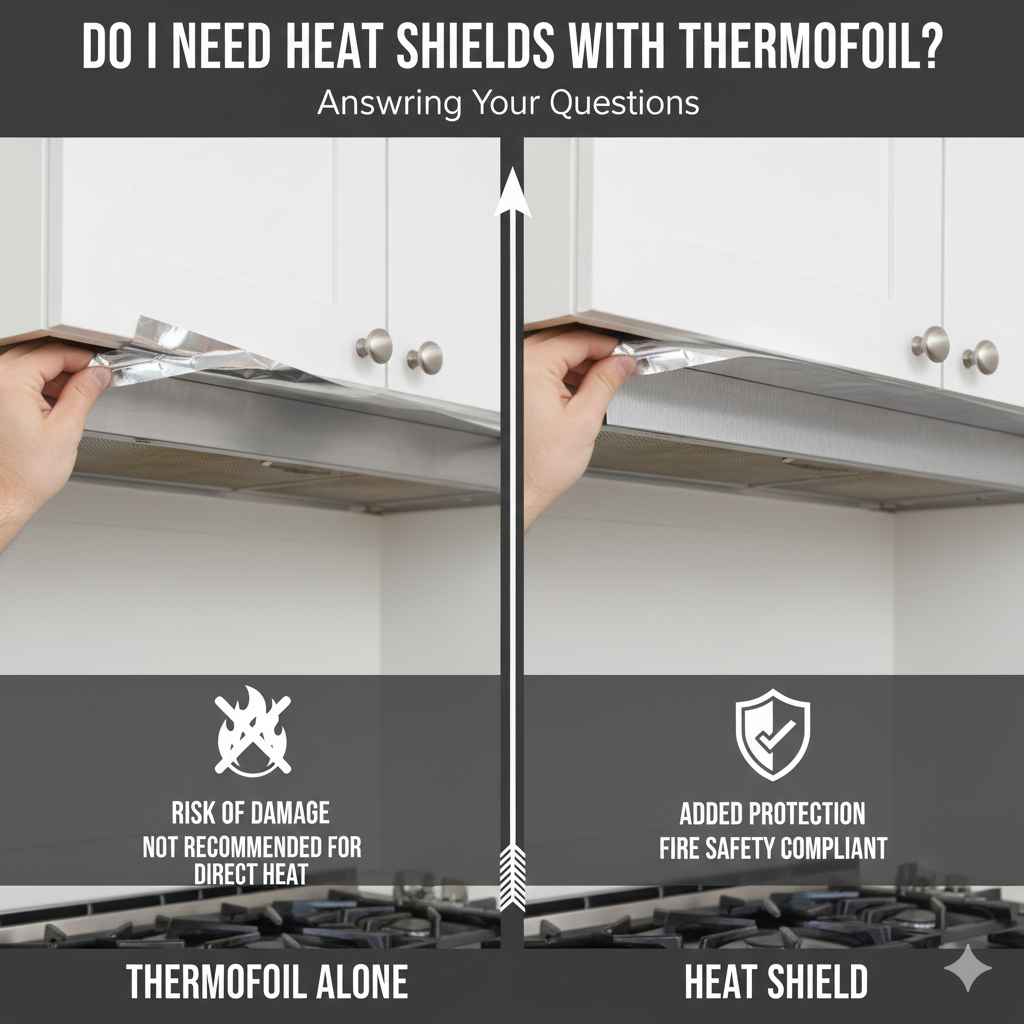
Do I Need Heat Shields With Thermofoil? Answering Your Questions
Figuring out whether you need something like a heat shield can be a bit tricky, especially when you’re starting with thermofoil. Many people wonder about this when they’re first working with it. Don’t worry! This post aims to clear up any confusion and simplify everything. We’ll go step-by-step to show you whether you need a heat shield. You’ll soon see that it is not complicated at all. Ready to discover the facts?
What is Thermofoil and Why It Matters
Thermofoil is like a special plastic skin that gets wrapped around things, often cabinets and doors. This process provides a nice, smooth finish that is easy to keep clean. It’s a popular choice because it gives items a clean, modern look. It’s also known for being a bit tough and resists scratches. However, it can be sensitive to heat. That’s why people often ask, Do I Need Heat Shields With Thermofoil? Understanding the materials involved and how they react to different temperatures is important. This helps ensure that the thermofoil stays in good shape and keeps its appealing appearance for a long time.
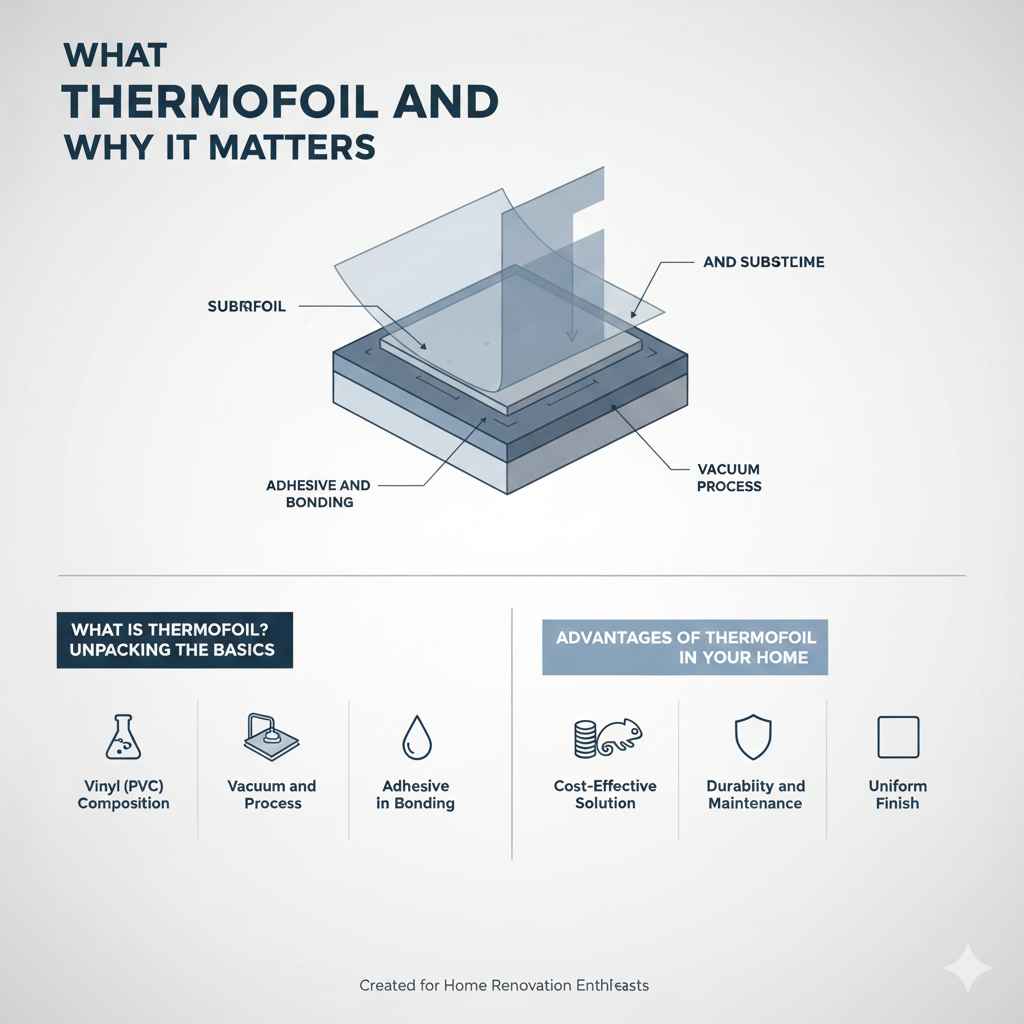
What is Thermofoil? Unpacking the Basics
Thermofoil is a thin sheet of flexible vinyl (PVC) that is heated and vacuum-formed over a substrate, typically medium-density fiberboard (MDF). MDF is a type of engineered wood product. The vinyl wraps around the MDF, creating a seamless, durable surface. This process is very effective. It gives a sleek, finished look without needing paint or other coatings. It’s a cost-effective way to get a high-end look without the high-end price. Thermofoil is often used for cabinet doors, drawer fronts, and other surfaces that require a consistent appearance. The manufacturing technique allows for various designs. These include different colors, textures, and even complex shapes.
- Vinyl (PVC) Composition: Thermofoil primarily consists of polyvinyl chloride (PVC). PVC is a strong, versatile plastic. PVC is known for its durability and resistance to water and chemicals. The vinyl is often treated with special additives. These additives enhance its flexibility, color stability, and UV resistance.
- Vacuum Forming Process: The application of thermofoil involves a vacuum-forming process. The MDF substrate is placed in a mold. The heated vinyl sheet is then placed over the MDF. A vacuum pulls the vinyl tightly onto the substrate, conforming it to the shape of the mold. The vacuum ensures there are no air bubbles or imperfections.
- Adhesive and Bonding: A special adhesive is applied to the MDF. This adhesive helps create a strong bond between the MDF and the vinyl. The adhesive is carefully chosen to withstand heat and moisture. It ensures the thermofoil stays firmly attached. The adhesive is a crucial part of the process.
Advantages of Thermofoil in Your Home
Thermofoil offers several benefits. It is a practical and attractive choice for various applications. From affordability to design flexibility, thermofoil presents a compelling option for homeowners. Knowing the advantages can help people make well-informed decisions. This makes thermofoil an attractive option. Let’s explore the key advantages it brings to your living spaces.
- Cost-Effective Solution: Thermofoil is generally less expensive than solid wood or painted surfaces. This makes it an accessible option. It is suitable for those looking for budget-friendly alternatives without sacrificing style. The lower cost is a major draw for home renovation projects.
- Design Versatility: Thermofoil can be molded into various shapes and designs. This capability opens doors to custom looks. It provides diverse styling possibilities. You can match any room decor. The versatility of thermofoil allows homeowners to achieve the look they desire.
- Durability and Maintenance: Thermofoil surfaces are highly resistant to moisture, stains, and scratches. Cleaning thermofoil is simple. Often, all it needs is a wipe-down. This makes it ideal for high-traffic areas. The durability ensures longevity.
- Uniform Finish: Unlike painted surfaces, thermofoil provides a consistent and smooth finish. This consistency contributes to a polished and professional look. It eliminates brushstrokes or imperfections often found in painted finishes. This even finish enhances the overall appearance.
Understanding Heat Shields: What They Do
Heat shields play a crucial role in protecting surfaces from heat damage. They provide a barrier that prevents excessive heat from reaching vulnerable materials. This can be especially important in areas with high heat sources, such as kitchens and around appliances. If you’re wondering, Do I Need Heat Shields With Thermofoil? Understanding the function of heat shields is essential. This helps to make sure you have the correct protection for your surfaces. These shields act as protectors. They extend the life and appearance of the materials. They do this by managing heat exposure.
How Heat Shields Function: Protection from Heat
Heat shields work by reflecting, absorbing, or dissipating heat energy. This process is designed to prevent the heat from damaging the materials beneath. They are usually made from materials with excellent thermal resistance. They can withstand high temperatures. This can involve a variety of materials. Some common materials include aluminum, stainless steel, and ceramic materials. The design and structure of heat shields enhance their effectiveness. This helps to deflect or absorb heat. It protects surfaces from heat damage.
- Reflection of Radiant Heat: Many heat shields are designed to reflect radiant heat away from the protected surface. Materials such as polished aluminum have high reflectivity. They bounce heat away. This minimizes the amount of heat absorbed by the underlying material. The effectiveness of reflection depends on the shield’s surface finish.
- Absorption of Thermal Energy: Some heat shields absorb thermal energy. They convert the heat into other forms of energy or dissipate it. They are good at taking in heat. This protects the material beneath. Materials with high thermal conductivity can effectively absorb and distribute heat. This reduces the risk of localized hotspots.
- Airflow and Convection: Some heat shields use airflow and convection to manage heat. They create a space between the heat source and the protected material. This allows air to circulate. The air carries away heat. This method helps in reducing the surface temperature.
Materials Used in Heat Shields
The materials used in heat shields are critical to their function. They have to withstand extreme temperatures. They need to be durable and efficient at managing heat. Materials are selected based on their thermal properties. They include resistance to corrosion and their ability to withstand mechanical stresses. Materials for heat shields vary. Each has unique characteristics. Here is a look at the most common materials.
- Aluminum: Aluminum is a popular choice for heat shields. It has good thermal conductivity and high reflectivity. It’s lightweight and resistant to corrosion. This makes it suitable for many applications. Aluminum shields can be formed into various shapes. It makes them flexible for different designs.
- Stainless Steel: Stainless steel is known for its durability and resistance to high temperatures and corrosion. It is often used in situations where durability is a priority. Stainless steel shields are heavy-duty. They provide robust protection against extreme heat. The material is often used in industrial settings.
- Ceramic Materials: Ceramic materials, such as ceramic fiber or ceramic-coated metals, provide excellent thermal insulation. They can withstand extremely high temperatures. They are ideal for applications. These include high-temperature environments, where other materials might fail. Ceramic shields are less common due to their higher cost.
- Composite Materials: Composite materials combine multiple materials to achieve optimal heat resistance and performance. These may include fiberglass-reinforced polymers or carbon fiber composites. Composites often provide a good balance between thermal properties, weight, and cost.
Does Thermofoil Need Heat Shields? Assessing the Risk
The question of whether to use heat shields with thermofoil is a common one. It depends on various factors. These include the proximity of heat sources and the design of the installation. For those wondering, Do I Need Heat Shields With Thermofoil?, the answer is often influenced by several considerations. They help you decide whether additional protection is needed. Assessing the risks of heat exposure helps ensure the longevity and appearance of your thermofoil surfaces.
Heat Sensitivity of Thermofoil: What to Consider
Thermofoil’s sensitivity to heat is a crucial factor. It determines whether or not a heat shield is necessary. Thermofoil can warp, blister, or delaminate. This can happen when exposed to high temperatures. The extent of this damage depends on several factors. These include the type of thermofoil, the intensity and duration of heat exposure, and the surrounding environment. Being aware of the risks allows you to apply the appropriate protective measures. It helps in protecting the finish.
- Temperature Thresholds: Thermofoil has specific temperature thresholds. It can withstand before it begins to show signs of damage. Most thermofoil materials have a maximum temperature tolerance. This is usually between 160°F and 200°F (71°C and 93°C). Exposure beyond these temperatures can cause deformation or damage.
- Proximity to Heat Sources: The distance between the thermofoil and heat sources significantly affects the risk of damage. Heat intensity decreases with distance. Direct exposure to heat, such as from a stovetop or oven, is the most significant threat. Areas close to heat sources are more likely to require heat shields.
- Type of Heat Exposure: The type of heat exposure is crucial. Continuous heat exposure, like a stove, poses a greater risk than short bursts. Radiant heat can be very damaging. It may warp or blister the surface. Convection heat, such as from an oven, also can affect thermofoil.
When Heat Shields Are Recommended for Thermofoil
Heat shields are not always needed with thermofoil. However, in certain situations, they are highly recommended. These are typically cases where thermofoil surfaces are near high heat sources. They are there to minimize the risk of damage. Installing heat shields adds an extra layer of protection. This can prevent costly repairs or replacements. It helps maintain the appearance of the thermofoil surfaces. Here are some instances where heat shields are best.
- Near Ovens and Stovetops: Thermofoil surfaces near ovens and stovetops are at the highest risk. Heat shields are often required to protect these areas. This is especially true if the thermofoil is close to the heat source. The shields deflect heat and protect against damage from high temperatures.
- Around Refrigerators and Dishwashers: While not as high a risk, heat from refrigerators and dishwashers can also affect thermofoil. Installing a heat shield can provide added protection. This prevents heat buildup. It also shields the surfaces. This extends the life of the surrounding cabinets.
- Areas Near Small Appliances: Small appliances, such as toasters and microwave ovens, can emit significant heat. Placing heat shields near these appliances helps to protect adjacent thermofoil surfaces. This reduces the risk of localized heat damage. This is a simple measure that can prevent future problems.
Step-by-Step Guide: Shielding Thermofoil from Heat
Protecting thermofoil from heat involves more than just knowing when to use a heat shield. It’s about choosing the correct type of shield. It’s about making the installation effective. This post will guide you step-by-step. It helps you assess your situation. It helps you select the right products. The goal is to provide a complete guide. It helps to keep your thermofoil surfaces looking their best. It also helps to prevent heat damage.
Assess the Heat Source and Proximity
The first step involves a detailed evaluation of your specific situation. This helps you determine the risk level and the type of protection needed. Properly assessing the heat source and proximity can save you time and cost. It can help you make a good decision. It can also ensure you apply the right measures to keep your thermofoil safe. This is a detailed process that will inform your decision.
- Identify the Heat Sources: Identify all heat sources near thermofoil surfaces. This includes ovens, stovetops, dishwashers, and small appliances. Note the types and sizes of appliances. This will influence the amount of heat and the areas exposed. Understanding the heat sources is key to a plan.
- Measure the Distance: Measure the distance between the heat sources and the thermofoil surfaces. This includes cabinets, doors, and drawer fronts. The closer the thermofoil is to the heat source, the greater the risk. The distance will affect the type of shield you need.
- Evaluate the Heat Intensity: Assess how often and how intensely the heat source is used. For example, a stovetop used for hours each day poses a greater risk than a rarely used microwave. High-intensity and frequent use warrant greater protection. Understanding the use helps assess the risks involved.
- Consider Ventilation: Examine the ventilation in the area. Good ventilation can help reduce heat buildup. Improving the airflow helps reduce the need for more complex heat shield solutions. Improving ventilation can help protect your thermofoil.
Choosing the Right Heat Shield Materials
Choosing the right heat shield materials is essential for effectiveness. Different materials are best suited for different applications. Consider factors like heat resistance, ease of installation, and appearance. Selecting the correct materials will ensure you have the best protection. The wrong choice can lead to wasted effort and even damage. Knowing the material will help protect the thermofoil from heat.
- Aluminum Shields: Aluminum shields are a good choice for most applications. They are easy to install. They are reflective. They reflect heat. Choose aluminum shields for stovetops and ovens. Aluminum provides an excellent balance of cost and performance.
- Stainless Steel Shields: Stainless steel shields are a more durable option. They can withstand extreme temperatures. Stainless steel shields are best for industrial kitchens. They are great for high-heat environments. Stainless steel provides excellent heat resistance.
- Ceramic Fiber Shields: Ceramic fiber shields provide very high thermal insulation. Ceramic fiber is ideal for areas with extreme heat exposure. They are often used in specialized applications. They are more costly than other options.
- Heat-Resistant Tape or Adhesive: Heat-resistant tape or adhesive is useful for securing the heat shields. It’s also used to seal gaps. Choose a tape that can withstand the heat. Be sure it won’t damage the thermofoil. Always test a small area first to ensure compatibility.
Installation Techniques and Best Practices
Proper installation is key to the effectiveness of heat shields. Careful installation ensures the shield functions correctly. It also ensures the protection of the thermofoil surfaces. These practices will maximize the performance of your heat shields. It also protects your thermofoil surfaces.
- Prepare the Surface: Before installing any heat shield, ensure the surface is clean and dry. Use a mild cleaner and let it dry. This allows for the best adhesion of any tape or adhesive. A clean surface is essential for a secure and long-lasting installation.
- Measure and Cut: Measure the area that needs protection. Use the correct tools for the material. Measure carefully to ensure the shield fits properly. Accurate measurements reduce the risk of any gaps. This can affect the shield’s effectiveness.
- Secure the Shield: Use appropriate mounting hardware, such as screws, clips, or heat-resistant adhesive tape. Ensure the shield is securely attached. Make sure there are no gaps. Gaps can let heat pass through. Properly secured shields provide the best protection.
- Sealing and Gaps: Seal any gaps around the edges of the heat shield with heat-resistant sealant or tape. This prevents heat from escaping. Properly sealed shields ensure maximum protection. This adds to the shield’s effectiveness.
Frequently Asked Questions
Question: Can I use any type of heat shield with thermofoil?
Answer: Not all heat shields are created equal. You need to choose materials that are specifically designed for the temperatures and conditions near your thermofoil surfaces. Always verify the heat resistance of the shield.
Question: How do I know if my thermofoil is already damaged by heat?
Answer: Look for signs like warping, bubbling, discoloration, or delamination. These are clear indications of heat damage. If you see any of these, consider installing heat shields to prevent further damage.
Question: Is it necessary to replace thermofoil if it gets slightly damaged by heat?
Answer: It depends on the extent of the damage. Small issues might be fixable. Extensive damage may require replacement. Evaluate the area and consult a professional. Make sure to consider cost and appearance.
Question: What’s the best way to clean a heat shield on my thermofoil surfaces?
Answer: Clean with mild soap and water. Avoid abrasive cleaners or strong chemicals. Wipe the heat shield clean with a soft cloth. Follow the manufacturer’s care instructions for the best results.
Question: Can I install a heat shield myself, or do I need a professional?
Answer: Many heat shield installations are easy enough for DIY projects. If you feel comfortable measuring and using basic tools, you can probably do it yourself. Complex installations or areas where electrical work is involved might require a professional.
Final Thoughts
Deciding if you need heat shields with thermofoil requires some thought. You should consider the proximity of heat sources and the type of heat exposure. We’ve explored everything you need to know. From how thermofoil and heat shields work. We also covered selecting the correct materials and the best installation methods. Now, you can better protect your surfaces. You can maintain the look of your kitchen and other spaces. Always assess the risks. When in doubt, it’s best to add protection. This helps keep your thermofoil looking great. With these steps, you can create a safe, stylish, and functional area for years to come. Remember, a little preparation goes a long way!