Are Heat Shields Easy To Install? Proven Solution
Yes, heat shields are generally easy to install, especially with the right tools and straightforward instructions. Most aftermarket and replacement heat shields are designed for DIY application, often requiring basic tools and less than an hour of your time. This guide will show you exactly why and how you can confidently tackle this task yourself.
Ever worried about that faint sizzling sound from your car’s undercarriage, or maybe seen a heat shield dangling precariously? It’s a common sight for many car owners. These metal panels might not seem like much, but they play a crucial role in keeping your car safe and performing its best. They protect vital components from the intense heat generated by your exhaust system. When one gets loose or lost, it’s natural to wonder if fixing it is a job for the pros or if you can simply do it yourself. The good news is, for most situations, installing a heat shield is surprisingly straightforward.
We’re here to break it down in a way that makes sense, even if you’ve never worked on your car’s exhaust before. Forget confusing jargon and complicated diagrams. We’ll walk you through why they’re important, what makes installation easier than you think, and how to do it safely. You’ll gain the confidence to tackle this common car maintenance task and keep your vehicle running smoothly and safely. Let’s find out just how easy it can be!
Why Heat Shields Matter for Your Vehicle
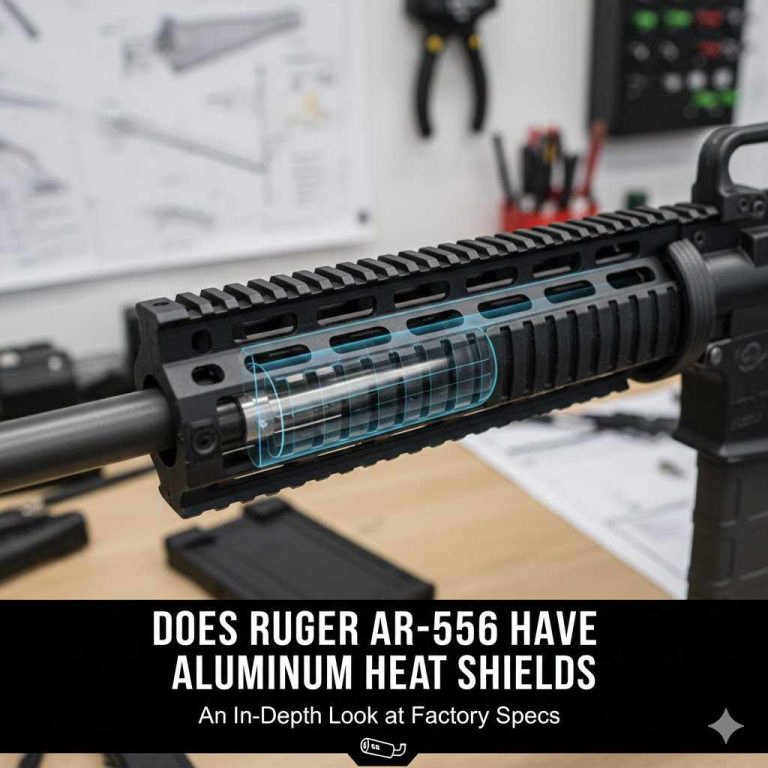
Think of heat shields as silent guardians of your vehicle’s underbelly. Your exhaust system, especially the catalytic converter and muffler, gets incredibly hot during operation – sometimes reaching over 1,000°F (538°C)! Without protection, this intense heat can damage nearby components. These can include fuel lines, electrical wiring, the brake system, and even the vehicle’s floor pan or body. Over time, exposure to this heat can degrade these parts, leading to costly repairs or, in the worst case, safety hazards like fuel leaks or fires.
A functioning heat shield acts as a barrier, deflecting and absorbing this extreme heat away from sensitive areas. This not only protects your car’s internal systems but also contributes to its overall efficiency and longevity. It helps maintain optimal operating temperatures for various components and prevents premature wear and tear. So, while they might be simple pieces of metal, their contribution to your car’s health and safety is significant.
What Makes Heat Shield Installation Easier Than You Think
The primary reason heat shield installation is generally beginner-friendly is their design. Manufacturers, especially for aftermarket replacements, aim for ease of installation to cater to a wider range of vehicle owners. Here’s why it’s often a manageable DIY task:
- Simple Attachment Methods: Most heat shields attach using basic hardware like bolts, nuts, washers, or specialized clips. These are designed to be accessible and require common tools.
- Direct Fit Designs: Many aftermarket heat shields are engineered to fit specific makes and models precisely. This means they align with existing mounting points on your vehicle’s exhaust system, eliminating the need for complex modifications.
- Lightweight Materials: Heat shields are typically made from thin gauge metal like aluminum or stainless steel. They are not heavy, making them easy to handle and maneuver into place underneath the vehicle.
- Clear Alignment: The shape and often pre-drilled holes in replacement heat shields guide you on how to position them correctly onto the exhaust pipe or component.
- Minimal Tools Required: You won’t need a professional mechanic’s toolkit. Typically, a socket set, wrench, pliers, and safety gear are sufficient.
These factors combine to create a repair that, for many common issues, can be completed in a relatively short amount of time, often under an hour. This makes it a perfect project for a weekend DIYer looking to save on labor costs and gain a sense of accomplishment.
When Might Heat Shield Installation Be Tricky?
While we’ve emphasized the ease, it’s important to acknowledge that some situations can add complexity. Understanding these potential challenges helps in preparing adequately:
- Corrosion and Rust: On older vehicles, the exhaust system and surrounding bolts can become heavily rusted. This can make removing old hardware difficult or require cutting it off, which can add time and require more robust tools like a reciprocating saw with a metal-cutting blade.
- Access Constraints: Some exhaust components are located in tight spaces. Depending on your vehicle’s design and how high it’s lifted, getting comfortable access to the mounting points might be challenging.
- Broken or Missing Mounting Points: If the original mounting points on your exhaust pipe or vehicle frame are rusted away or damaged, you’ll need to find alternative, secure ways to attach the new shield. This might involve using specialized clamps designed for exhaust pipes, like those from JM Specialties, which offer various clamping solutions.
- Custom Exhausts or Modifications: If you have a non-standard exhaust system or modifications, a generic aftermarket heat shield might not fit perfectly and could require minor adjustments or a custom solution.
- Heat Shield Material and Size: Some high-performance or specialized heat shields might be made of thicker materials or have unique shapes that could make them harder to maneuver or install without specific fixtures.
For the vast majority of common issues with standard vehicles, these challenges are manageable. However, if you encounter severe rust or very limited access, consulting a professional mechanic might be the safest and most efficient route.
Tools You’ll Likely Need
To make your heat shield installation as smooth as possible, gathering the right tools beforehand is key. Here’s a list of common items you’ll probably need. Remember to check your specific vehicle’s requirements, as some might use unique fasteners.
| Tool | Purpose | Notes |
|---|---|---|
| Jack and Jack Stands | To safely lift and support your vehicle, providing access to the underside. | Crucial for safety. Never work under a vehicle supported only by a jack. Ensure they are rated for your vehicle’s weight. |
| Wheel Chocks | To prevent the vehicle from rolling when lifted. | Place them behind the wheels that will remain on the ground. |
| Socket Set | To loosen and tighten nuts and bolts. | A metric set is common for most cars. 10mm, 12mm, 14mm, and 17mm are often useful sizes. A deep socket might be needed for some bolts. |
| Wrench Set | Alternative to sockets for some fasteners, or to hold nuts in place while tightening bolts. | Open-end and box-end wrenches. |
| Pliers | For gripping, bending, or holding small parts, and sometimes for manipulating clips. | Standard pliers, needle-nose pliers, and perhaps locking pliers (Vise-Grips). |
| Penetrating Oil (e.g., WD-40, PB Blaster) | To loosen rusted or seized bolts and nuts. | Apply generously and let it soak for 10-15 minutes before trying to loosen. For more stubborn rust, a tool like Kroil is highly regarded by mechanics. |
| Safety Glasses | To protect your eyes from falling debris, rust, or lubricants. | Absolutely essential. |
| Gloves | To protect your hands from sharp metal, grease, and heat. | Mechanic’s gloves or sturdy work gloves. |
| Wire Brush | To clean rust and debris from mounting surfaces and threads before installing new hardware. | Helps ensure a good fit and allows new hardware to thread smoothly. |
| Torque Wrench (Optional but Recommended) | For tightening bolts to the manufacturer’s specified tightness. | Prevents overtightening (which can damage parts) or undertightening (which can lead to loosening). Check your vehicle’s service manual for specific torque values. |
| Rust Inhibitor/Anti-Seize Compound (Optional) | Apply to new bolt threads to prevent future seizing. | Can make future removals much easier. |
Having these tools ready means you won’t have to stop midway through the job to go shopping. It saves time and frustration!
Step-by-Step Guide: How to Install a Heat Shield
Let’s get to the practical part! This guide covers the typical installation of an aftermarket heat shield. Always refer to any specific instructions that come with your new heat shield, as they may have unique requirements.
Step 1: Safety First – Prepare Your Workspace
Find a level, stable surface to park your car. Engage the parking brake firmly. Place wheel chocks behind the rear wheels. Using your jack, lift the front of the vehicle to a height that allows comfortable access underneath. Securely place jack stands under the recommended support points on your vehicle’s frame. Gently lower the jack until the vehicle rests firmly on the jack stands. Give the car a gentle push to ensure it’s stable before getting under it.
Step 2: Locate the Old/Damaged Heat Shield
Slide under your vehicle and locate the exhaust system. You’ll usually find heat shields around the catalytic converter, muffler, or exhaust pipes. Identify the heat shield that needs replacement or the area where one is missing. If you are replacing an old one, note how it was attached and its orientation.
Step 3: Remove the Old Heat Shield (If Applicable)
If you are replacing an existing heat shield, you’ll need to remove it. Spray any bolts or clips holding it in place with penetrating oil. Let it soak for 10-15 minutes. Using your socket set or wrench, carefully try to loosen and remove the fasteners. If the bolts are severely rusted, you might need to use more penetrating oil, a wire brush to clean the threads, or even a rubber mallet to tap them loose. In some cases, you may need to cut the old fasteners or the shield itself if they are too corroded to remove, using a hacksaw or a reciprocating saw if necessary.
Step 4: Clean the Mounting Area
Once the old shield is off, use a wire brush to clean the mounting points on the exhaust component and the vehicle’s frame. Remove any rust, dirt, or debris. This ensures the new heat shield will sit flush and that any new hardware will thread properly. If you are using new bolts, a light application of anti-seize compound on the threads is a good idea to prevent future corrosion.
Step 5: Position the New Heat Shield
Take your new heat shield and carefully maneuver it into position. Align its mounting holes with the corresponding mounting points on the exhaust system or frame. For many aftermarket shields, there’s often a specific orientation that makes it obvious where it should go. If it has a specific shape (like a U-shape around a pipe), make sure it’s facing the correct direction to provide the most effective heat deflection.
Step 6: Secure the New Heat Shield
Insert the new bolts, nuts, and washers or clips through the aligned holes. Start all fasteners by hand to avoid cross-threading. Once all fasteners are in place, use your socket set or wrench to tighten them. Work in a star pattern if there are multiple fasteners, tightening them gradually and evenly. This helps to ensure the shield seats properly and evenly. If you have a torque wrench, tighten the fasteners to the manufacturer’s recommended torque specification. If not, tighten them firmly but avoid overtightening, which could strip the threads or damage the shield.
Step 7: Final Check and Lowering the Vehicle
Once the heat shield is securely fastened, give it a gentle tug to ensure it’s solid and doesn’t rattle. Double-check that all tools and debris have been removed from under the vehicle. Slowly and carefully raise the vehicle off the jack stands using the jack, then remove the jack stands. Lower the vehicle completely to the ground.
Step 8: Test Drive
Start your car and let it run for a few minutes. Listen for any unusual noises, like rattling or buzzing, which might indicate the shield isn’t secured properly. Take your car for a short test drive around the block at low speeds, paying attention to any sounds or vibrations. If everything sounds normal, congratulations, you’ve successfully installed your heat shield!
Troubleshooting Common Heat Shield Installation Issues
Even with a straightforward process, you might run into a snag. Here are common issues and how to resolve them:
| Problem | Cause | Solution |
|---|---|---|
| New heat shield doesn’t fit properly. | Incorrect part ordered or slight variation in vehicle model year. | Double-check the part number against your vehicle’s specifications. If it’s a minor alignment issue, you might be able to slightly bend the shield (if material allows) or use an alternative mounting method like exhaust clamps. If it’s a significant mismatch, contact the supplier for an exchange. |
| Bolts won’t thread into existing nuts/studs. | Rust, dirt, or cross-threading. | Use a wire brush to clean the threads thoroughly. Apply more penetrating oil. If the threads are damaged, you may need to replace the nut or stud, or drill out and re-tap the hole. |
| Stripped bolt head or nut. | Overtightening, rusted fasteners, or using the wrong size tool. | If the head is stripped, you might try using locking pliers (Vise-Grips) to grip and turn it. If that fails, you may need to use a bolt extractor kit or cut the bolt off. |
| Not enough clearance to work. | Vehicle not lifted high enough or obstructed exhaust/frame components. | Safely lift the vehicle higher using additional jack stands if needed (ensure stable support). Clear any obstructing debris. Sometimes, a mechanic’s creeper can help you slide more easily. |
| New fasteners are loose after tightening. | Threads are damaged, or fasteners are incorrect. | Remove the fastener and inspect the threads. If damaged, consider using slightly larger, self-tapping screws or replacing the nut/stud. Ensure you are using the correct thread pitch and size. |
For more in-depth information on exhaust system repairs, resources like those found on NHTSA.gov (National Highway Traffic Safety Administration) provide valuable safety guidelines and recall information, which are always good to be aware of when working on your vehicle.
Benefits of a Properly Installed Heat Shield
Ensuring your heat shields are correctly in place offers several advantages:
- Enhanced Safety: The most critical benefit. Proper heat shielding prevents heat-related damage to fuel lines, reducing the risk of leaks and fires. It also protects passengers from uncomfortable heat radiating into the cabin.
- Extended Component Life: By diverting heat, you protect sensitive under-vehicle components like brake lines, wiring harnesses, and rubber bushings from premature degradation, saving you money on future repairs.
- Improved Vehicle Performance: While not a performance upgrade, consistent temperatures can help maintain optimal conditions for systems like the catalytic converter, ensuring it functions efficiently.
- Reduced Noise: Sometimes, a loose or damaged heat shield can vibrate against the exhaust, causing rattling or buzzing noises. Securing or replacing it can lead to a quieter ride.
- Preventing Costly Repairs: Addressing a loose or missing heat shield promptly is far cheaper than repairing damage caused by overheating or a shield falling off completely and potentially damaging other parts or road surfaces.
FAQ: Your Heat Shield Installation Questions Answered
Q1: How often should I check my car’s heat shields?
A: It’s a good idea to inspect your heat shields at least twice a year, perhaps during oil changes, or whenever you notice unusual rattling noises from under your vehicle. Visually checking for any signs of loosening, rust, or damage is quick and can prevent bigger issues.
Q2: Can I drive with a missing or damaged heat shield?
A: It is not recommended. While your car may seem to drive okay initially, a missing or improperly functioning heat shield exposes critical components to excessive heat, which can lead to expensive damage, component failure, and even fire hazards over time. It’s best to address it as soon as possible.