1970 LT-1 Corvette Exhaust Manifolds: Factory Specs
Figuring out the right details for your 1970 LT-1 Corvette exhaust manifolds can seem tricky at first. Lots of information exists, and it can be hard for new owners to find exactly what they need. Don’t worry, this guide makes it simple.
We will walk through everything you need to know, step by step. Get ready to learn all about the 1970 LT-1 Corvette Exhaust Manifolds: Factory Specs.
1970 LT-1 Corvette Exhaust Manifolds Factory Specs Overview
This section gives you a clear picture of what the original exhaust manifolds for a 1970 LT-1 Corvette looked like from the factory. We’ll cover their basic design and why these specifics matter for enthusiasts and restorers. Understanding these factory specs helps maintain originality and performance.
Original Design Features
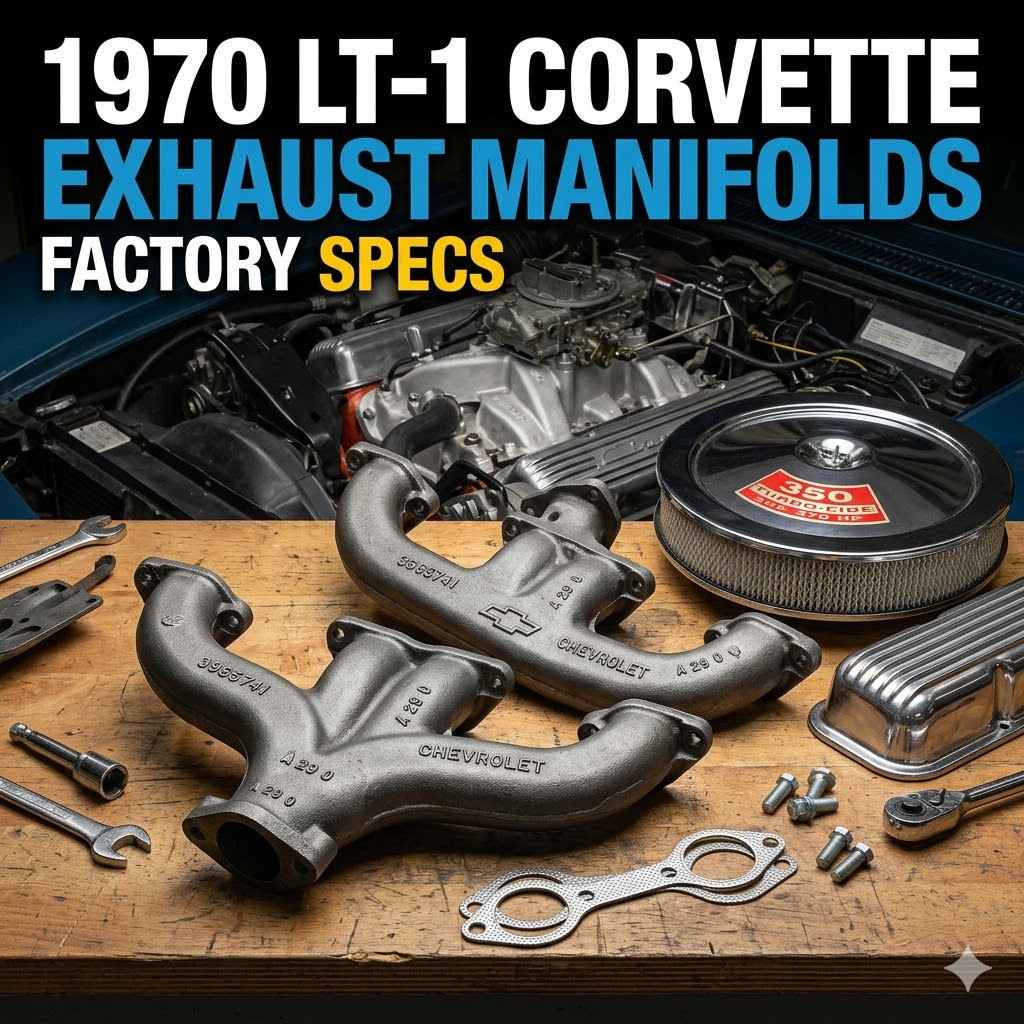
The 1970 LT-1 Corvette came with specific exhaust manifolds designed for its high-performance engine. These manifolds were built to handle the extra power and heat generated by the LT-1 motor. Their design focused on directing exhaust gases efficiently away from the engine.
This helped the engine breathe better and perform at its best.
Key aspects of the original design include the material used and the shape of the runners. The manifolds were typically made from cast iron. This material is known for its durability and ability to withstand high temperatures.
The internal shape of the pipes, called runners, was also carefully engineered.
Material Composition
The cast iron used in these manifolds provides excellent heat resistance. This is vital for a performance engine like the LT-1, which operates at higher temperatures. The iron also helps to dampen exhaust noise, contributing to a more refined sound for the car.
Over time, cast iron can develop surface rust, but its structural integrity remains strong with proper care.
Runner Configuration
The shape and length of the exhaust runners are important for engine performance. For the 1970 LT-1, the runners were designed to optimize exhaust gas flow at specific engine speeds. This helps the engine expel spent gases quickly and efficiently.
This design contributes to better horsepower and torque. The routing of the pipes also affects how they connect to the rest of the exhaust system.
Flange Design and Gasket Surface
The manifold attaches to the cylinder head using a flange. The factory design ensured a precise fit to create a good seal. The surface where the gasket sits must be flat and clean.
Any imperfections here can lead to exhaust leaks, reducing performance and creating noise. The bolt hole pattern is also specific to the cylinder head design of the LT-1 engine.
Importance of Factory Specifications
For collectors and restorers, adhering to factory specifications is often a top priority. These details ensure the car remains as close to its original state as possible. This is crucial for maintaining its value and authenticity.
Using original or reproduction parts that match factory specs is key.
Deviations from factory specifications can affect performance. Different manifold designs might alter exhaust flow characteristics. This can lead to changes in horsepower, torque, and even fuel efficiency.
Correcting these issues requires a deep knowledge of the original engineering.
A well-restored vehicle with correct components is highly prized. It represents a piece of automotive history. Knowing the exact details of the 1970 LT-1 Corvette Exhaust Manifolds: Factory Specs helps owners make informed decisions about repairs and modifications.
It ensures the car runs and looks the way it was intended.

Understanding LT-1 Engine Performance Needs
The LT-1 engine was a special, high-performance version of the small-block Chevrolet V8. It was designed for enthusiasts who wanted more power and speed from their Corvette. This engine demanded components that could keep up with its aggressive nature.
The exhaust system, including the manifolds, played a critical role in achieving this performance.
High-performance engines like the LT-1 generate more heat and require better airflow. The exhaust manifolds are the first part of the exhaust system. They must efficiently remove hot gases from the engine’s cylinders.
This process allows fresh air and fuel to enter for the next combustion cycle. A well-designed manifold helps the engine “breathe” freely.
The original engineers put a lot of thought into how the exhaust would flow. They wanted to get the most power out of the engine without sacrificing reliability. This meant balancing performance with other factors like noise levels and emissions control, which were becoming more important in the 1970s.
Airflow and Exhaust Scavenging
Exhaust scavenging is a key concept for understanding engine performance. It’s like a wave effect. When a cylinder fires, the exhaust gases rush out.
This rush creates a low-pressure pulse behind it. This pulse can actually help pull the remaining exhaust gases out of the cylinder.
For the 1970 LT-1 Corvette Exhaust Manifolds: Factory Specs, the design of the pipes was optimized for this scavenging effect. The length and diameter of each pipe leading away from the exhaust port were carefully chosen. This helps ensure that the pulses from different cylinders don’t interfere negatively with each other.
Instead, they can work together to improve the engine’s efficiency.
Think of it like a group of people breathing. If everyone exhales at the same time and in a disorganized way, it’s messy. But if they exhale in a timed sequence, each person can inhale more easily.
Exhaust scavenging works in a similar way for engine cylinders.
Optimized Runner Lengths
The length of each individual exhaust runner is critical. Factory engineers calculated these lengths to create beneficial pressure waves. These waves travel at the speed of sound.
By timing them correctly, they can create a vacuum effect that helps clear the cylinder. This means less work for the piston on its exhaust stroke.
Smooth Transitions
The transition from the exhaust port on the cylinder head to the manifold runner must be smooth. Any sharp edges or abrupt changes in direction can disrupt the airflow. This disruption creates turbulence and reduces scavenging efficiency.
The factory manifolds aimed for gentle curves to maintain smooth flow. This is why hand-porting or aftermarket headers often focus on smoothing these areas.
Collector Design
While the manifold itself doesn’t have a complex collector like some aftermarket headers, the way the two pipes from each manifold meet is still important. The factory setup typically had the pipes merge in a specific way. This merge point influences how the exhaust pulses interact.
It’s designed to continue the scavenging effect down the line. Some collectors are designed to promote a certain firing order of pulses.
Heat Management
High-performance engines produce a lot of heat. The exhaust manifolds are directly exposed to these extreme temperatures. Managing this heat is vital for engine longevity and consistent performance.
Overheating can cause parts to warp or fail. It can also reduce the engine’s power output.
Cast iron manifolds are good at absorbing and dissipating heat. However, they also get very hot. This heat can transfer to other engine components and the engine bay.
The factory design considered how to help the engine cool down effectively. This often involved the placement of the manifolds and surrounding components.
For the 1970 LT-1 Corvette Exhaust Manifolds: Factory Specs, the material choice and thickness of the cast iron were key factors in heat management. Thicker castings can absorb more heat before reaching critical temperatures. They also help to radiate heat away from the engine more gradually.
This helps to keep engine bay temperatures more stable.
The factory often included heat shields or wrapped certain areas. These measures helped to protect sensitive components from the intense heat generated by the manifolds. They also helped to keep the heat within the exhaust system, which can sometimes improve exhaust gas velocity.
Identifying Correct 1970 LT-1 Corvette Exhaust Manifolds
If you’re working on restoring a 1970 LT-1 Corvette, or if you’ve bought one and want to ensure it’s correct, you need to know how to identify the original exhaust manifolds. This isn’t always straightforward, as many different manifolds can fit on a small-block Chevy. However, the LT-1 had specific parts that set it apart.
The primary goal is to find manifolds that match the factory specifications. This means looking at the part numbers, casting marks, and general shape. These are the clues that tell you if you have the correct pieces for your car.
Many reproduction parts exist, but originality is key for many collectors.
Let’s explore how to tell if you have the genuine article, or at least something that closely matches the 1970 LT-1 Corvette Exhaust Manifolds: Factory Specs. It requires attention to detail and knowing what to look for.
Part Numbers and Casting Marks
Original Chevrolet parts often have specific part numbers stamped onto them. These numbers are usually cast directly into the metal. For the exhaust manifolds, these numbers are often found on the underside or the side of the casting.
The exact part numbers for the 1970 LT-1 Corvette exhaust manifolds are specific. They typically start with a “39” prefix, common for Chevrolet parts of that era. For example, a common manifold used on many L48 and LT-1 Corvettes of this period is the 3932442.
However, it’s important to verify if this specific number applies to the LT-1 with its unique exhaust ports and requirements.
Besides the part number, there might be other casting marks. These can include date codes, foundry marks, or internal manufacturer codes. These marks help confirm the authenticity and age of the part.
A manifold with a date code from before or during the car’s production period is more likely to be original.
Locating Part Numbers
You’ll need to get under the car or remove the manifolds to find these numbers. They are usually cast into the metal itself, not stamped onto a separate plate. Use a wire brush to clean away dirt and rust.
This will make the numbers visible. Sometimes, you might need a bright light to see them clearly.
Interpreting Date Codes
Date codes typically follow a system like “Day-Month-Year” or “Month-Day-Year.” For Chevrolet parts from the late 60s and early 70s, you might see a format like “D270” meaning April 27, 1970. The year is usually the last digit. Knowing the car’s build date helps you determine what date codes are appropriate.
Distinguishing From Other Small-Block Manifolds
Many small-block Chevy engines used similar-looking exhaust manifolds. The LT-1, being a high-performance engine, might have slightly different internal port shapes or external features. It’s crucial to compare the manifold you have with known correct examples or detailed specifications for the LT-1.
For instance, some manifolds have wider or narrower exhaust ports.
Physical Dimensions and Shape
Beyond part numbers, the physical shape and dimensions are key indicators. The factory manifolds for the LT-1 had a specific casting design. This design was intended to mate perfectly with the LT-1 cylinder heads and the rest of the exhaust system.
The overall size and the shape of the exhaust ports themselves are important. The LT-1 engine had larger ports than some other small-block engines. Therefore, its exhaust manifolds would have had corresponding larger openings to match.
This allows for better gas flow.
The angle and length of the exhaust pipes leaving the manifold also matter. They need to clear the frame rails, steering components, and other parts of the chassis. The factory design accommodated these clearances precisely.
Any significant differences in shape or size might indicate a non-original manifold.
For those seeking the 1970 LT-1 Corvette Exhaust Manifolds: Factory Specs, comparing the physical dimensions to known good examples is a reliable method. Visual inspection alone can reveal a lot if you know what to look for. Subtle differences in the casting or the shape of the pipes can be telling.
Reproduction vs. Original
Today, you can buy reproduction exhaust manifolds. These are made to look like the originals and often fit correctly. For many owners, especially those who drive their cars regularly, these reproductions are a practical choice.
They offer the correct appearance without the cost or fragility of rare original parts.
However, for serious collectors and restorers, originality is paramount. Original parts, even if they show signs of age, carry a certain authenticity. They are part of the car’s history.
The exact patina and casting imperfections of an original part can be desirable.
When evaluating a part, consider its casting quality, the clarity of markings, and the overall finish. Original manifolds will often have a more raw, less refined casting appearance compared to modern reproductions. However, some reproductions are made with great attention to detail.
A comparison can be helpful:
| Feature | Original Manifold | Reproduction Manifold |
|---|---|---|
| Casting Quality | Often rougher, visible sand texture | Smoother, more uniform finish |
| Part Numbers/Dates | Present, sometimes worn or hard to read | May be present, often crisply stamped, or absent |
| Material | Original cast iron | Cast iron or other alloys, may vary |
| Fitment | Designed for original fit, may show wear | Designed for direct fit, can vary in precision |
Ultimately, deciding between original and reproduction depends on your project’s goals and budget. But for those aiming for true originality, the hunt for correct 1970 LT-1 Corvette Exhaust Manifolds: Factory Specs involves scrutinizing these details.
Installation and Fitment Considerations
Getting the exhaust manifolds bolted onto your 1970 LT-1 Corvette is more than just tightening bolts. Proper installation ensures a good seal, prevents leaks, and allows the engine to perform as intended. It’s a step where many details matter, especially when dealing with classic cars.
The fitment of exhaust manifolds can be affected by many factors. These include the condition of the cylinder heads, the quality of the gaskets, and the torque applied. Even slight variations can lead to exhaust leaks, which are noisy and reduce engine performance.
So, it’s important to be thorough.
We’ll cover the key points to ensure your installation goes smoothly and results in a leak-free, high-performing exhaust system that respects the 1970 LT-1 Corvette Exhaust Manifolds: Factory Specs.
Gasket Selection and Preparation
The gasket between the exhaust manifold and the cylinder head is crucial. It creates the seal that prevents exhaust gases from escaping. For a high-performance engine like the LT-1, choosing the right gasket is very important.
Original factory gaskets were typically made of a composite material designed to withstand high heat and pressure. Today, you can find various types of aftermarket gaskets. Some are made of thicker materials or have special coatings to improve sealing.
Multi-layer steel (MLS) gaskets are also an option, known for their durability and ability to conform to imperfect surfaces.
Before installing the gasket, both the manifold’s flange and the cylinder head’s exhaust port surface must be clean and flat. Any rust, carbon buildup, or warping can prevent a proper seal. You might need to use a gasket scraper or even a block of wood with sandpaper to ensure a smooth, clean surface.
A wire wheel on a grinder can also be used carefully.
Types of Gaskets
Common gasket types include composite fiber, steel-reinforced composite, and multi-layer steel. Each has its pros and cons. For an LT-1, a gasket that can handle high temperatures and pressure cycles is best.
Some enthusiasts prefer a gasket that is slightly thicker to help seal minor imperfections.
Surface Preparation
This step cannot be overstressed. Both surfaces need to be perfectly clean and smooth. Any debris left behind will become a weak point for the seal.
A flat surface ensures even pressure from the bolts. If the cylinder head or manifold surface is warped, it will need to be machined flat.
Gasket Sealants
Some installers use gasket sealants. These can help improve the seal, especially on slightly imperfect surfaces. However, it’s important to use a sealant designed for high exhaust temperatures.
Read the sealant’s instructions carefully. Some sealants are meant to be applied to the gasket, while others are applied to the mating surfaces.
Bolt Tightening Sequence and Torque
Tightening the exhaust manifold bolts correctly is vital. A proper tightening sequence ensures the manifold is drawn down evenly onto the gasket and cylinder head. This creates an even seal and prevents stress on the manifold or the cylinder head.
The general rule is to tighten the bolts in a crisscross pattern, starting from the center and working outwards. This pulls the manifold down evenly. The exact torque specifications can vary depending on the type of bolt and gasket used.
It’s best to consult a service manual for the specific torque values for your 1970 LT-1 Corvette.
Over-tightening can warp the manifold or strip the threads in the cylinder head. Under-tightening can lead to exhaust leaks. It’s also recommended to re-torque the bolts after the engine has run for a short period and cooled down.
This is because the metal expands and contracts with heat, which can loosen the bolts.
For the 1970 LT-1 Corvette Exhaust Manifolds: Factory Specs, following the original Chevrolet procedures is the best approach. These procedures were developed to ensure optimal performance and longevity of the engine components.
A typical tightening sequence might look like this:
- Install all bolts loosely.
- Snug up the center bolts first.
- Work outwards in a crisscross pattern, tightening in stages.
- Apply final torque in the specified sequence.
- After the engine reaches operating temperature and cools, re-torque bolts.
Common Fitment Issues
Even with the correct manifolds, fitment can sometimes be a challenge. This is especially true on older cars where previous repairs or modifications might have been made.
One common issue is interference with other engine bay components. This could include steering linkage, brake lines, or the clutch linkage on manual transmission cars. The factory design had specific clearances built in.
If the engine or chassis has been altered, the manifolds might not fit as expected.
Another problem can arise if the cylinder heads have been modified or
Warped manifolds themselves can also be a problem. If a manifold has been overheated or subjected to stress, it might not sit flat on the cylinder head. This will invariably lead to exhaust leaks, even with a new gasket.
In such cases, the manifold might need to be resurfaced or replaced.
For owners striving to maintain the 1970 LT-1 Corvette Exhaust Manifolds: Factory Specs, it’s essential to be prepared for these potential issues. Having reference materials and a good understanding of how the system should fit will help overcome any installation challenges.
Maintaining and Restoring Your Exhaust Manifolds
Once you have the correct exhaust manifolds for your 1970 LT-1 Corvette, or if you’re working with the ones already on the car, you’ll want to know how to maintain them. Keeping them in good condition not only looks better but also helps ensure they perform correctly and last longer.
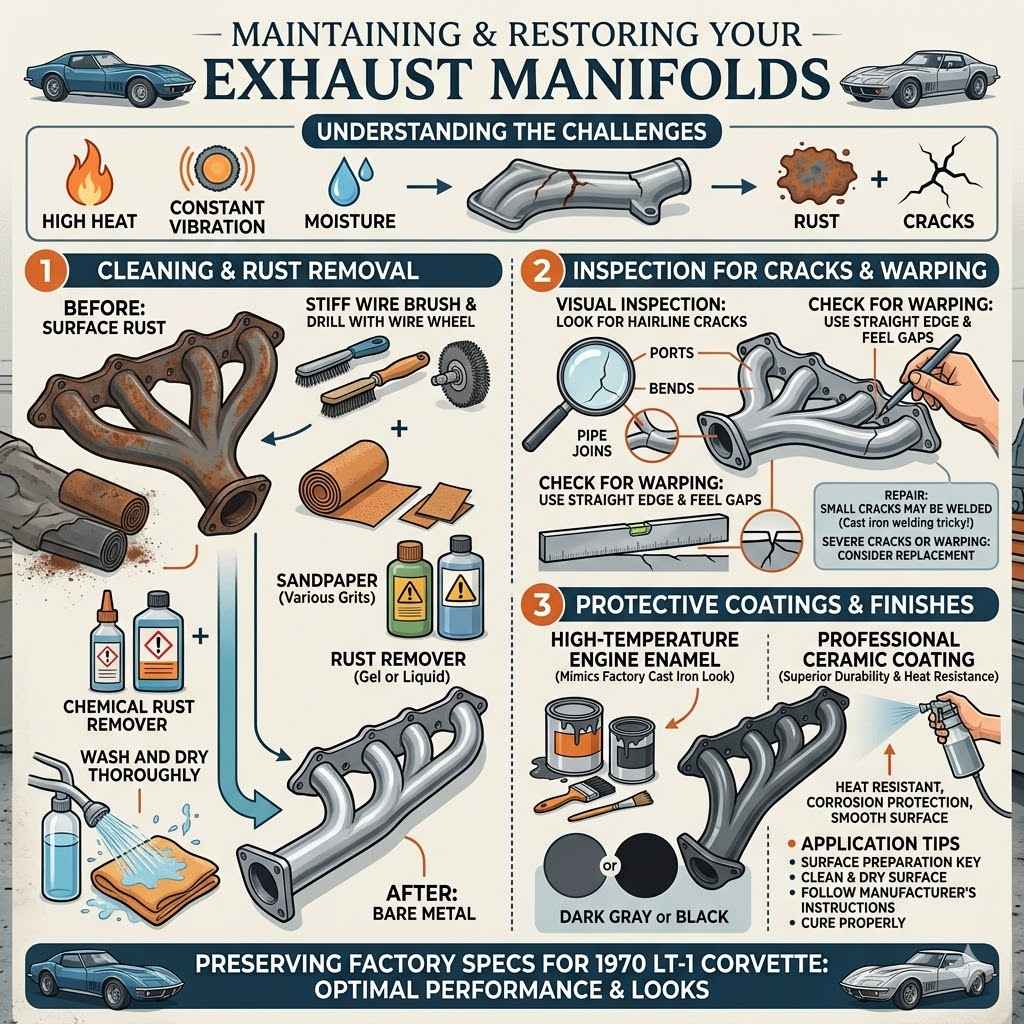
Exhaust manifolds are exposed to harsh conditions: high heat, constant vibration, and moisture. This can lead to rust, cracks, or other damage over time. Proper maintenance can prevent these problems or address them before they become major issues.
Restoring original manifolds can be a rewarding process for enthusiasts.
Let’s look at the steps involved in keeping your 1970 LT-1 Corvette Exhaust Manifolds: Factory Specs in top shape, whether through maintenance or full restoration.
Cleaning and Rust Removal
Cast iron exhaust manifolds are prone to surface rust. This is a cosmetic issue for the most part, but if left unchecked, it can eventually lead to pitting and weakening of the metal.
The first step in cleaning is usually a good scrub with a wire brush. This removes loose rust and dirt. For more stubborn rust, you might need to use a chemical rust remover.
These products can effectively dissolve rust, but it’s important to follow the manufacturer’s safety instructions. Always wear gloves and eye protection.
After rust removal, the manifold will have a bare metal appearance. To prevent immediate re-rusting, the surface needs to be treated. This can involve applying a high-temperature primer and paint, or a specialized ceramic coating.
Tools for Cleaning
A stiff wire brush, a drill with a wire wheel attachment, and sandpaper of various grits are essential. For stubborn rust, a chemical rust remover or electrolysis tank might be used. Always ensure good ventilation and wear protective gear.
Chemical Rust Removers
These products are available in liquid or gel form. They work by chemically converting rust into a paintable surface or dissolving it. Some require rinsing, while others leave a protective coating.
Always test on an inconspicuous area first.
Preventing Future Rust
Once cleaned, the bare cast iron needs protection. High-temperature engine enamel paint is a common choice. Ceramic coatings offer superior durability and heat resistance.
Ensure the surface is completely dry and free of any oils or grease before applying any protective coating.
Inspection for Cracks and Warping
Beyond rust, the most serious issue for exhaust manifolds is cracking. Cracks can form due to thermal stress, impact, or manufacturing defects. A cracked manifold will leak exhaust, creating noise and potentially allowing toxic fumes into the cabin.
Inspect the manifolds carefully, especially around the exhaust ports, the pipe bends, and where the pipes join. Look for hairline cracks that might not be immediately obvious. A magnifying glass can be helpful.
Warping can also occur, particularly if a manifold has been overheated or improperly installed. A warped manifold will not seal properly against the cylinder head. You can check for warping by placing a straight edge across the mating surface of the manifold.
Any gaps indicate warping.
If you find small cracks, they can sometimes be repaired by welding. However, cast iron can be tricky to weld, and the high temperatures involved might cause further stress. For significant cracks or severe warping,
Protective Coatings and Finishes
After cleaning and any necessary repairs, applying a protective coating is essential. This not only prevents rust but also gives the manifolds a factory-correct appearance.
High-temperature engine enamel is a popular choice. It’s available in colors that mimic the original cast iron look, often a dark gray or black. These paints are formulated to withstand the extreme heat of the exhaust system.
For a more durable and higher-performance finish, ceramic coatings are available. These coatings are applied by professional shops and offer excellent heat resistance, corrosion protection, and a smooth, easy-to-clean surface. They can also help keep under-hood temperatures down by reflecting heat.
When applying any coating, proper surface preparation is key. The surface must be clean, dry, and free of any contaminants. Following the manufacturer’s instructions for application and curing will ensure the best results.
Applying these finishes helps maintain the look of your 1970 LT-1 Corvette Exhaust Manifolds: Factory Specs, preserving their condition for years to come.
Frequently Asked Questions
Question: What is the primary material used for 1970 LT-1 Corvette exhaust manifolds
Answer: The 1970 LT-1 Corvette exhaust manifolds were primarily made of cast iron. This material is durable and can withstand the high temperatures generated by the engine.
Question: How can I identify original 1970 LT-1 Corvette exhaust manifolds
Answer: You can identify them by looking for specific part numbers stamped on the casting, such as 3932442, and by checking date codes. Comparing the shape and dimensions to known originals is also important.
Question: Are reproduction exhaust manifolds a good option for a 1970 LT-1 Corvette
Answer: Yes, reproduction manifolds are a practical choice for many owners, offering correct appearance and fitment. For serious collectors, original parts are preferred.
Question: What is exhaust scavenging and why is it important for the LT-1 engine
Answer: Exhaust scavenging is a phenomenon where the exiting exhaust pulse helps to pull remaining gases from the cylinder. This improves engine efficiency and power output, and the LT-1 manifolds were designed to optimize this effect.
Question: What steps should I take to prevent rust on my cast iron exhaust manifolds
Answer: After cleaning and rust removal, apply a high-temperature primer and paint or a ceramic coating. Proper surface preparation before application is key.
Conclusion
Ensuring your 1970 LT-1 Corvette has the correct exhaust manifolds is vital. Knowing the factory specs helps maintain originality and performance. Paying attention to details like part numbers, shape, and material ensures authenticity.
Proper installation and maintenance will keep them looking great and functioning well.