How Many Exhaust Mounts Do You Need
Figuring out how many exhaust mounts your car needs can seem tricky, especially if you’re new to car parts. You might wonder if there’s a magic number or if it depends on the car. It’s a common question, and the answer isn’t always obvious.
But don’t worry! We’re here to make it simple. We’ll walk you through exactly how many exhaust mounts you really need, step by step, so you can get your exhaust system sorted out correctly and easily.
Installation Tips for Exhaust Clamps
How Many Exhaust Mounts Are Standard
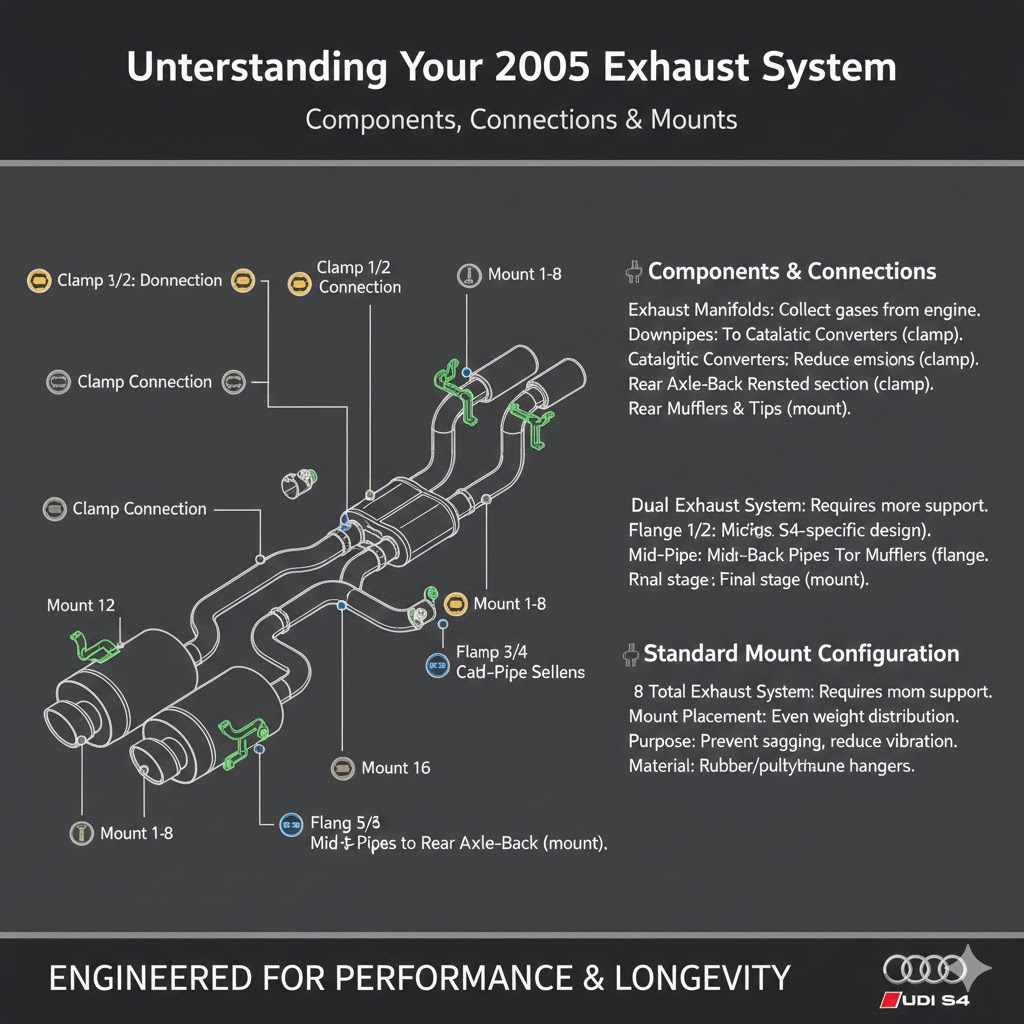
The number of exhaust mounts your car needs is primarily determined by the factory design of your vehicle. Car manufacturers spend a lot of time engineering their exhaust systems for optimal performance, sound, and longevity. They calculate exactly where to place supports to evenly distribute the weight and manage vibrations.
A typical passenger car with a single exhaust system might have anywhere from two to four exhaust mounts. These are usually positioned strategically along the length of the exhaust pipe to provide balanced support.
For vehicles with dual exhaust systems, meaning two separate pipes running from the engine back, you’ll generally need more mounts. Each pipe will need its own set of mounts, often doubling the total number required compared to a single system. So, a car with a dual exhaust might have anywhere from four to eight or even more mounts depending on the complexity of the system.
The goal is always to ensure that each section of the exhaust is held securely and that the weight is distributed across the chassis without causing strain on any single point. This is crucial for preventing rattles, leaks, and premature wear.
Factors Influencing Mount Quantity
Several factors dictate how many exhaust mounts a car needs. The length and design of the exhaust system are primary. Longer exhaust systems, or those with multiple bends and mufflers, will naturally require more support points to prevent sagging.
The weight of the exhaust components themselves is also a major consideration. A performance exhaust made from thicker, heavier materials will need more robust and possibly more numerous mounts than a standard, lighter system. The material of the exhaust pipes can also play a role; for example, stainless steel is heavier than aluminized steel.
The type of vehicle also plays a part. Trucks, SUVs, and performance cars often have more complex exhaust systems or carry heavier loads, which can necessitate additional mounting points for better stability and durability. The suspension travel and articulation of the vehicle are also considered during design.
The exhaust system needs to be mounted in a way that allows for the full range of suspension movement without the exhaust pipes hitting the chassis or other components. This can involve flexible mounts or specific placement that provides adequate clearance.
Environmental factors and intended use can also influence design choices. For vehicles that might be driven off-road or in harsh conditions, manufacturers might add extra mounts or use more durable materials to ensure the exhaust system can withstand more abuse. The overall structural integrity of the car’s undercarriage is also a factor, as the mounting points need to be securely attached to a strong part of the chassis.
Engineers aim for a balance between sufficient support and avoiding unnecessary weight or complexity.
Common Mount Configurations
For a standard single exhaust system on a sedan or hatchback, you’ll commonly find three or four exhaust mounts. One or two might be near the muffler at the rear, and others positioned along the pipe towards the front, perhaps near the catalytic converter or resonator. This distribution provides good overall support.
For a larger sedan or a vehicle with a more complex single exhaust, like one with an extra resonator, you might see five or six mounts. The key is to have supports spaced out to prevent any single section from bearing too much weight.
On vehicles with dual exhaust systems, the configurations can vary widely. A common setup for a V6 or V8 engine might have two mounts for each pipe, totaling four. However, some performance cars or trucks with extensive dual exhaust systems could have three or even four mounts per side, leading to six or eight mounts in total.
These mounts are typically positioned to mirror each other on both sides of the vehicle. The goal is symmetry and even weight distribution. The placement also considers airflow and heat management, ensuring no single component is overly stressed.
Consider a sports car with a performance exhaust. It might have a main muffler and then two smaller mufflers or resonators before the tips. Each of these components would likely require at least one mount, possibly two for larger ones.
So, a system like this could easily have six to eight mounts. Even smaller cars might use a combination of hangers and U-shaped brackets for different parts of the exhaust. The specific arrangement is always tailored to the vehicle’s chassis and the exhaust system’s layout.
When Do You Need More or Fewer Mounts
Generally, you should stick to the number of mounts your car originally came with. This is the safest and most effective approach. However, there are situations where you might need to adjust.
If you’re installing an aftermarket exhaust system, especially a performance one, it might come with a different number or type of mounting points. In such cases, it’s best to follow the manufacturer’s recommendations for that specific exhaust system. They’ve designed it to work best with a certain number of supports.
If your exhaust system starts to sag or rattle, it’s a clear sign that you might have a broken or missing mount. You should replace the faulty mount immediately. Sometimes, a bent or damaged exhaust pipe might cause it to hang lower, and a new mount might not fix the problem if the pipe itself is compromised.
In such instances, you might need to repair or replace the damaged section of pipe first, and then ensure you have the correct number of mounts supporting it.
Aftermarket Exhaust Systems
When you upgrade to an aftermarket exhaust, whether for sound, performance, or looks, it’s crucial to consider its mounting requirements. Many performance exhausts are designed to be lighter and might feature a different routing than the stock system. This can mean they come with their own set of mounting brackets and hangers.
Some might even suggest using fewer mounts if the new system is designed to be more rigid or self-supporting in certain areas. Always refer to the installation instructions provided with the aftermarket exhaust kit.
If an aftermarket kit doesn’t come with specific mount recommendations, a good rule of thumb is to match the number of mounts to the original system, or slightly more if the new exhaust components are significantly heavier. For instance, if you’re switching to a full stainless steel exhaust system that’s known to be robust, you might need to ensure you have strong, well-placed mounts. Sometimes, aftermarket systems are designed to use existing factory mounting locations, making the transition simpler.
If new locations are needed, they are usually clearly marked or indicated in the instructions.
It’s also worth noting that some aftermarket exhaust systems are designed with a specific sound profile in mind. The way the exhaust is supported can subtly influence this. For example, a system designed to produce a deep rumble might benefit from slightly more rigid mounting in certain areas to allow for more resonant vibration, while one aimed at a smoother tone might use more vibration-dampening mounts.
Always follow the manufacturer’s guide for optimal results, both in terms of sound and structural integrity.
Repair and Replacement Scenarios
When a mount breaks, the immediate solution is to replace it. If you have a broken rubber hanger, you can usually buy a direct replacement that matches the original. These are widely available at auto parts stores.
When replacing a mount, it’s often a good idea to inspect the surrounding exhaust pipes and brackets for any signs of rust or damage. If a bracket on the car’s chassis is rusted, it might need repair or reinforcement before a new mount can be securely attached. This ensures the repair is lasting.
In some cases, especially with older vehicles or those exposed to harsh weather, the exhaust hangers might be integrated into a larger bracket assembly that is bolted to the car’s frame. If this entire assembly fails, you’ll need to replace the whole unit. It’s also wise to inspect other mounts while you’re under the car.
If one has failed, others might be close to failing, especially if they are all exposed to the same conditions. Replacing them proactively can save you from further trouble down the line.
A practical scenario: You notice your exhaust is dragging after hitting a pothole. You get under the car and find one of the rear rubber mounts has snapped. You can easily buy a new one.
However, before installing it, you check the exhaust pipe near where the mount attaches. You notice a small crack in the pipe itself. In this case, simply replacing the mount won’t fix the problem.
You’ll need to either repair the crack with a special exhaust patch or replace the section of pipe, and then reattach the new mount. This approach ensures a complete and durable fix.
How to Determine Your Needs
The easiest way to determine how many exhaust mounts you need is to look at your car. Underneath your vehicle, you can visually inspect the exhaust system. Trace its path from the engine back to the tailpipe.
You’ll see rubber or metal hangers connecting the exhaust pipes to the car’s frame. Count how many of these are present and intact. This will give you the factory standard for your specific make and model.
If you’re unsure, consulting your car’s owner’s manual or a reliable online parts catalog for your vehicle can provide diagrams and specifications.
Another helpful method is to check online forums or resources dedicated to your car model. Enthusiasts often share detailed information about common maintenance and repair issues, including exhaust system specifics. You can also take photos of your current exhaust setup and show them to a mechanic or a knowledgeable parts specialist.
They can quickly identify the number and type of mounts your car uses. If you’re planning an upgrade, the aftermarket exhaust manufacturer’s website or literature is the best place to find information on their specific mounting requirements.
Visual Inspection Guide
When you look under your car, start at the rear and work your way forward. You’ll see the tailpipe first. Look for rubber straps or metal arms that are holding the pipe up.
These are your exhaust mounts. Follow the exhaust pipe along its length. You’ll likely find mounts spaced at intervals to support different sections, such as the muffler, any resonators, and the pipe itself.
Note the material (rubber, metal with rubber), the shape (loop, strap, arm), and how it attaches to both the exhaust and the car’s frame. Count each one you find.
Pay attention to the condition of existing mounts. Are they cracked, torn, or stretched? If you see any damage, that mount is likely failing or has already failed.
The areas where the mounts attach to the car’s chassis should be checked for rust or corrosion. If these attachment points are weak, the new mounts won’t be held securely. You might also notice some mounts are double-ended, connecting two sections of pipe or a pipe to a bracket.
Each connection point generally signifies a mount.
For a typical sedan with a single exhaust, you might find a mount near the rear muffler, one supporting the mid-pipe, and perhaps one closer to the catalytic converter. Some systems might have a small intermediate hanger to prevent excessive flex in long pipes. If your car has a dual exhaust, you’ll see a similar arrangement mirrored on both sides.
Don’t forget to check if there are any mounts supporting heat shields, as these are also technically part of the exhaust system’s support structure.
Consulting Professionals and Resources
If you’re still uncertain after a visual inspection, don’t hesitate to ask for help. A mechanic at a local auto shop can quickly tell you how many mounts your car uses and inspect their condition. They have the experience to spot potential issues you might miss.
You can also call an auto parts store and provide them with your car’s year, make, and model. They can look up the correct exhaust mount part numbers and tell you how many are typically needed for your vehicle. This is often a very straightforward way to get accurate information.
Online resources are abundant. Websites like RockAuto, AutoZone, or Advance Auto Parts allow you to search for exhaust hangers by vehicle. These sites often show diagrams or list the number of mounts required.
You can also find dedicated automotive forums for your car’s make and model. Posting a question there with details about your car will likely get you a response from experienced owners who know the ins and outs of your specific vehicle. YouTube also has many DIY repair videos that can show you exactly what to look for.
For example, if you drive a Honda Civic from the early 2000s, a quick search for “Honda Civic exhaust mount diagram” might bring up forum posts or repair manuals detailing the exact number and location of each mount. Similarly, searching for “Ford F-150 exhaust hanger
Installing and Replacing Exhaust Mounts
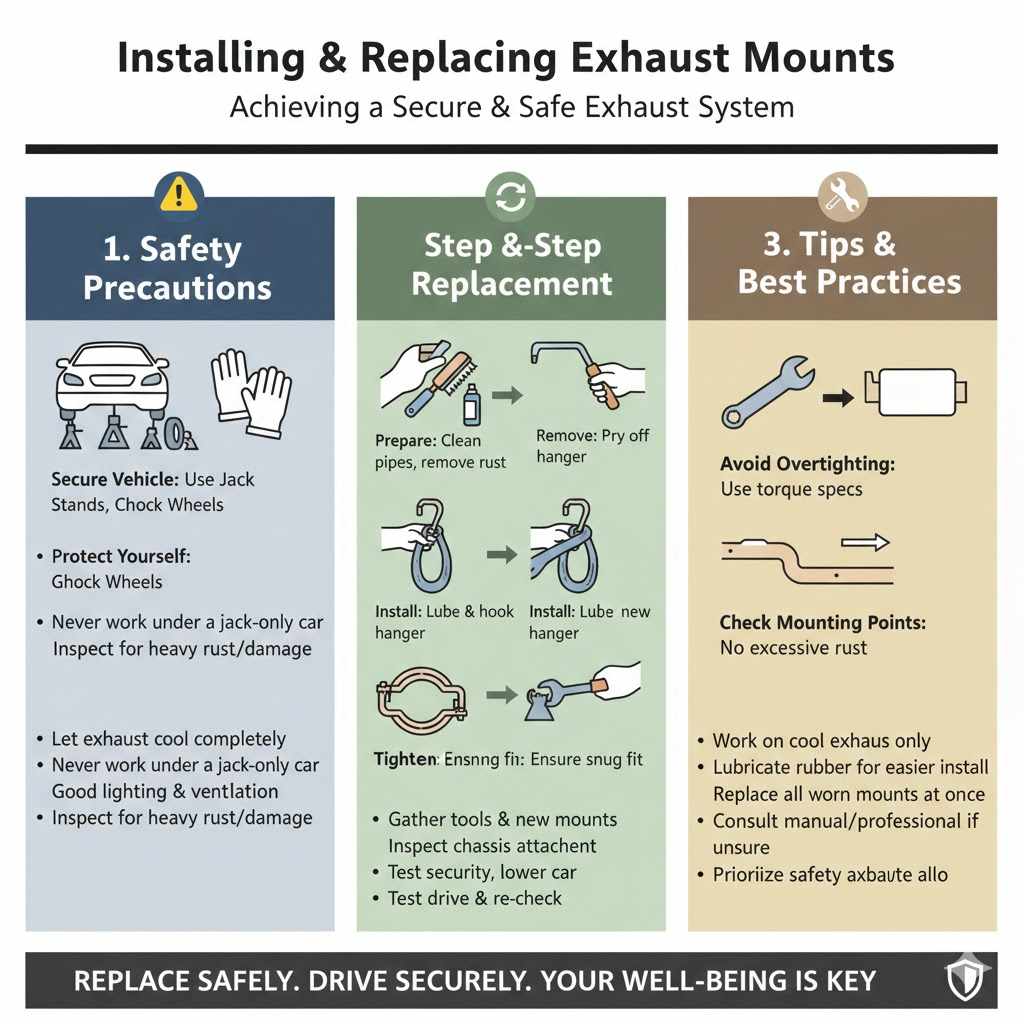
Replacing exhaust mounts is usually a straightforward DIY job, but it’s essential to do it safely. Always ensure your car is securely supported on jack stands on a level surface. Never work under a car supported only by a jack.
You’ll typically need a few basic tools, like a pry bar, pliers, and sometimes a socket set if you’re removing a bracket. If you’re replacing a broken rubber hanger, you can often just unhook the old one and hook on the new one.
If a bracket is rusted or corroded, you might need to clean it up with a wire brush or even replace the entire bracket assembly. When installing new mounts, make sure they are firmly seated. For aftermarket systems, always follow the specific installation instructions.
If you’re unsure about any step, it’s better to consult a professional than risk damaging your exhaust system or your car. Safety is paramount, so take your time and double-check everything.
Safety Precautions
Working on a car’s exhaust system means dealing with potentially hot components. Always let the exhaust system cool down completely before you start working on it. This can take several hours after the car has been driven.
Use sturdy jack stands to support the vehicle; never rely on a jack alone. Place wheel chocks behind the rear wheels to prevent the car from rolling. Wear safety glasses to protect your eyes from debris, and gloves to protect your hands from sharp edges and dirt.
Ensure you have good lighting so you can clearly see what you’re doing. If you’re working in a confined space, make sure there’s adequate ventilation. If any bolts or nuts are seized due to rust, use a penetrating lubricant and allow it to soak in.
Be patient and don’t force things, as you could strip a bolt or damage a component. If at any point you feel uncomfortable or unsure about a step, it’s best to stop and seek professional help.
A crucial safety tip is to inspect the condition of the exhaust system itself before replacing mounts. If the pipes are heavily rusted, crumbling, or have large holes, simply replacing the mounts might be a temporary fix. The integrity of the exhaust pipes is vital for safety and performance.
Ensure all attachment points on the chassis are sound and not excessively rusted, as a failing chassis point can lead to the entire exhaust system detaching.
Step-by-Step Replacement Process
First, gather your new exhaust mounts and tools. Ensure the exhaust system is cool. Safely lift and support your vehicle with jack stands.
Locate the damaged or missing exhaust mount. If it’s a rubber hanger, unhook the old one from the exhaust pipe and the chassis bracket. Clean the hooks or attachment points if necessary.
Install the new rubber hanger, connecting it first to the chassis bracket and then stretching it to hook onto the exhaust pipe bracket. Sometimes, a bit of lubricant can help the rubber stretch.
If you need to
After installing the new mount, gently tug on the exhaust pipe to ensure it feels securely held. Lower the vehicle safely off the jack stands. Take a short test drive to listen for any unusual noises or rattles.
Check under the car again after the drive to make sure everything is still in place. If you’re replacing multiple mounts, work methodically, one at a time, to keep the exhaust system supported and prevent it from falling or causing further damage.
Conclusion
Frequently Asked Questions
Question: How many exhaust mounts do most cars have
Answer: Most cars have between two and four exhaust mounts for a single exhaust system. Dual exhaust systems usually require twice as many.
Question: Can I use fewer exhaust mounts than my car came with
Answer: It is generally not recommended to use fewer exhaust mounts than your car originally had, as this can lead to sagging and stress on the system.
Question: What happens if an exhaust mount breaks
Answer: A broken exhaust mount can cause the exhaust pipe to sag, rattle, hang too low, or even detach, leading to noise and potential damage.
Question: Are exhaust mounts universal
Answer: While some basic rubber hangers might fit multiple vehicles, specific mounting brackets and designs are often unique to a car model.
Question: How often should exhaust mounts be checked
Answer: It’s a good idea to check your exhaust mounts periodically, perhaps during oil changes or tire rotations, especially if you notice any new noises.
Summary
Determining how many exhaust mounts your car needs is straightforward. It’s best to stick to the factory number provided by the manufacturer. Your car’s design dictates the precise support required for its exhaust system.
Always inspect your current mounts and replace them if they are damaged. When installing aftermarket systems, follow their specific instructions. Properly mounted exhausts ensure a quiet ride and prevent damage.