
How Long Does It Take to Weld Exhaust Tips
Many car owners wonder How Long Does It Take to Weld On Exhaust Tips? It can seem a little tricky, especially if you’re new to car work. You might worry about getting it right or how much time you’ll actually spend. Don’t stress!
We’ll break it all down simply. You’ll see it’s totally doable. Let’s get your exhaust looking sharp.
Estimating Time To Weld Exhaust Tips
Figuring out how long it takes to weld on exhaust tips depends on a few things. The main factor is your skill level. If you’ve welded before, it will be faster.
If this is your first time, it will take longer. We will look at what goes into the job so you can have a good idea of the time involved. You’ll learn about the steps and what makes the process quicker or slower.
Experience Level Impact
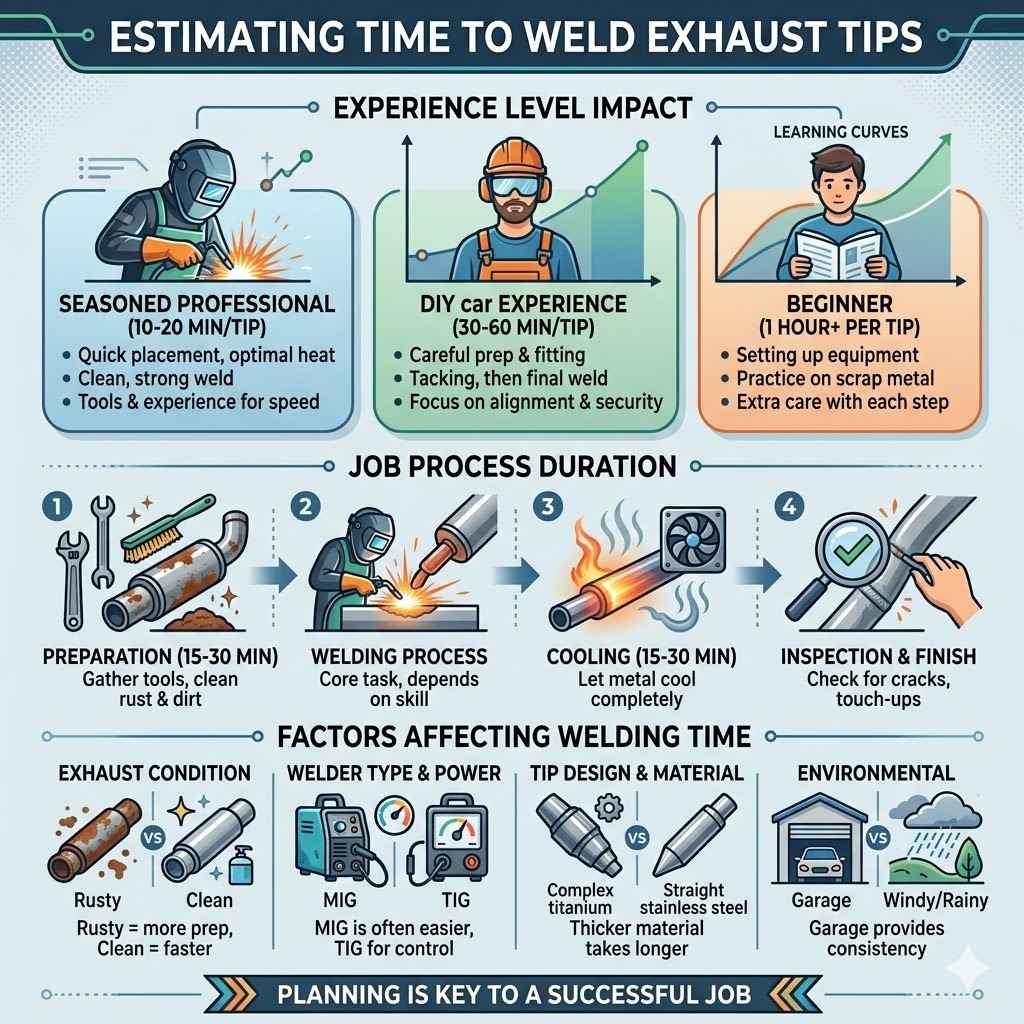
A seasoned professional welder can attach exhaust tips very quickly. They know exactly where to place the tip, how much heat to use, and how to make a clean, strong weld. For them, the actual welding part might only take 10-20 minutes per tip.
They have the tools and experience to make it look easy. This speed comes from years of practice.
For someone with some DIY car experience but limited welding skills, it will take more time. You might spend 30-60 minutes per tip. This includes careful preparation, fitting, tacking, and then the final weld.
It’s important to take your time to ensure the tips are straight and the welds are secure. Safety is also a big part of the time commitment for beginners.
Beginners will find this task takes the longest. Expect to spend at least an hour or more per tip. This is because you are learning as you go.
You’ll need to set up your welding equipment, practice on scrap metal, and be extra careful with each step. Getting the angle and fit just right can be challenging. The focus for beginners should be on learning and doing it safely and correctly, not speed.
Preparation Time
Before you even pick up a welder, you need to prepare. This means gathering your tools and materials. You’ll need the exhaust tips, a welder, safety gear, and possibly some cleaning supplies.
Cleaning the exhaust pipe where you’ll be welding is super important. Rust and dirt can mess up your weld. This prep work can add 15-30 minutes to the overall job, regardless of skill level.
Proper cleaning makes for a much better weld.
Welding Process Duration
The actual welding time is the core of the job. For experienced welders, this is fast. For beginners, it’s where most of the time is spent.
You’ll be laying down beads of molten metal to fuse the tip to the pipe. This takes patience and a steady hand. Rushing can lead to weak welds or unsightly marks.
Cooling and Inspection
After welding, the metal is very hot. You need to let it cool down. This can take another 15-30 minutes.
Once cool, you’ll inspect your work. Check for any cracks or gaps. You might need to do some grinding or touch-up welding.
This inspection step is vital for a good finish and can add a little extra time.
Factors Affecting Welding Time
Several factors influence how long welding exhaust tips takes. It’s not just about how fast you can weld. The type of metal, the condition of your equipment, and even the weather can play a role.
Understanding these variables helps set realistic expectations for your project. We’ll explore these in more detail.
Exhaust System Condition
If your current exhaust system is rusty or damaged, it will take longer. You might need to clean a lot of rust off the pipe before you can weld. Sometimes, you might even need to cut out a bad section and
On the other hand, if the exhaust pipe is in good shape, it’s much easier. You’ll just need a quick clean to remove grime and soot. This speeds up the prep work considerably.
A shiny, uncorroded pipe allows the welder to focus on the actual joining process without dealing with extra cleaning challenges.
Welder Type and Power
The type of welder you use matters. A MIG welder is often easier for beginners and can be quite fast. A TIG welder offers more control and a cleaner finish but has a steeper learning curve.
Stick welders can also be used but might be trickier for exhaust work. The power output of your welder also affects how quickly you can lay down a good bead.
A more powerful welder can fuse metal faster, reducing welding time. However, too much power can burn through thin exhaust pipes. Finding the right setting is key.
For DIY exhaust tip welding, a 110V or 130V MIG welder is usually sufficient for most common exhaust materials like mild steel or stainless steel.
Tip Design and Material
Some exhaust tips are designed for easier welding than others. Bolt-on tips or those with a simple, straight mounting flange are quicker. Tips with complex shapes or those made from harder materials like titanium might take longer.
The thickness of the tip’s mounting tube also affects how long it takes to weld.
Thicker materials require more weld to penetrate and secure. Stainless steel is popular for its durability and resistance to rust, but it can be a bit trickier to weld than regular steel. It requires specific settings and techniques to prevent contamination and ensure a strong bond.
Always check the material of your tips and exhaust pipe.
Environmental Factors
Working outside can be tough. Wind can blow away shielding gas needed for some welders, leading to poor welds. Rain or extreme temperatures also make the job more difficult and potentially unsafe.
It’s best to weld in a dry, well-ventilated area, like a garage. This ensures a better weld and a more comfortable working experience.
A controlled environment allows for consistent welding temperatures and prevents external elements from interfering with the weld pool. This leads to a stronger, more reliable connection between the exhaust tip and the pipe. It also makes it easier to focus on the intricate task of welding without distractions.
Step-By-Step Welding Process
Let’s walk through the steps involved in welding exhaust tips. This gives you a clear picture of what happens and where your time will be spent. Each step is important for a safe and strong result.
We’ll make it easy to follow so you know what to expect.
Preparation and Fitting
First, you need to get your car ready. Make sure it’s on a level surface. Use jack stands for safety.
You’ll need to position the exhaust tips where you want them. Many people like them to stick out a bit past the bumper. Use a tape measure to make sure they are even on both sides.
Once the tips are in the right spot, you need to secure them temporarily. You can use C-clamps or even some strong tape to hold them in place. This is crucial because if they move while you’re welding, your finished look will be off.
Take your time here to get them perfectly aligned. This preparation phase is critical for a good outcome.
Cleaning the Surfaces
Clean the outside of the exhaust pipe where the tip will attach. Use a wire brush or sandpaper to remove any rust, dirt, or old coating. Also, clean the inside of the exhaust tip.
A clean surface is essential for a strong weld. Grime can make your weld weak or porous.
For stubborn rust or heavy carbon buildup, you might need to use a rust remover or degreaser. This ensures that no contaminants interfere with the molten metal. A smooth, bare metal surface is the ideal canvas for welding.
This step usually takes about 10-20 minutes depending on the condition of the exhaust.
Temporary Tack Welds
With the tips perfectly positioned and the surfaces clean, you’ll make small, temporary welds called tack welds. These are just tiny dots of weld that hold the tip in place. They are not meant to be the final, strong weld.
They just keep everything from shifting before you do the real welding.
Make 2-3 tack welds around the circumference of the tip. These tack welds should be strong enough to hold the tip firmly, but they can be easily ground down or welded over later. This allows you to check the alignment one last time before committing to the full weld.
It’s a critical step for ensuring symmetry.
The Welding Procedure
Now it’s time for the main welding. You’ll be creating a continuous bead of metal that joins the tip to the exhaust pipe. This requires a steady hand and the correct settings on your welder.
If you’re new to this, practicing on scrap metal first is a great idea.
Making the Continuous Weld
Start welding where you left off with your tack welds. Move the welder in a steady motion around the tip. Try to keep the weld bead consistent in width and height.
Overlap your welds slightly to create a strong, continuous seal. Don’t rush this process. Take your time to get it right.
The goal is to create a strong, leak-proof bond. If you’re using a MIG welder, use a slight push or drag technique depending on the manufacturer’s recommendation for exhaust work. For TIG, a consistent weave motion is often best.
The amount of time this takes will vary greatly based on your skill and equipment.
Finishing Touches
Once the main weld is done, you’ll inspect it. If there are any rough spots or imperfections, you can use a grinder to smooth them out. Some people like to add a final bead for extra strength or a cleaner look.
Be careful not to grind away too much metal. You want to maintain the integrity of the weld.
After grinding, you might want to clean the area again with a degreaser. This removes any grinding dust. If you’re planning to paint or coat the exhaust for protection or looks, now is the time to prepare for that.
This final smoothing and cleaning can add another 15-30 minutes.
Cooling and Final Inspection
After all the welding is complete, the metal will be extremely hot. It’s important to let it cool down naturally. Rushing this can cause stress on the welds or even warp the metal.
Once it’s cool to the touch, you can give it a final check.
Allowing for Cooling
The exhaust system, especially the welded area, can stay hot for a good while. Typically, you’ll want to wait at least 20-30 minutes for it to cool down. This allows the metal to contract slowly, which helps prevent cracking.
Avoid spraying water on it to cool it down quickly, as this can cause thermal shock and damage the weld.
The rate of cooling also depends on the ambient temperature and how thick the metal is. On a hot day, it might take longer. On a cooler day, it will cool down faster.
Patience is key here. Waiting ensures the weld is as strong as possible.
Checking for Leaks and Fit
Once cool, start the car and listen carefully to the exhaust. You shouldn’t hear any hissing or puffing sounds around the new tips, which would indicate a leak. You can also use a soapy water solution applied to the weld seam; if bubbles form, there’s a leak.
Visually inspect the welds. They should look smooth and consistent, not jagged or full of holes. Ensure the tips are still perfectly aligned and haven’t shifted during the welding and cooling process.
If you find any issues, it’s better to address them now rather than later.
Total Time Estimates and Tips
So, how long does it really take? We’ve broken down the steps. Now let’s put it all together with some realistic time estimates and advice to help you out.
Knowing what to expect makes the job much easier.
Realistic Time Scenarios
Here’s a breakdown of likely time commitments:
- Experienced Welder: 1-2 hours total. This includes prep, welding both tips, and cooling. The actual welding is quick.
- DIYer with Some Welding Experience: 3-5 hours total. This allows for more careful prep, slower welding, and potential learning curve adjustments.
- Beginner Welder: 5-8 hours or more. This accounts for significant time learning, practicing, and being extra cautious with each step. It’s better to take too long than rush and do it wrong.
First-Time DIYer Example
Imagine it’s your first time welding exhaust tips. You’ll spend maybe 30 minutes gathering tools and safety gear. Cleaning the pipe and tips takes another 20 minutes.
Setting up your welder and doing a few practice welds on scrap metal might take an hour. Positioning and tack welding both tips could take 45 minutes. The actual welding of both tips, going slowly, might take 2 hours.
Then you need to let it cool for 30 minutes. Finally, inspecting and doing minor touch-ups could add another 30 minutes. That’s a total of around 5 hours and 35 minutes.
Experienced DIYer Example
An experienced DIYer who has welded before would be faster. They might spend 15 minutes on prep. Cleaning is quicker, maybe 10 minutes.
They skip the extensive practice and go straight to positioning and tack welding, taking 30 minutes. The welding itself, done confidently on both tips, could take 45 minutes. Cooling takes 20 minutes.
Final checks are quick, maybe 15 minutes. This brings the total to about 2 hours and 15 minutes.
Tips for a Faster and Better Weld
To make the process smoother and quicker, always prioritize safety. Wear your welding helmet, gloves, and fire-resistant clothing. Make sure you have good ventilation.
A clean workspace helps prevent accidents and ensures better results.
Good lighting is also very important. You need to see exactly what you are doing. If working under a car, use bright work lights.
Investing in decent quality exhaust tips will also make the job easier, as they often have a better fit. Using the right welding gas for your welder, like Argon for MIG, also makes a big difference in weld quality.
Proper Tool Selection
Having the right tools makes a huge difference. Use a good quality wire brush or a flap disc on an angle grinder for cleaning. For positioning, C-clamps or magnetic holders are very useful.
For welding, ensure your welder is set to the correct amperage and voltage for the thickness of the exhaust pipe and tips you are working with. Using a spool gun for MIG welding can offer more control when working in tight spaces.
The correct nozzle for your MIG welder can also help direct the gas and protect the weld pool. For TIG welding, having the right tungsten electrode and filler rod makes the process smoother. Always double-check that your welding leads are in good condition and securely connected to avoid power loss or intermittent welding.
Practicing Your Technique
If you’re a beginner, don’t skip practice. Weld on some scrap pieces of metal that are similar in thickness to your exhaust. This helps you get a feel for how the welder behaves and how to create a consistent bead.
Practice laying down short tack welds and then longer, continuous beads. Try different speeds and angles. This practice will save you time and frustration during the actual installation.
You can also practice on an old, discarded exhaust pipe if you have access to one. This simulates the actual environment you’ll be working in, including the challenge of welding in awkward positions. Focus on achieving good penetration without burning through the metal.
Watching online welding tutorials specific to exhaust systems can also provide valuable insights.
How Long Does It Take to Weld On Exhaust Tips?
The question How Long Does It Take to Weld On Exhaust Tips? doesn’t have one simple answer. It’s a project that can range from a couple of hours for an expert to a full day for a beginner. The key is preparation and taking your time.
You need to clean well, position perfectly, and weld carefully. Don’t forget safety at every step.
By understanding the steps and the factors that influence time, you can plan your project better. Whether you’re doing it yourself or hiring a professional, knowing the process helps. The reward is a great-looking exhaust system that adds to your car’s appeal.
Common Challenges and Solutions
One common challenge is getting the tips perfectly aligned. If they are crooked, it will look bad. The solution is to take your time with the initial fitting and tack welding.
Use measuring tape and level tools to ensure symmetry. Another issue is burning through the exhaust pipe, especially if it’s old or thin. Use lower heat settings and stitch welding techniques instead of one long continuous bead.
If your welder isn’t performing well, it could be due to low gas pressure, dirty contact tips, or incorrect wire feed speed. Double-checking these settings and cleaning your equipment can resolve many welding problems. Poor welds can often be fixed by grinding down the bad weld and re-welding over the area.
Patience is truly a virtue when welding.
Professional Installation Time
If you decide to have a professional install your exhaust tips, the time it takes is much shorter. A muffler shop or custom exhaust shop typically has experienced welders. They can usually complete the job in 1 to 2 hours.
This includes fitting, welding, and inspection. Their efficiency comes from specialized tools and extensive practice.
The cost will be higher than a DIY job, but you gain the assurance of a professional, high-quality installation. They also have the proper equipment to lift and support your vehicle safely. This is a good option if you’re not comfortable with welding or working under your car.

Frequently Asked Questions
Question: Can I weld exhaust tips without a welder
Answer: No, welding exhaust tips requires a welding machine to fuse the metal together. There are clamp-on exhaust tips available that do not require welding, but a welded installation is generally more permanent and secure.
Question: What is the best type of welder for exhaust tips
Answer: A MIG welder is often recommended for exhaust tips because it is relatively easy to use, provides good control, and creates strong welds. TIG welding can also be used for a cleaner finish, but it requires more skill.
Question: How do I know if my welds are strong enough
Answer: Visually inspect your welds for consistency and continuity. There should be no gaps or holes. A strong weld will have good penetration into both the tip and the exhaust pipe.
You can also tap the weld lightly with a hammer to check for any signs of weakness.
Question: Do exhaust tips need to be welded with special gas
Answer: For MIG welding, a shielding gas like 75% Argon and 25% CO2 is commonly used for steel exhaust systems. Stainless steel may require a different gas mixture. The gas protects the weld pool from atmospheric contamination.
Question: What if I don’t have a garage to weld in
Answer: Welding outdoors is possible, but it’s best to do it on a calm day with no wind to protect the shielding gas. Ensure you have good lighting and a safe, level area away from flammable materials. Wearing appropriate safety gear is even more critical in an uncontrolled environment.
Summary
In summary, welding exhaust tips takes varied time. An expert can do it in an hour or two. A beginner might need five to eight hours or more.
Preparation, skill, and conditions all play a role. Taking your time, focusing on safety, and practicing will lead to great results. Enjoy your newly enhanced exhaust!