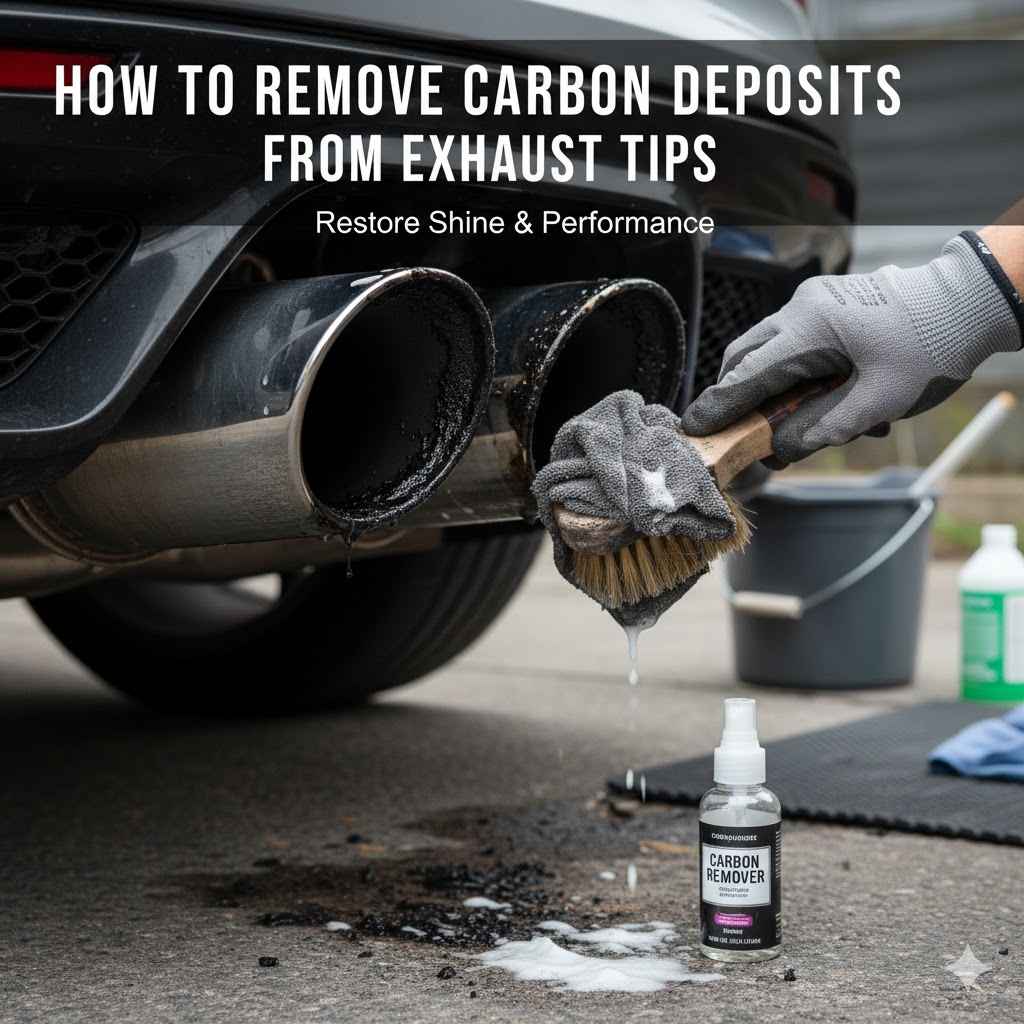
How to Remove Carbon Deposits From Exhaust Tips
Cleaning your car’s exhaust tips can seem a little tricky at first, especially when you see that black gunk built up. It’s a common sight for many car owners, but don’t worry! This guide will show you exactly how to remove carbon deposits from exhaust tips.
We’ll walk through it step-by-step so you can make them look shiny and new again without any fuss. Get ready to see your exhaust tips sparkle!
Easy Ways to Remove Carbon Deposits From Exhaust Tips
Carbon buildup on exhaust tips is a normal thing for most vehicles. It happens because of the exhaust gases that come out of your engine. These gases contain unburned fuel and soot, which stick to the hot metal of your exhaust pipes.
Over time, this creates a dark, often tough-to-clean layer. For beginners, dealing with this stubborn grime can be a bit confusing, leaving them unsure of where to start. But with the right methods and a little effort, you can restore your exhaust tips to their former glory.
This section will cover the most effective and straightforward cleaning techniques.
Understanding Carbon Deposits
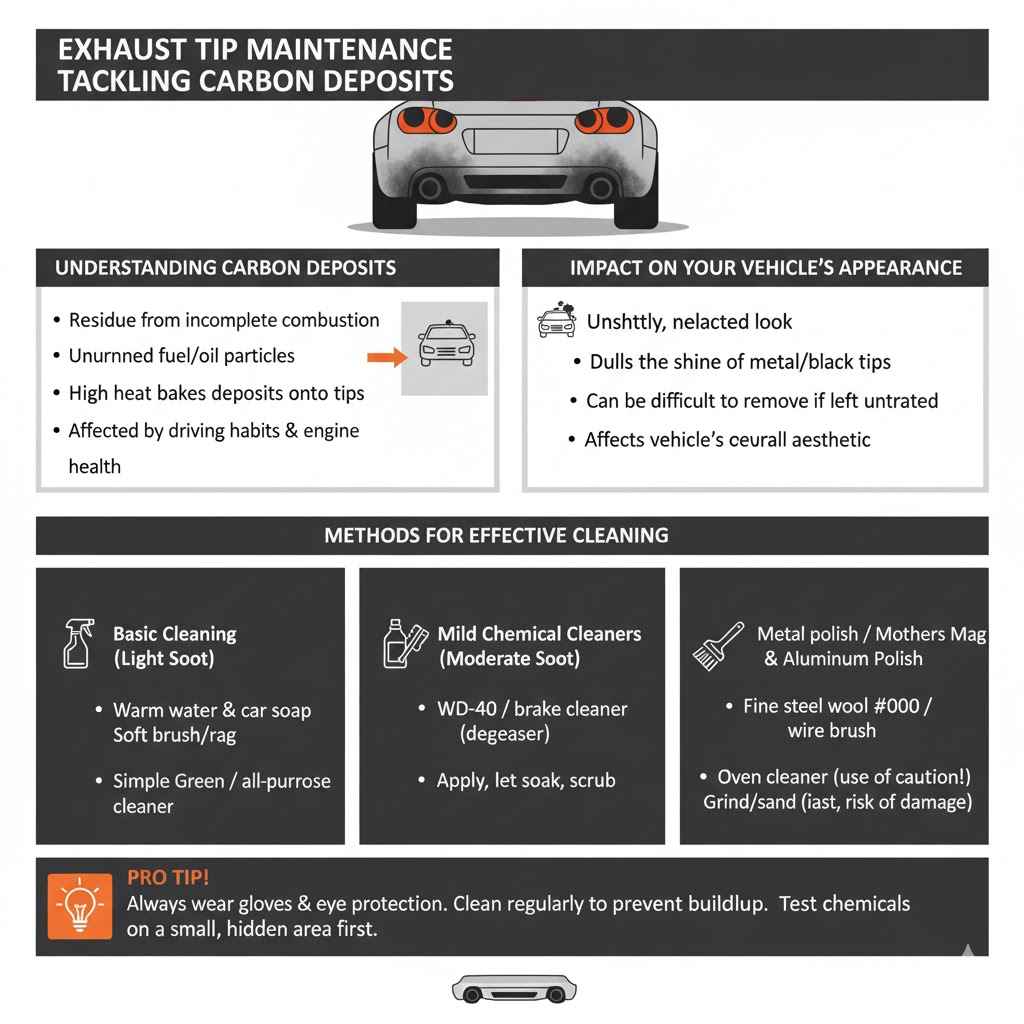
Carbon deposits, often called exhaust soot or carbon fouling, are a residue left behind by the combustion process in your car’s engine. When fuel burns, not all of it burns completely. Some unburned hydrocarbons and oil droplets can escape the combustion chamber.
These particles, along with other byproducts of burning fuel, are expelled through the exhaust system.
As the hot exhaust gases exit the tailpipe, these particles cool and stick to the inner and outer surfaces of the exhaust tips. The high temperatures involved in exhaust can bake these deposits on, making them quite hard to remove. Factors like driving habits (short trips vs.
long highway drives), fuel quality, and the overall health of your engine can influence how quickly and severely carbon deposits form.
For many car owners, the appearance of heavily fouled exhaust tips detracts from the overall look of their vehicle. It can make even a clean car appear neglected. Learning to tackle this issue is not just about aesthetics; it’s about maintaining your car’s appearance.
What Causes Carbon Deposits?
Several things contribute to carbon deposits on exhaust tips:
- Incomplete Combustion: Sometimes, the air-fuel mixture in your engine isn’t perfect. This means not all the fuel burns up cleanly. The leftover fuel particles can turn into soot and stick to your exhaust tips. Think of it like a campfire where some wood just smolders instead of burning bright. This unburned fuel is a key ingredient in that black gunk.
- Oil Consumption: If your engine uses a little oil, some of that oil can get into the combustion chamber. When oil burns, it creates thicker, stickier carbon deposits than just fuel soot. This is why engines that burn oil tend to have more stubborn buildup on their exhaust tips. It adds another layer of difficulty to cleaning.
- Short Trips: When you only drive your car for short distances, the exhaust system doesn’t get hot enough for long enough. This means the deposits don’t get burned off naturally. They just keep accumulating. This is why city drivers often see more buildup than those who take long road trips.
- Fuel Quality: The quality of the gasoline you use can also play a role. Lower quality fuels might contain more impurities that can contribute to carbon formation. Higher octane fuels sometimes burn cleaner, but this isn’t always the case. It really depends on the specific additives in the fuel.
Impact on Vehicle Appearance
The most obvious impact of carbon deposits is on your car’s appearance. Exhaust tips that are coated in black soot look dull and dirty, even if the rest of the car is spotless. This can make your vehicle look older or less well-maintained than it actually is.
For car enthusiasts, this is often a big concern, as they want their cars to look their best.
Imagine a shiny sports car with dull, black exhaust pipes. It just doesn’t have the same visual appeal. Regular cleaning of exhaust tips is a simple but effective way to boost the overall aesthetic of your vehicle.
It shows attention to detail and pride in ownership. Many car washes offer detailing services that include exhaust tip cleaning, but doing it yourself can save money and give you a great sense of accomplishment.
Gathering Your Cleaning Supplies
Before you start cleaning, it’s important to have all your supplies ready. This will make the process smoother and more efficient. Having the right tools and cleaning agents ensures you can tackle the carbon deposits effectively without damaging your exhaust tips.
Think of it like preparing ingredients before you cook; it makes everything easier.
You won’t need a lot of fancy equipment, just some common household items and a few automotive-specific products. Gathering these items beforehand means you can get straight to work once you’re ready. This preparation step is key to a successful cleaning session, preventing interruptions and frustration.
Essential Cleaning Agents
Here are the key cleaning agents you’ll likely need:
- All-Purpose Cleaner (APC) or Degreaser: A good APC is designed to break down grease, oil, and grime. Many are safe for automotive use and can effectively loosen carbon deposits. Look for one specifically formulated for car exteriors or engines. Some are spray-on, while others need to be diluted with water.
- Metal Polish: Once the carbon is removed, a metal polish will restore the shine and luster to your exhaust tips, especially if they are chrome or stainless steel. These polishes contain mild abrasives that buff out minor scratches and bring back that mirror-like finish. Make sure the polish is appropriate for the type of metal your exhaust tips are made of.
- Car Wash Soap: For general cleaning and rinsing, a pH-neutral car wash soap is essential. It helps remove loose dirt and grime before you tackle the tougher carbon spots. Using the right soap prevents stripping waxes or sealants from other parts of your car.
- Water: Plenty of clean water is needed for rinsing away cleaning solutions and loosened dirt. A hose with a spray nozzle is ideal.
Helpful Tools and Accessories
These tools will make the cleaning process much easier:
- Microfiber Towels: You’ll need several clean microfiber towels. They are soft, absorbent, and won’t scratch surfaces. Use some for applying cleaners, others for scrubbing, and a final set for drying and buffing.
- Gloves: Protect your hands from chemicals and dirt by wearing rubber or nitrile gloves.
- Brushes: A stiff-bristled brush (like a tire brush) or an old toothbrush can be very useful for scrubbing stubborn carbon deposits. For more delicate tips, a softer nylon brush might be better to avoid scratches.
- Bucket(s): One bucket for your cleaning solution and another for rinsing your brushes or mitts is a good practice. This prevents spreading dirt back onto the surface you’re cleaning.
- Safety Glasses: It’s always a good idea to wear safety glasses, especially when working with cleaning chemicals, to protect your eyes from splashes.
Step-by-Step Cleaning Process
Now that you have your supplies, let’s get started with the actual cleaning. We will go through each step carefully to ensure you achieve the best results. This process is designed to be simple and effective for anyone wanting to clean their exhaust tips.
Follow these steps to make your exhaust tips look like new again. The goal is to remove that stubborn black soot without causing any damage to the metal.
Step 1 Cool Down the Exhaust
This is the most important first step. Never attempt to clean hot exhaust tips. The heat can cause cleaning solutions to evaporate too quickly, leaving streaks or even damaging the metal finish.
Plus, you could burn yourself badly. Wait until the exhaust system is completely cool to the touch. This usually takes at least an hour after the car has been turned off, but longer is always safer, especially on a hot day.
Step 2 Initial Rinse and Wash
Start by rinsing the exhaust tips with plain water. This will wash away any loose dirt, dust, or debris that’s just sitting on the surface. Then, use your car wash soap and a bucket of water to give the tips a gentle wash.
This step helps to clean off the surface layer of grime, making it easier to tackle the tougher carbon buildup underneath. Use a soft cloth or sponge for this initial wash.
Step 3 Applying the Cleaner
Once the tips are clean of surface dirt, it’s time to use your all-purpose cleaner or degreaser. Spray a generous amount of the cleaner directly onto the carbon deposits. Make sure to cover all the affected areas.
Let the cleaner sit for a few minutes, as instructed on the product label. This gives the chemicals time to work on breaking down the hardened carbon. Don’t let the cleaner dry on the surface; if it starts to dry, lightly mist it with water.
Step 4 Scrubbing the Deposits
Now, use your brush to scrub the carbon deposits. Start with a stiff-bristled brush if the buildup is thick. Work in a circular motion or back and forth, applying moderate pressure.
For more delicate or polished tips, a softer nylon brush might be a better choice to prevent scratching. You may need to reapply cleaner and scrub multiple times on particularly stubborn areas. The goal is to lift and loosen the carbon without scratching the metal.
Here’s a scenario: Imagine your exhaust tips look like they’ve been dipped in charcoal. You spray on your APC, and you can see the cleaner starting to lift the edges of the black stuff. You take your tire brush and scrub.
At first, it feels like you’re not doing much, but with persistent scrubbing and maybe another spray of cleaner, the black starts to turn into a muddy residue that washes away. You can see the bare metal underneath peeking through.
Step 5 Rinse Thoroughly
After scrubbing, rinse the exhaust tips thoroughly with clean water. Make sure all the cleaner residue and loosened carbon are washed away. Any leftover cleaner can cause streaks or dull the finish.
You might need to rinse several times to ensure everything is completely gone. Pay attention to any nooks or crannies where dirt might be hiding.
Step 6 Repeat if Necessary
For very heavy carbon buildup, you might find that one cleaning session isn’t enough. If you still see significant black residue, don’t hesitate to repeat steps 3 through 5. It’s better to do a couple of cleaning cycles than to scrub too aggressively and risk damaging the metal.
Patience is key here. You’re aiming for a clean, bare metal surface.
Step 7 Dry and Polish
Once you’re satisfied with the removal of carbon deposits, it’s time to dry the exhaust tips. Use a clean, dry microfiber towel to wipe them down completely. Moisture left on the surface can lead to water spots.
After drying, apply a metal polish with a clean microfiber cloth. Rub the polish in using a circular motion until you achieve a high shine. Buff off any excess polish with another clean, dry microfiber towel.
A common mistake is to stop after the carbon is gone. However, polishing is what really makes the exhaust tips pop. It brings back that reflective, almost mirror-like quality that makes them look brand new.
The combination of a clean surface and a good polish is what creates that showroom finish.
Advanced Cleaning Methods for Tough Buildup
Sometimes, standard cleaning methods aren’t enough to tackle extremely stubborn carbon deposits. For these situations, there are a few more advanced techniques you can try. These methods involve stronger solutions or different tools that can break down even the most baked-on grime.
Always use these with caution and follow instructions carefully to avoid damaging your exhaust tips.
These advanced techniques are for those times when regular scrubbing just isn’t cutting it. They might require a bit more elbow grease or specialized products, but they can be very effective. Remember, safety and patience are your best allies.
Using Steel Wool (with caution)
For very tough, baked-on carbon, fine-grade steel wool (like #0000 grade) can be effective. However, this should be used with extreme caution, especially on chrome-plated or painted exhaust tips, as it can scratch the surface. It’s best suited for raw stainless steel tips where scratching is less of a concern.
Always work in one direction and apply gentle pressure.
How it works: Steel wool acts as a very fine abrasive. When rubbed against the carbon deposits, the tiny steel fibers can physically scrape away the hardened soot. Because it’s made of steel, it’s harder than the carbon, allowing it to lift the grime.
However, steel is also harder than the underlying metal finish, which is why caution is needed.
When to use: This method is a last resort for very old, thick, and hardened carbon that other methods won’t touch. It’s not for light dusting or regular maintenance. If your tips are chrome, avoid steel wool altogether, or you’ll end up with a scratched, dulled finish that’s worse than the carbon.
Important Tip: Always wet the area with a lubricant (like soapy water or a dedicated metal cleaner) before using steel wool. This helps the steel wool glide more easily and reduces the risk of scratching. After using steel wool, you will absolutely need to polish the tips to restore shine and remove any micro-scratches.
Specialized Carbon Removers
The automotive aftermarket offers specialized cleaners designed specifically for carbon deposits on exhaust systems. These products often contain stronger chemicals that can dissolve or break down carbon more effectively than general-purpose cleaners. They might come in spray or gel forms.
How they work: These removers often use solvents or mild acids that are formulated to target carbonized hydrocarbons. They work by breaking the chemical bonds that hold the carbon particles together and to the metal surface. Some might also contain emulsifiers to help lift and suspend the loosened carbon in the cleaning solution.
How to use: Always follow the manufacturer’s instructions precisely. Typically, you’ll spray the product on, let it dwell for a specified time (without letting it dry), and then scrub and rinse. Some might require a follow-up with a neutralizer or a sealant.
Example Scenario: You’ve tried APC and scrubbing for an hour, but a black film remains on your exhaust tips. You decide to try a product like “Exhaust Carbon Remover X.” You spray it on, and within minutes, you see the black layer start to bubble and loosen significantly. After a gentle scrub with a nylon brush and a thorough rinse, the carbon is gone, revealing shiny metal.
Using a Power Washer (with care)
A pressure washer can be a powerful tool for removing stubborn dirt and grime, including carbon deposits. However, it’s crucial to use the correct nozzle and pressure setting. Too much pressure or the wrong nozzle can damage your exhaust tips, especially if they are painted or have a delicate finish.
How it works: The high-pressure stream of water forcefully dislodges and blasts away the loosened carbon particles. When combined with a suitable cleaning agent applied beforehand, it can be very effective. The concentrated spray can reach into crevices and remove tough grime.
When to use: This is best for durable exhaust tips that can withstand some pressure, like stainless steel. Avoid using it on chrome that might be peeling or on painted tips. Always start with the lowest pressure setting and a wider fan nozzle, holding the wand at a safe distance.
Safety Note: Never direct the high-pressure stream directly at seals, sensors, or painted body panels of your vehicle. Keep a safe distance of at least 12-18 inches from the exhaust tips themselves.
Maintaining Clean Exhaust Tips
Once you’ve successfully removed the carbon deposits, you’ll want to keep your exhaust tips looking clean for as long as possible. Regular maintenance is much easier than dealing with heavy buildup. A little effort now and then can save you a lot of scrubbing later.
It’s all about consistency and using the right preventative measures.
Keeping your exhaust tips clean isn’t just about looks; it can also help prevent further corrosion or damage to the metal. A clean surface is less likely to hold onto new dirt and grime. Here are some simple tips to help you maintain that shiny look.
Regular Washing
The simplest way to prevent heavy carbon buildup is to wash your car regularly. Include your exhaust tips in your routine car washes. A quick spray and wipe down with car wash soap and water whenever you wash the rest of your vehicle can remove new deposits before they have a chance to harden.
This takes just a few extra minutes but makes a big difference.
Frequency: Aim to wash your car at least once every two weeks, or more often if you drive in harsh conditions (e.g., rain, snow, dusty roads). When you wash, make sure to give the exhaust tips a good scrub with your wash mitt or a dedicated brush.
Technique: Use your regular car wash soap and a bucket of water. A soft brush or a microfiber cloth is usually enough for new deposits. Rinse thoroughly and dry to prevent water spots.
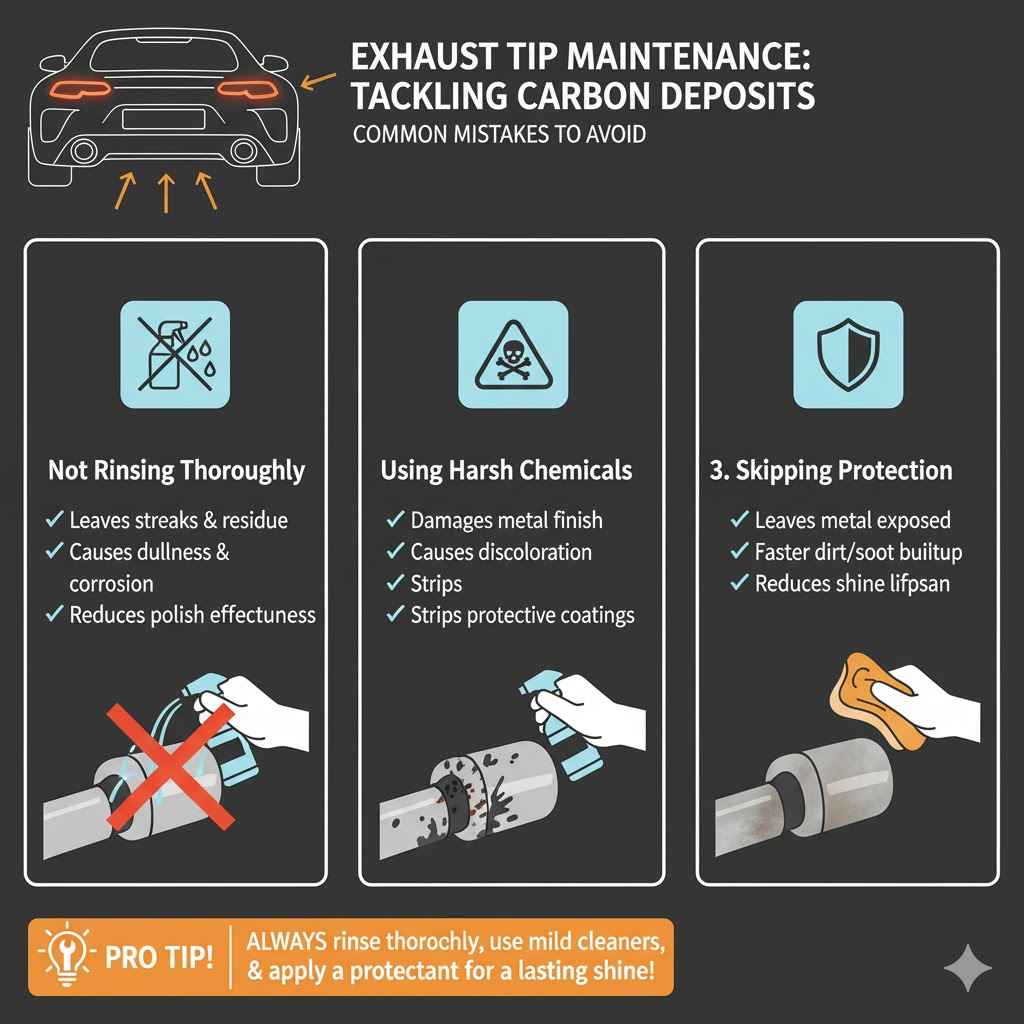
Applying a Sealant or Protectant
After cleaning and polishing your exhaust tips, you can apply a ceramic sealant, wax, or a specialized metal protectant. These products create a barrier on the surface of the metal, making it harder for dirt, soot, and road grime to stick. They also add an extra layer of shine.
How it works: Sealants and waxes fill in the microscopic pores on the metal surface, creating a smooth, non-stick layer. This smooth surface makes it difficult for particles to adhere. When contaminants do land on the surface, they are much easier to rinse or wipe away.
Application: Apply these products after the exhaust tips are clean and dry. Follow the product instructions for application and curing times. Reapplication is needed periodically, typically every few months, depending on the product and environmental conditions.
Example: You’ve just polished your exhaust tips to a brilliant shine. You then apply a thin layer of a ceramic spray sealant. Once it dries, you buff it off, and the tips have an even deeper shine and feel incredibly smooth to the touch.
Now, when dirt hits them, it often beads up and rolls off, keeping them cleaner for longer.
Driving Habits
While you can’t always change your driving habits drastically, being aware of how they affect your exhaust tips can be helpful. As mentioned, short trips don’t allow the exhaust system to get hot enough to burn off deposits. If possible, occasionally take your car for a longer drive on the highway.
This will help to naturally clean out some of the accumulated carbon.
Longer drives: When you drive at highway speeds for a sustained period (30 minutes or more), the exhaust system reaches higher temperatures. This heat can help to burn off some of the less stubborn carbon deposits, keeping them from building up as severely. It’s like giving your exhaust a mini self-cleaning cycle.
Driving cycles: If your daily commute involves many short trips, consider combining errands or taking a slightly longer route that includes some highway driving if feasible. This small adjustment can make a noticeable difference over time in the amount of carbon buildup you experience.
Common Mistakes to Avoid
When cleaning your car’s exhaust tips, it’s easy to make a mistake that could lead to damage or less-than-ideal results. Being aware of these common pitfalls can help you achieve a perfect finish. Avoiding these errors will save you time, effort, and potentially the cost of repairs.
These are the things that many people learn the hard way. By understanding them now, you can skip the frustration and get straight to a sparkling clean exhaust.
Using Harsh Chemicals or Abrasives
Using chemicals not designed for automotive use or overly abrasive scrubbing tools can cause permanent damage. Harsh acids or strong solvents can etch or discolor metal finishes. Similarly, using steel wool on chrome or painted surfaces will lead to scratches that are difficult or impossible to remove.
Always test cleaners in an inconspicuous area first.
Consequences: Scratches, dulling of the finish, discoloration, and etching are common results of using inappropriate cleaning agents or abrasives. For chrome, this can mean losing its reflective quality. For painted tips, it can mean the paint peeling or chipping.
Alternative: Stick to automotive-specific cleaners and polishes. For scrubbing, use brushes designed for car cleaning or very fine grade steel wool (#0000) only on appropriate surfaces, and always with lubrication.
Cleaning Hot Exhaust Tips
As mentioned earlier, cleaning hot exhaust tips is dangerous and ineffective. The heat causes cleaning solutions to evaporate instantly, leaving streaks and potentially damaging the finish. More importantly, you risk severe burns.
Always ensure the exhaust is completely cool before you start cleaning.
Why it’s bad: Rapid evaporation of cleaners leads to uneven cleaning and streaks. Thermal shock can damage certain finishes. The risk of personal injury from touching hot metal or splashed hot chemicals is very high.
Solution: Patience. Wait at least an hour after the car has been turned off, and preferably longer if the exhaust seemed very hot. Touch the tips with the back of your hand to test temperature before proceeding.
Not Rinsing Thoroughly
Leaving cleaning solution residue on the exhaust tips can lead to streaks, dullness, and even corrosion over time. It’s essential to rinse thoroughly after each cleaning and scrubbing step. Make sure all traces of the cleaner have been washed away before drying and polishing.
The problem: Residue can etch into the metal or attract dirt. It can also interfere with the adhesion of polishes or sealants, reducing their effectiveness and lifespan.
What to do: After scrubbing, rinse with plenty of clean water. You might need to use a hose with a strong spray to ensure all the residue is gone. It’s a good idea to rinse until you can’t see any suds or feel any slipperiness from the cleaner.
Frequently Asked Questions
Question: How often should I clean my exhaust tips?
Answer: It’s best to clean your exhaust tips whenever you wash your car, at least every two weeks. More frequent cleaning prevents heavy buildup, making the job easier each time.
Question: Can I use oven cleaner on exhaust tips?
Answer: It’s generally not recommended to use oven cleaner. Oven cleaners are very harsh and can damage the finish of your exhaust tips, especially if they are chrome or painted. Stick to automotive-specific cleaners.
Question: What is the best way to remove really stubborn carbon stains?
Answer: For stubborn stains, try a specialized exhaust carbon remover product. If that doesn’t work, carefully use fine-grade steel wool (#0000) with a lubricant, but only on suitable materials like raw stainless steel.
Question: Will cleaning my exhaust tips improve my car’s performance?
Answer: Cleaning exhaust tips is primarily for cosmetic appearance. It does not directly affect your car’s engine performance or fuel efficiency.
Question: How long does it take to clean exhaust tips?
Answer: For light to moderate buildup, it can take about 15-30 minutes. Heavily soiled tips might take an hour or more, especially if multiple cleaning cycles are needed.
Summary
You’ve learned how to remove carbon deposits from exhaust tips using simple, effective methods. From gathering supplies to the final polish, each step helps restore shine. Regular washing and protective sealants keep them looking great longer.
Avoiding harsh chemicals and cleaning hot pipes prevents damage. Now, your car’s exhaust tips will look as good as the rest of your ride.