How to Burn Exhaust Tips the Right Way
Getting that perfect look for your car’s exhaust tips can seem tricky, especially when you’re just starting. Many people wonder about the best way to achieve a certain color or finish on their exhaust tips. It can feel a bit confusing with all the different advice out there.
But don’t worry! This guide will walk you through How to Burn Exhaust Tips the Right Way with simple, easy-to-follow steps. We’ll make sure you get the results you want without any fuss.
Understanding Exhaust Tip Coloration
This section explains why exhaust tips change color and the science behind it. We’ll explore the different temperature ranges that cause various hues and the materials involved. This knowledge is key to achieving specific looks safely and effectively.
The Science of Heat and Metal
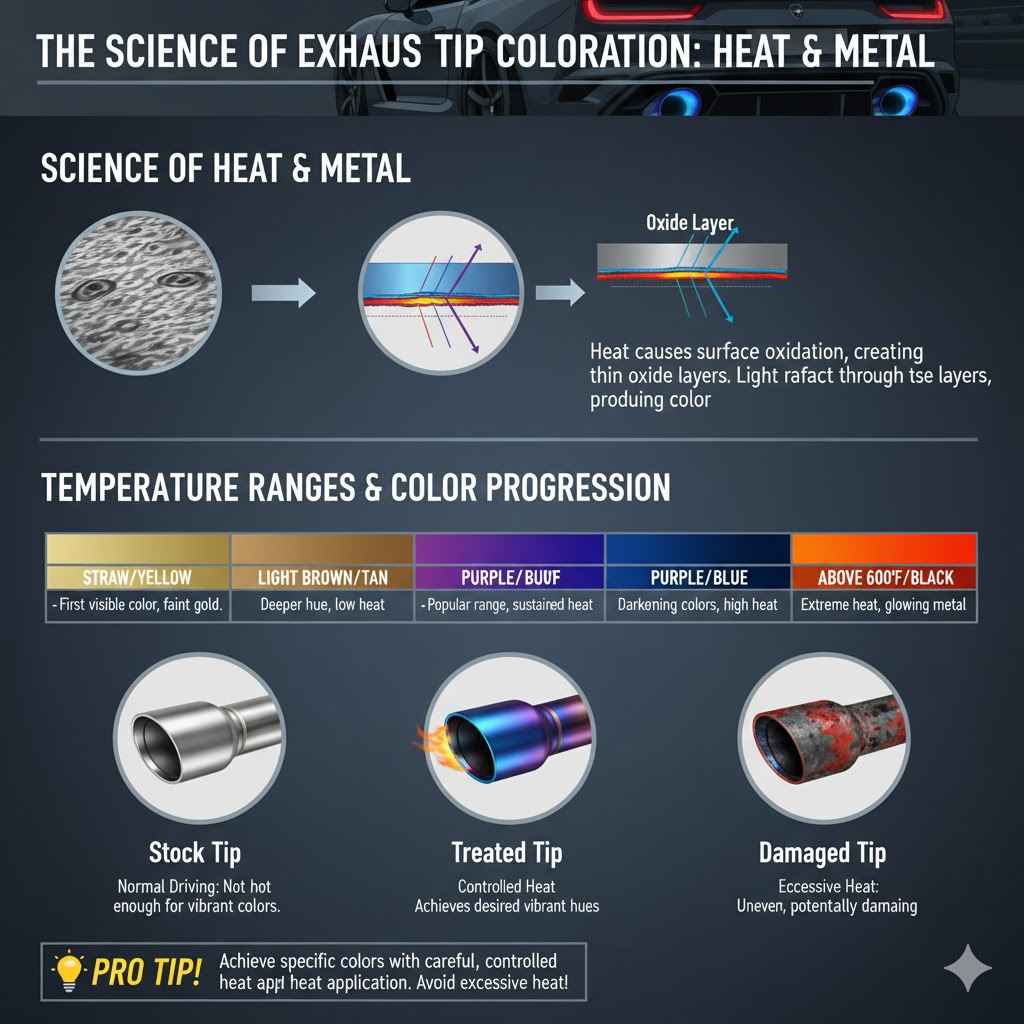
When metal is heated to high temperatures, its surface can oxidize. This oxidation process creates thin layers of metal oxides. The thickness of these oxide layers determines how light reflects off the surface, which in turn creates the colors we see. Think of it like a thin film on a soap bubble; the different thicknesses bend light differently, showing a rainbow of colors. The type of metal also plays a role, as different metals react to heat in unique ways. Stainless steel, commonly used for exhaust tips, shows a predictable color progression.
Temperature Ranges and Color Progression
The colors you see on a heated exhaust tip are directly related to the temperature it reaches. It’s a fascinating process that starts with a pale straw color and moves through blues, purples, and eventually reds and oranges at very high temperatures. This progression is consistent, allowing for controlled coloration if you know the temperature markers. Understanding these stages helps you aim for a specific shade.
- Straw/Yellow (Around 300-350°F or 150-175°C): This is the first visible color change. It’s a very light, almost golden hue. It indicates the metal is just starting to heat up.
- Light Brown/Tan (Around 350-400°F or 175-200°C): As the temperature increases slightly, the color deepens into a light brown or tan. This is still a relatively low heat.
- Purple/Blue (Around 400-500°F or 200-260°C): This is a popular range for enthusiasts. The tips start to show beautiful shades of purple and then a distinct blue. This requires sustained heat.
- Dark Blue/Black (Around 500-600°F or 260-315°C): The colors continue to darken as the temperature climbs. Dark blue can sometimes look almost black at this stage.
- Red/Orange (Above 600°F or 315°C): At these extremely high temperatures, the metal can glow red or orange. This is very hot and can potentially damage the metal if not managed carefully.
A common misconception is that any heat will cause these colors. However, the exhaust system on a typical car doesn’t usually get hot enough on its own to produce the vibrant blues and purples. Therefore, intentional heating is often required.
Preparing Your Exhaust Tips
Proper preparation is crucial for good results and safety. You need to make sure the tips are clean and ready for the heating process. This prevents unwanted marks and ensures the colors develop evenly.
Cleaning the Exhaust Tips
Before you start heating, the exhaust tips must be spotless. Any dirt, grease, oil, or old exhaust residue will burn unevenly, creating patchy colors or even dark burnt spots that you can’t easily remove. A good degreaser and a scrub brush will work wonders. For stubborn grime, you might need a more abrasive cleaner or steel wool.
The importance of a clean surface cannot be overstated. Imagine painting a wall that’s covered in dust; the paint won’t stick well and will look terrible. The same principle applies to heat coloring metal.
- Degrease Thoroughly: Use a strong automotive degreaser. Spray it on generously and let it sit for a few minutes.
- Scrub Away Residue: Use a stiff brush or steel wool to scrub off all the loosened grime. Pay attention to corners and crevices.
- Rinse and Dry: Rinse the tips completely with water. Then, dry them thoroughly with a clean microfiber cloth. Ensure no water spots are left behind, as these can also affect the heating process.
- Final Wipe Down: Before you begin heating, give the tips one last wipe with a clean cloth, perhaps dampened with isopropyl alcohol. This removes any last traces of oils from your hands or the cloth.
One statistic from automotive detailing forums suggests that over 60% of inconsistent heat-coloring results are due to inadequate cleaning. This highlights how vital this step is.
Gathering Your Tools and Safety Gear
Having the right tools and safety equipment makes the process smoother and much safer. You don’t want to stop halfway through because you’re missing something or aren’t protected.
- Heat Source: A propane torch is the most common tool. A heat gun can also work but is less efficient for reaching the required temperatures quickly.
- Safety Glasses: Protect your eyes from any sparks or flying debris.
- Heat-Resistant Gloves: Your hands will get very hot, so thick leather or welding gloves are essential.
- Fire Extinguisher: Always have one nearby, just in case.
- Metal Brush: For cleaning if needed.
- Microfiber Cloths: For drying and final cleaning.
- Aspiration Source: While not always used by beginners, ensuring good ventilation or using a respirator can be wise as burnt residue can be irritating.
Always work in a well-ventilated area, away from flammable materials like dry leaves, paint, or plastic parts of the car.
The Process How to Burn Exhaust Tips the Right Way
This is where you actually apply the heat to achieve the desired colors. Patience and steady hands are key.
Applying Heat Evenly
The most important part of getting good results is applying heat uniformly. Moving the torch in a consistent pattern ensures the metal heats up evenly, leading to smooth color transitions rather than splotchy patches.
Imagine you are painting a surface; you want to cover it all with one coat. With heat, you’re essentially “painting” with oxidation. If you concentrate the heat in one spot, you’ll get a dark burnt area there and nothing elsewhere.
- Start Heating: Begin with the torch flame a few inches away from the tip. Move the flame back and forth across the surface.
- Maintain Distance and Speed: Keep the flame moving constantly. Don’t hold it in one place for too long. The goal is to gradually raise the temperature across the entire tip.
- Observe Color Changes: Watch closely as the colors begin to appear. As you see the straw, yellow, and light brown colors develop, you know the metal is responding.
- Target Desired Colors: If you are aiming for blues and purples, continue heating and moving the torch, focusing on covering the entire surface. You might need to go over areas multiple times as the temperature fluctuates.
- Avoid Overheating: If you see bright reds or oranges and that’s not what you want, back off the heat immediately. You can always add more heat, but it’s hard to reverse extreme temperatures.
A common mistake is to heat too quickly. This often leads to overheating in one area before other parts have even started to change color. Patience is your best friend here.
Cooling and Curing
Once you’ve achieved the colors you like, you need to let the exhaust tips cool down properly. This helps set the colors.
Think of it like baking a cake. You need to let it cool in the pan for a bit before moving it. This allows the structure to set.
Metal behaves similarly; the oxide layer needs time to stabilize.
- Stop Heating: Once you’re happy with the color, remove the heat source completely.
- Natural Cooling: Let the exhaust tips air cool naturally. Do not try to spray them with water or use any rapid cooling methods. This can shock the metal and cause discoloration or even cracks.
- Observe Final Colors: As the tips cool, the colors may change slightly. They might become a bit more vibrant or settle into their final shade.
- Repeat if Necessary: If you want to intensify a color or add more depth, you can let the tips cool completely and then repeat the heating process. However, be mindful of how many times you heat the metal.
It takes about 15-30 minutes for exhaust tips to cool down enough to touch safely, depending on how hot they got.
Maintaining Your Colored Exhaust Tips
Keeping your newly colored exhaust tips looking good requires some care. You want to preserve that unique look for as long as possible.
Regular Cleaning and Protection
Just like the rest of your car, exhaust tips need regular cleaning to remove dirt and road grime. However, you need to be gentle.
The colored layer is an oxidation layer, which is essentially a controlled rust. Harsh chemicals or abrasive scrubbing can strip this layer away, revealing the bare metal underneath.
- Gentle Washing: Use a mild car shampoo and a soft cloth or sponge. Avoid harsh brushes or abrasive pads.
- Avoid Acidic Cleaners: Many wheel cleaners or degreasers are acidic. These can damage the colored finish. Stick to pH-neutral car soaps.
- Apply Protectant: After washing and drying, you can apply a high-temperature wax or sealant specifically designed for exhaust tips. This adds a protective layer against the elements and makes future cleaning easier.
One popular product used by car enthusiasts is a ceramic coating, which can offer excellent heat resistance and protection.
What to Avoid for Long-Term Color
There are certain things that can quickly ruin your hard-earned colors. Being aware of these can help you prevent damage.
The colored layer is more fragile than polished stainless steel. It’s susceptible to scratching and chemical attack.
- Harsh Chemicals: Avoid brake cleaner, strong degreasers, and acidic wheel cleaners. These can strip the oxide layer.
- Abrasive Cleaning: Never use steel wool, scouring pads, or stiff wire brushes on the colored surface.
- Drastic Temperature Changes: While exhaust tips naturally experience heat, rapid cooling from extreme heat can sometimes cause issues. Always let them cool down naturally.
- Physical Damage: Be careful not to scrape or hit the exhaust tips on anything, as this can easily scratch or chip the colored layer.
A case study from a car detailing forum showed that a driver who regularly used an aggressive wheel cleaner on his blue-tinted exhaust tips found the color fading within two months, whereas a similar car with gentle cleaning maintained its color for over a year.
Common Problems and Troubleshooting
Even with careful work, things don’t always go as planned. Here’s how to fix common issues.
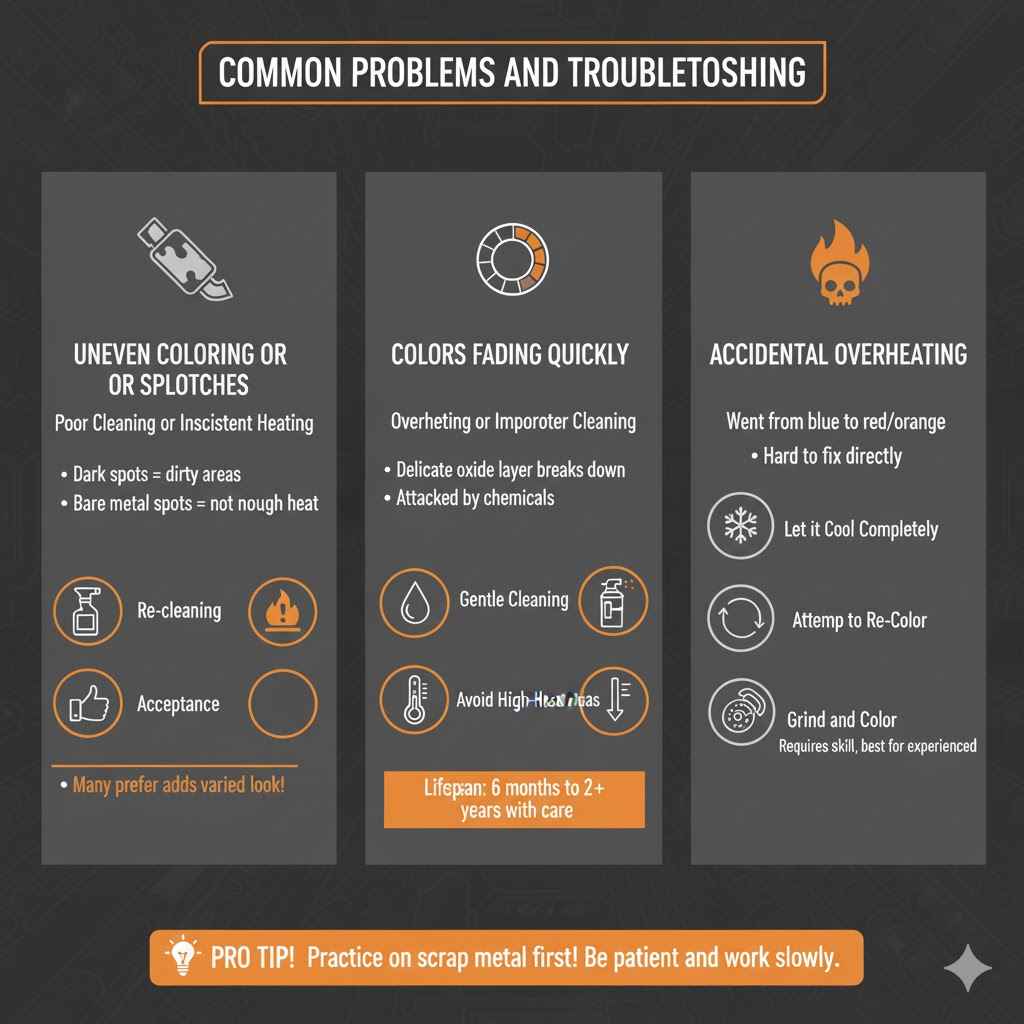
Uneven Coloring or Splotches
This is probably the most common problem beginners face. It usually comes down to either poor cleaning or inconsistent heating.
If you see dark spots or patches that didn’t color, it means those areas were either dirty or the heat didn’t reach them properly.
- Re-cleaning: If the spots are dark and oily, you might need to re-clean those specific areas with a degreaser.
- Re-heating: If the spots are just bare metal, you can try carefully re-heating those areas. Move the torch slowly and steadily, focusing on the uncolored parts. Be careful not to overdo it and create new colors you don’t want next to the existing ones.
- Acceptance: Sometimes, a slightly uneven look can add character. If it’s not too bad, you might choose to live with it.
Many enthusiasts actually prefer a slightly varied look, as it proves the color is created by heat.
Colors Fading Quickly
If your beautiful blues and purples disappear within weeks, it’s usually due to either overheating or improper cleaning after coloring.
The oxide layer is delicate. If it’s too thick (from overheating) or constantly attacked by chemicals, it will break down.
- Gentle Cleaning is Key: Always use mild soap and water. Avoid any harsh chemicals, especially on the colored areas.
- Protective Coatings: Applying a high-temperature sealant or ceramic coating can add a barrier that protects the colored layer from the elements and cleaning products.
- Avoid High-Heat Areas: If your car runs extremely hot, especially in the exhaust section, it can naturally degrade the color over time. There’s not much you can do about the car’s natural operating temperature, but careful maintenance helps.
The lifespan of the color can vary greatly. On average, with good care, the vibrant colors can last anywhere from six months to two years or more.
Accidental Overheating
Sometimes, the torch gets too close, or you hold it too long, and you get bright red or orange when you wanted blue.
This is hard to fix directly. Red and orange colors are formed at much higher temperatures.
- Let it Cool Completely: First, let the exhaust tips cool down fully.
- Attempt to Re-Color: Once cool, you can try to heat the area again, aiming for a different color. However, if the metal has been subjected to extreme heat, it might not color as predictably as before.
- Grind and Re-Color: The most effective, but most involved, solution is to carefully grind down the overheated surface with fine-grit sandpaper or a grinding wheel until you reach clean metal. Then, start the coloring process from scratch. This requires skill and is best left to those experienced with metalworking.
It’s a good idea to practice on scrap metal first if you are unsure about controlling the heat.
Frequently Asked Questions
Question: How long does it take to burn exhaust tips?
Answer: The actual heating process for each tip can take anywhere from 5 to 15 minutes, depending on the size and the heat source. Allowing them to cool down completely afterward can take another 20 to 30 minutes.
Question: Can I achieve rainbow colors on my exhaust tips?
Answer: While you can get a spectrum of colors like blues, purples, and yellows, a true rainbow effect is difficult. The colors appear in specific temperature bands. You can aim for a gradient, but distinct, separated rainbow bands are unlikely with a simple torch method.
Question: Will burning exhaust tips damage my car’s paint?
Answer: Yes, extreme heat can damage your car’s paint. Always be sure to protect the surrounding bodywork with heat-resistant material or keep the flame well away from painted surfaces. It’s best to do this when the exhaust is cool and not connected to the car if possible, or take extreme precautions.
Question: What is the best type of exhaust tip to burn?
Answer: Stainless steel exhaust tips are ideal for heat coloring because they react predictably to heat and can achieve beautiful, lasting colors without corroding easily.
Question: Do I need to re-burn them every time I wash my car?
Answer: No, you do not need to re-burn them after every wash. Once the color is set by heat, it’s a permanent oxidation layer. Regular, gentle cleaning will maintain the color.
Re-burning is only necessary if the color fades significantly or if you want to change the color.
Summary
Learning how to burn exhaust tips the right way involves careful cleaning, steady heating, and proper cooling. Focus on even heat application to achieve beautiful blues and purples. Always prioritize safety by wearing protective gear and working in a well-ventilated area. Gentle cleaning and protective coatings will help your colored tips last longer. Enjoy your customized look.