Do You Break in Exhaust Tips? Essential Guide
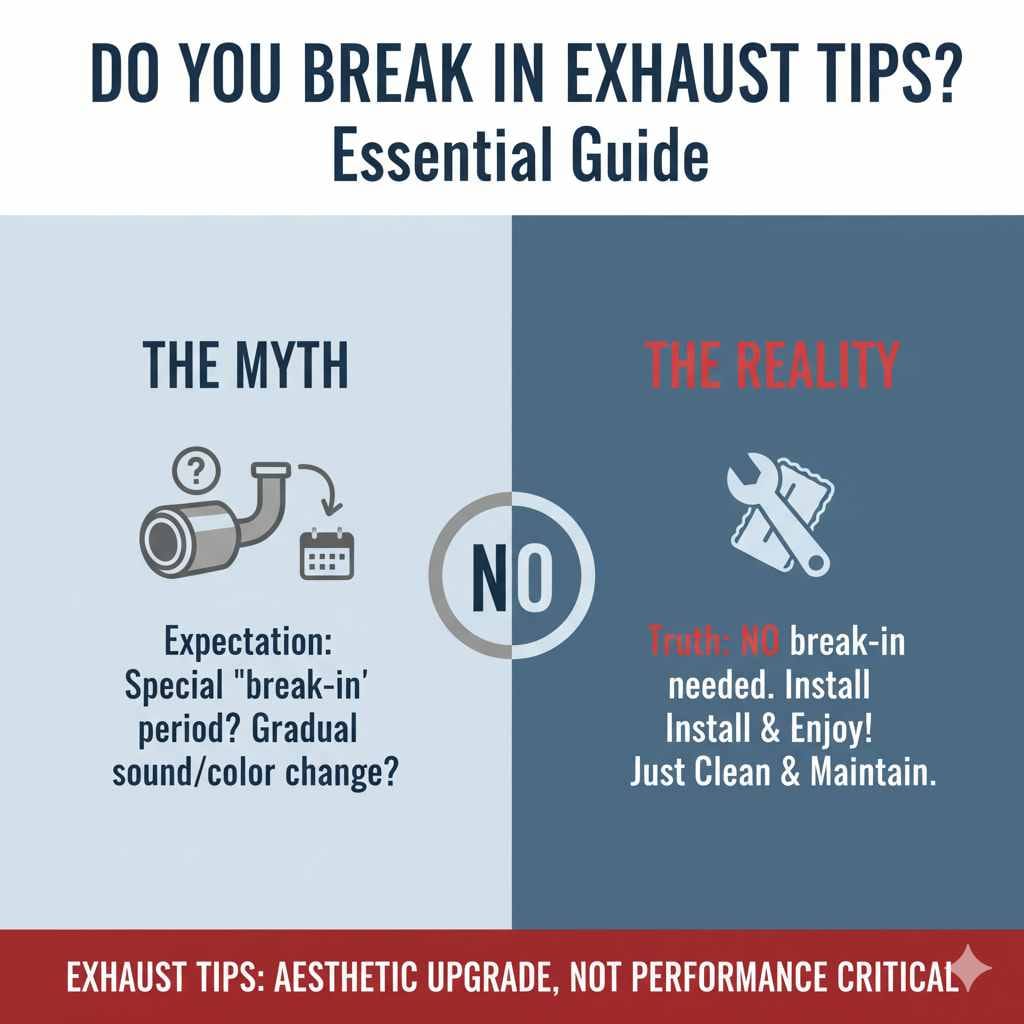
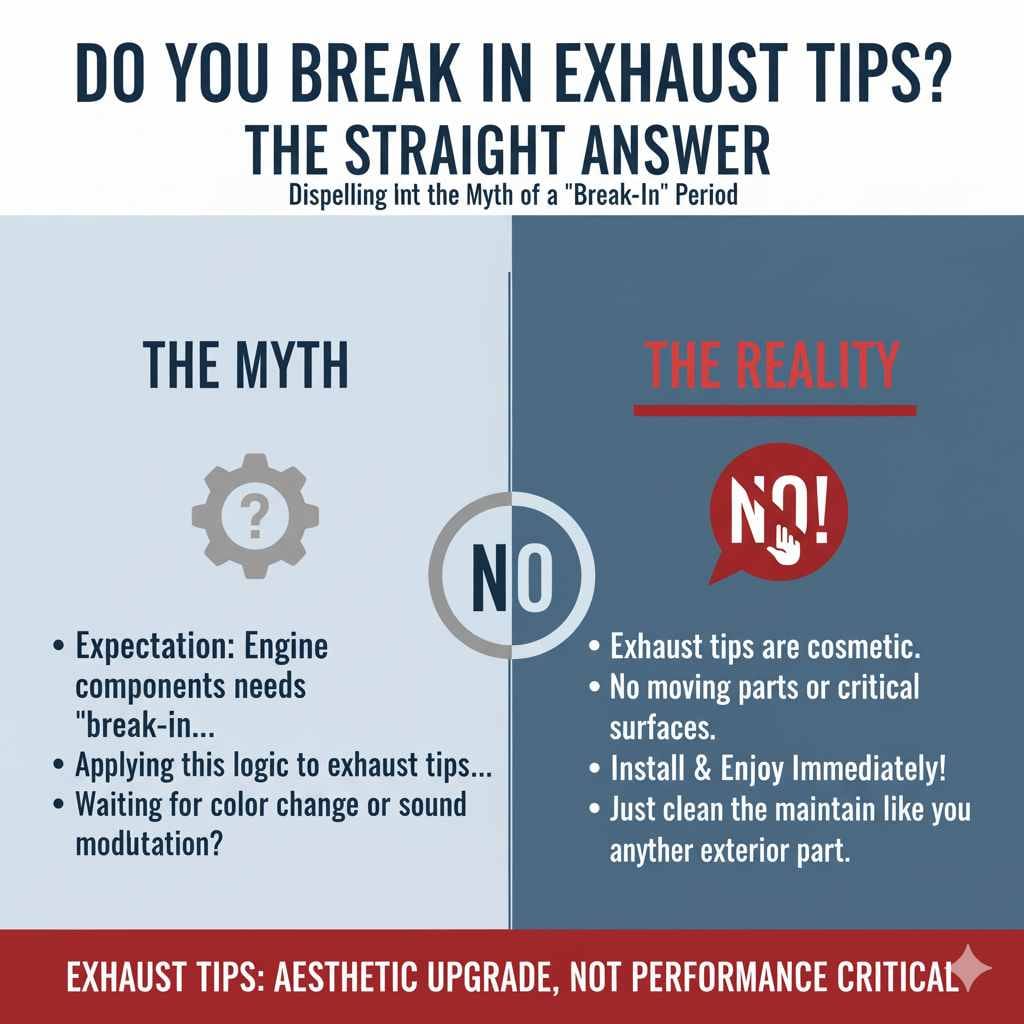
No, you do not need to “break in” exhaust tips in the traditional sense like you would new engine parts. New exhaust tips don’t require a special break-in period; they are ready to be installed and used immediately after purchase. Their performance and appearance are not affected by a break-in process.
Welcome, fellow car lover! Ever looked at those shiny new exhaust tips and wondered if they need a special treatment before you can really show them off? It’s a common question, especially when you’re new to car care or looking to spruce up your ride. Many parts on a car, like new tires or even engine components, have a “break-in” period. This is to help them adjust and perform at their best. But what about exhaust tips? The idea of “breaking in” something as visible as your exhaust tips can be a bit confusing. You want everything to look and perform perfectly, right? Don’t worry! I’m here to clear things up. We’ll go through exactly what you need to know about exhaust tips and whether they need this special treatment. Let’s get your exhaust looking its best without any guesswork!
What Are Exhaust Tips, Anyway?
Before we dive into the “break-in” question, let’s quickly touch on what exhaust tips are. Think of them as the stylish end to your car’s exhaust system. They are the visible part that sticks out from under your bumper. While the rest of the exhaust system (like the muffler and pipes) is crucial for managing exhaust gases and noise, exhaust tips are mainly about aesthetics. They add a custom look, making your vehicle stand out. They come in tons of shapes, sizes, and finishes—from sleek chrome to rugged black—allowing you to personalize your car’s rear end.
Do You Break In Exhaust Tips? The Straight Answer
Let’s get straight to the point: No, you do not need to “break in” exhaust tips. This is a crucial distinction that often causes confusion. Unlike engine components that rely on friction and heat to settle their parts for optimal performance, or tires that need to shed a release agent from the manufacturing process, exhaust tips are purely cosmetic. They don’t have moving parts or critical surfaces that require a gradual introduction to their operating environment. Once they are manufactured, polished, and packaged, they are ready to be fitted onto your car and admired. There’s no performance benefit or longevity improvement to be gained from a special “break-in” period for exhaust tips themselves.
Why the Confusion? Understanding “Break-In” in Automotive Terms
The confusion often arises because many automotive parts do indeed require a break-in period. It’s helpful to understand why this is the case for other components, which might lead someone to assume exhaust tips need it too.
- Engine Components: New piston rings need to “seat” against the cylinder walls. This happens over the first few hundred miles. Running the engine under varying loads helps ensure a good seal.
- Brake Pads: New brake pads often need to be “bedded in.” This involves a series of controlled stops to transfer a thin layer of pad material to the rotor surface. This ensures optimal braking performance and prevents noise.
- Tires: Factory-new tires have a mold release agent on their surface. This makes them slippery. A short period of driving, typically 50-100 miles, helps wear this off, improving grip.
- Clutches: New clutch plates and flywheels can benefit from a gentle break-in period. This allows them to mate properly without rapid engagement or excessive slipping.
As you can see, these parts have specific functional requirements. They involve friction, heat, or mating surfaces. Exhaust tips, on the other hand, are essentially decorative sleeves fitted onto the end of your existing exhaust pipe. They don’t interact with other components in a way that requires wear-in. Their job is to look good!
Types of Exhaust Tips and Their Installation
Understanding how exhaust tips are installed can further clarify why they don’t need a break-in. The installation method usually dictates how they are attached, and none of these methods involve a “break-in” procedure.
Common Types of Exhaust Tips:
- Bolt-On Tips: These are the most common and easiest to install. They have a clamp or bolts that secure them directly onto the existing exhaust pipe.
- Weld-On Tips: These require welding to be permanently attached. They offer the most secure fit but necessitate professional welding equipment and skills.
- Interchangeable/Slip-On Tips: Some systems allow for tips to be easily swapped out, often secured by a screw or a specific fitting mechanism.
Installation: A Simple Process
For bolt-on and interchangeable tips, the process is usually straightforward:
- Ensure your existing exhaust pipe is clean and cool.
- Slide the new tip onto the exhaust pipe.
- Tighten the clamp or bolts to secure it in place.
For weld-on tips, a professional welder will ensure a strong, permanent bond by fusing the tip to the exhaust pipe. In neither case is there a step that involves “running the engine for X miles” or “avoiding hard acceleration.” The tip is immediately functional in its role as a decorative piece as soon as it’s securely attached.
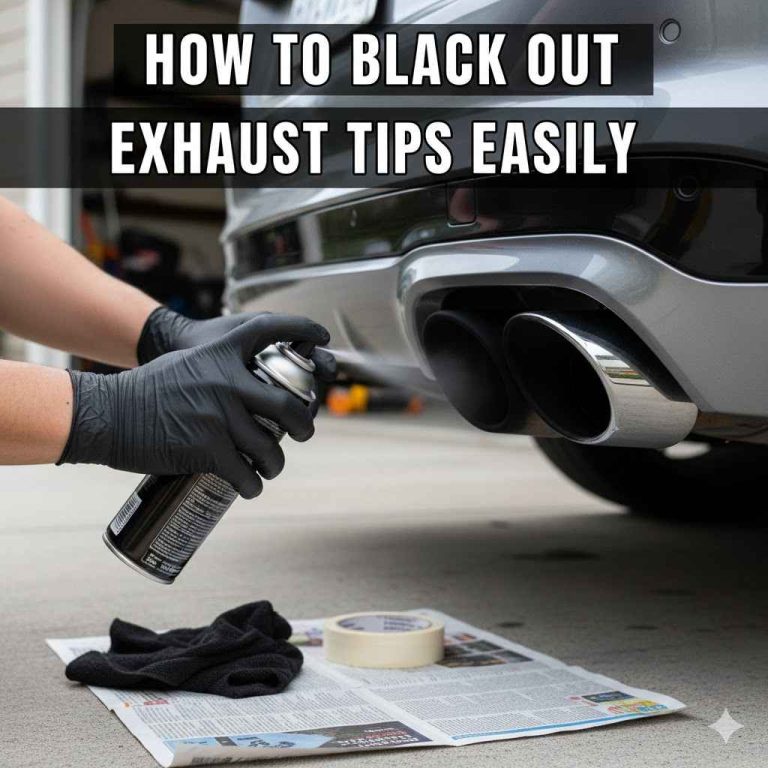
What About the Finish? (Chrome, Black, Carbon Fiber)
Perhaps the question about “breaking in” comes from a desire to protect the new finish of the exhaust tip. This is a valid concern because exhaust tips are exposed to harsh elements: heat, moisture, road salt, and exhaust byproducts. However, the “break-in” concept doesn’t apply here either. Instead, you should focus on proper care and maintenance to keep the finish looking its best.
Caring for Different Finishes:
- Chrome: Chrome tips are popular for their mirror-like shine. To maintain them, wash regularly with mild soap and water. For stubborn grime or water spots, use a dedicated chrome polish. Avoid abrasive cleaners or pads, which can scratch the surface.
- Powder-Coated Black: Black tips often have a durable powder coat finish. Clean them with a mild soap and water. Avoid harsh chemicals that could degrade the coating. If you notice minor scratches, some specialized touch-up paints are available.
- Carbon Fiber: Authentic carbon fiber tips are lightweight and stylish. They are typically coated with a clear UV-resistant layer. Clean them with car shampoo and water. A good quality automotive wax or sealant can add an extra layer of protection and shine, but this is a maintenance step, not a break-in.
- Stainless Steel: Stainless steel is known for its corrosion resistance. Regular washing is usually sufficient. For a deeper clean or to remove discoloration, a stainless steel cleaner can be used.
The key to a long-lasting finish on any exhaust tip is consistent, gentle cleaning and protection, not a break-in period. Think of it like caring for new shoes – you wouldn’t “break them in” to make the leather shiny; you’d polish them.
Initial Heat Cycling and Exhaust System “Break-In” (A Different Concept)
It’s possible that the idea of “break-in” is being conflated with the initial heat cycling that some new exhaust systems might undergo, especially if new welds or coatings are involved. This is not about the tip specifically, but the entire assembly, and it’s more relevant for systems with critical new welds or muffler packing. However, for a simple exhaust tip replacement, this is almost never a concern.
If you were installing a completely new, aftermarket exhaust system from the muffler back, the manufacturer might recommend a gentle initial drive. This is usually to:
- Allow any new muffler packing material to cure or settle.
- Ensure new welds are thoroughly heated and cooled, which can sometimes strengthen them.
- Burn off any protective oils or residues from the manufacturing process on the pipes and muffler (which can cause temporary smoky smells).
A typical recommendation for an entire system might be something like:
- Drive for 10-15 minutes at moderate speeds.
- Avoid hard acceleration or prolonged idling for the first few hundred miles.
This is completely different from just changing the tips. Exhaust tips are typically made from pre-finished materials and are designed to be a cosmetic add-on. The heat and gases passing through them are the same as what the rest of your exhaust handles. There are no internal mechanical components within the tip that need to gradually adapt to operating temperatures.
Common Misconceptions and Why They Are Wrong
Let’s address some of the common misunderstandings:
Misconception 1: “My exhaust tip is new, it needs to get used to the heat.”
Reasoning: Exhaust tips are made from robust materials like stainless steel, chrome-plated steel, or carbon fiber, designed to withstand extreme temperatures from your engine’s exhaust. Repeated exposure to heat is what they are built for. They don’t have sensitive parts that get damaged by initial heat exposure.
Misconception 2: “There’s a coating on it that needs to burn off.”
Reasoning: While some entire exhaust systems might have manufacturing oils that burn off initially (causing smoke and smell), this is rare for just exhaust tips. If a tip does have a temporary coating, it’s usually to protect it during shipping. This coating would typically be removed during the cleaning process before installation, or it would burn off very quickly and harmlessly on the first drive.
Misconception 3: “Running the engine for a while will help it fit better.”
Reasoning: Exhaust tips are usually secured by clamps or bolts. The fitment is mechanical. Applying heat might cause slight expansion, but not enough to “settle” or improve the fit of a well-manufactured tip. The secure attachment comes from the fastening hardware, not from thermal adjustment.
When to Consider a “Break-In” (And It’s Not for the Tips!)
While the tips themselves don’t need a break-in, there are situations related to exhaust work where a cautious approach is wise:
- After Welding: If your new tips were welded on, or if any part of your exhaust system was recently welded, it’s a good idea to let the vehicle sit for a few hours after welding before starting it. This allows the metal to cool properly, preventing stress cracks.
- After Installing a Full System: As mentioned, if you’re installing a brand-new muffler, catalytic converter, or full exhaust kit, follow the manufacturer’s specific break-in recommendations for those components. This is about the system’s performance, not the tip.
- New Catalytic Converter: A new catalytic converter often requires a specific amount of driving (sometimes a few hundred miles) for its internal catalysts to become fully active and efficient.
These scenarios highlight that the “break-in” or “settling” period applies to the functional components of the exhaust system, not the decorative tips.
Tools You Might Need for Installation (No Special Break-In Tools Required!)
To install your new exhaust tips, you won’t need any special “break-in” tools. The tools required are standard for most DIY automotive tasks:
- Socket Wrench Set or Screwdriver: To tighten the bolts or clamps securing the tip. The specific size will depend on the tip’s hardware.
- Gloves: To keep your hands clean and protect them from sharp edges.
- Safety Glasses: Always important when working on your car.
- Wire Brush or Rag: To clean the end of the existing exhaust pipe before fitting the new tip for a snug fit.
- Penetrating Oil (Optional): If the old clamp or bolts are rusted, a little penetrating oil can help loosen them.
- Jack and Jack Stands (If necessary): If the exhaust tips are difficult to access from the ground, you may need to safely lift the rear of your vehicle. Always use proper safety equipment.
You can find good quality tool sets online from reputable retailers. For example, Sears Tools offers a wide range of general hand tools suitable for such tasks.
Step-by-Step: Installing Your (Non-Break-In) Exhaust Tips
Here’s a simple guide to installing new exhaust tips. Remember, no break-in needed!
Step 1: Preparation
- Ensure your car is parked on a level surface.
- Make sure the exhaust system is completely cool.
- If you need to lift the car for better access, use a jack and secure it with jack stands. Never work under a car supported only by a jack.
Step 2: Remove Old Tips (If Applicable)
- If your car currently has exhaust tips, locate the clamp or bolts holding them.
- Loosen and remove the hardware.
- Gently slide the old tips off the exhaust pipe. If they are stuck, a little penetrating oil and wiggling might help.
Step 3: Clean the Exhaust Pipe
- Use a wire brush or a clean rag to remove any rust, dirt, or carbon buildup from the end of the exhaust pipe where the new tip will attach. A clean surface ensures a snug fit.
Step 4: Position the New Tip
- Slide the new exhaust tip onto the cleaned end of the exhaust pipe.
- Ensure it’s pushed on far enough for a secure fit, and that it’s straight and centered where you want it. Check the alignment from the rear of the car.
Step 5: Secure the New Tip
- If your tip uses a clamp, align the clamp and tighten the bolt(s) securely. Don’t overtighten, as you could crush the tip or exhaust pipe.
- If your tip bolts directly, thread and tighten the bolts into place.
- For weld-on tips, this step is done by a professional welder.
Step 6: Final Check
- Lower the vehicle if it was raised.
- Double-check that the tips are firmly attached and aligned correctly.
- Start the engine briefly to check for any unusual noises or leaks around the connection.
And that’s it! Your new exhaust tips are installed and ready to go. No special drives or waiting periods required.
Benefits of New Exhaust Tips (Beyond Just Looking Good)
While the primary benefit of adding new exhaust tips is cosmetic, there are other small advantages:
- Personalization: They allow you to customize your vehicle’s appearance to match your style.
- Protection: They can offer a slight layer of protection to the end of your exhaust pipe against minor impacts or corrosion.
- Masking Imperfections: If your original exhaust pipe end is rusted or damaged, a new tip can cover it up for a cleaner look.
- Potential for Sound Modulation (Minor): Very rarely, a larger or differently shaped tip might very subtly alter the exhaust note. However, this effect is minimal compared to muffler or resonator changes.

When To Get Professional Help
While installing bolt-on or slip-on tips is usually a DIY job, you might need a professional for:
- Weld-On Tips: Requires welding expertise and equipment.
- Complex Installations: If access is very difficult or requires significant modification.
- Full Exhaust System Replacement: If changing more than just the tips.
For those situations, consult your local reputable exhaust shop. They can ensure a safe and correct installation. You can often find local service recommendations through sites like Yelp.
Frequently Asked Questions (FAQ)
Q1: Do I need to clean my exhaust tips after installing them?
A1: Yes, it’s always a good idea to give them a quick clean after installation, especially if they’ve been handled a lot. Use mild soap and water. This helps remove any fingerprints or manufacturing residues from the surface.
Q2: What will happen if I don’t “break in” exhaust tips?
A2: Nothing significant will happen. Since there’s no break-in needed for exhaust tips, not performing one makes no difference. They will function (aesthetically speaking) exactly the same.
Q3: I noticed a smoky smell the first time I drove with new tips. Is this a break-in issue?
A3: It’s possible, but unlikely to be related to the tips themselves unless they had a specific protective coating. More often, a smoky smell indicates a residue from the rest of the exhaust system (like a new muffler) or possibly a lubricant used during installation that’s now burning off.