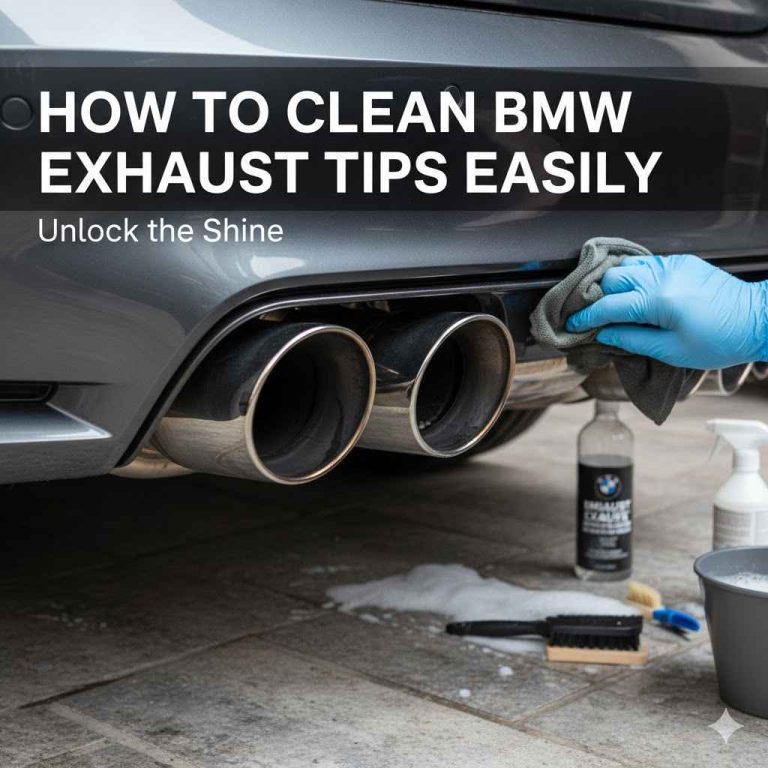
Are Exhaust Tips Welded Or Bolted? Essential Secrets
Exhaust tips are typically secured using either welding or clamping/bolting methods. Welding offers a permanent, clean look but requires professional installation, whereas bolted or clamped tips are easier for DIY replacement or adjustment, offering flexibility but sometimes requiring more maintenance to stay tight.
When you look underneath your car at that shiny piece of chrome or stainless steel sticking out the back, you might wonder how it actually stays attached. Are exhaust tips welded on strong, or do they just bolt right up? This question is a big deal, especially if you plan to upgrade, clean, or replace a rusty one yourself. Spending time trying to figure out the attachment method before you start working saves you time and frustration.
Don’t worry if this seems confusing! Many car owners feel the same way. Whether you have factory tips or aftermarket diamonds, understanding the connection method is the first step to proper care. We are going to break down exactly how those tips stay put—welded, bolted, or clamped—in simple, easy-to-follow steps. By the end of this guide, you’ll know exactly what you are dealing with and how to handle it safely.
Understanding Exhaust Tips: More Than Just Looks
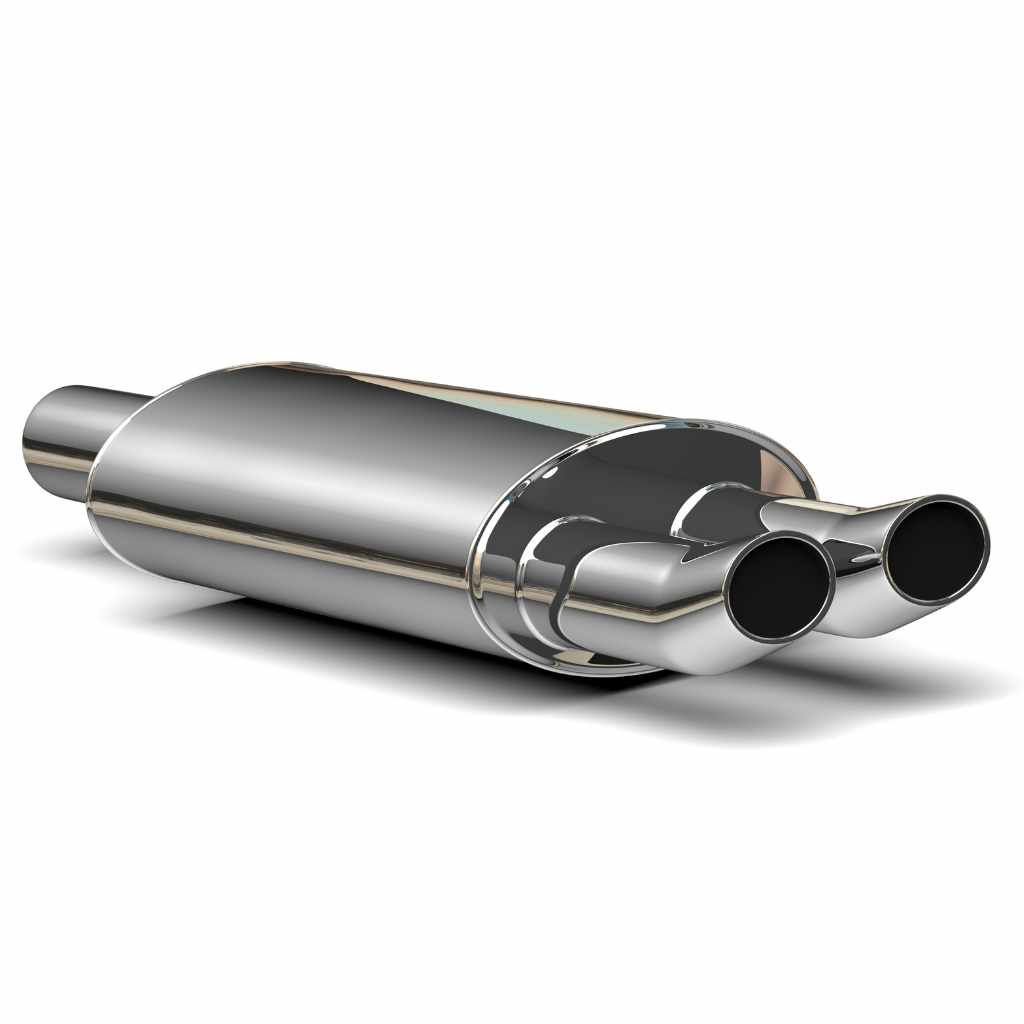
Exhaust tips, sometimes called tailpipes or finishers, are the very end pieces of your car’s exhaust system. While they look nice and change the sound slightly, they are crucial for directing hot, dirty exhaust gases safely away from the vehicle body.
The way they attach directly impacts cleaning, maintenance, and upgrade path for your ride. Getting this detail right ensures your new look lasts and doesn’t fall off on the highway!
The Two Main Attachment Styles: Welded vs. Bolted/Clamped
When you examine your exhaust tip, it will almost always fall into one of these two primary attachment camps. Knowing which one you have dictates whether you need a wrench or a grinder to make a change.
1. Welded Exhaust Tips (The Permanent Solution)
Welding is the process where two pieces of metal are fused together permanently using high heat. This method is very common on factory-installed exhaust systems or when an owner wants a seamless, high-end look.
When a tip is welded, it is fused directly onto the muffler exit pipe or the tailpipe leading to it. There is no gap, no seam, and usually no visible hardware holding it in place.
2. Bolted or Clamped Exhaust Tips (The Adjustable Solution)
This method uses hardware to secure the tip. It is extremely common with aftermarket replacement tips because it allows owners to install them without needing specialized welding equipment.
There are two main variations here:
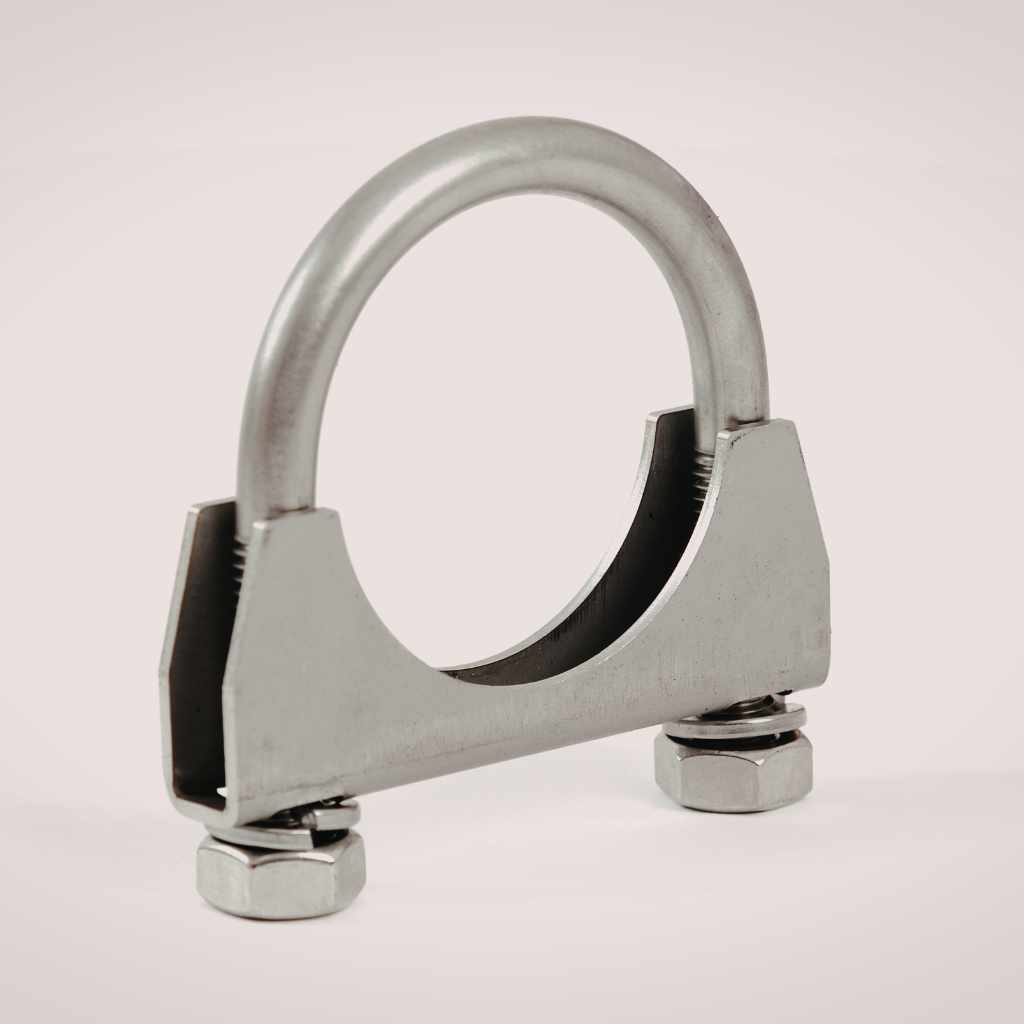
- Clamped/Slip-On: The tip slides over the existing pipe, and a heavy-duty clamp (similar to a hose clamp, but much stronger) tightens around the connection point to hold it tight against the pipe via friction.
- Bolt-On: Less common for just the tip itself (more common for full axle-back systems), this involves drilling small holes and using nuts and bolts to mechanically fasten the tip housing to the existing pipe.
How to Tell If Your Exhaust Tips Are Welded or Bolted
This is the most important secret! You don’t need expensive diagnostic tools; you just need a flashlight and maybe a small mirror. Follow these steps carefully to positively identify your tip’s attachment method.
Step 1: Visual Inspection at the Connection Point
Get low and look directly at where the decorative tip meets the piping leading from the muffler. You are looking for clear seams or hardware.
What to Look For in a Welded Tip:
- Smooth Transition: The tip and the pipe should look like one continuous piece of metal.
- Weld Beads: Look for a thin, slightly raised line of metal running around the circumference where the two pieces meet. This is the weld bead. It often looks slightly textured or uneven compared to the rest of the pipe.
- No Gaps: There should be zero space between the tip and the pipe underneath it.
What to Look For in a Bolted/Clamped Tip:
- Visible Hardware: Look for the head of a bolt or a screw, usually accessible from the top or side of the connection point.
- The Clamp Band: You will see a metal band wrapped around the pipe with a bolt tightening it down. This is a dead giveaway for a slip-on/clamp connection.
- Small Gap or Seam: You might notice a very slight, uniform gap or a clearer seam line where the two pieces simply slide into each other before tightening.
Step 2: The Wiggle Test (Gentle Prodding)
This test requires a gentle touch, especially if your car is hot. Ensure the car has been off for several hours and the exhaust system is completely cool before touching anything.
- Grip the exhaust tip firmly but gently.
- Try to twist or wiggle it side-to-side or up-and-down.
- If the tip moves even slightly, especially if you hear a faint squeak or scraping sound, it is almost certainly a slip-on/clamped style. Welded joints should not move at all.
Step 3: Dealing with Factory Over-Pipes (A Tricky Case)
Some manufacturers use a system where the tip is actually part of a larger tailpipe assembly that is bolted to the muffler. In this case, the tip itself might look welded to that tailpipe section, but the entire section bolts off the main muffler.
If you can’t see clamps or bolts directly connecting the tip to the pipe right before it, look further up the system where the whole tailpipe section connects to the muffler. If that connection uses bolts, you have a removable assembly, even if the tip design looks fused.
Comparison Table: Welded vs. Bolted Installation
To help you decide if you want to stick with your current setup or upgrade, here is a quick comparison of the pros and cons of each attachment style.
| Feature | Welded Attachments | Bolted/Clamped Attachments |
|---|---|---|
| Attachment Permanence | Permanent; removal requires cutting or grinding. | Temporary; easy to loosen, remove, or adjust. |
| Installation Difficulty (DIY) | High (Requires a certified welder). | Easy to Moderate (Requires basic hand tools). |
| Aesthetic Finish | Cleanest, seamless look possible. | Can sometimes show the clamp or a slight gap. |
| Vibration Risk | Very Low (Securely fixed). | Slightly Higher (Can loosen over time due to thermal stress). |
| Cost to Install/Replace | Higher (Due to specialized labor cost). | Lower (Often comes with the aftermarket tip). |
Why Do People Choose Welded Over Bolted (And Vice Versa)?
Your choice depends heavily on your goals for your vehicle. Are you aiming for maximum performance and a clean look, or are you prioritizing easy-to-do maintenance?
The Appeal of Welding: Longevity and Aesthetics
For long-term owners or those seeking a customized look, welding is often the preferred path.
- Durability: A good weld will last the life of the car and will not vibrate loose, even under rough driving conditions or heavy engine vibration.
- No Leaks: Because the seam is fused, there is virtually no chance of exhaust leaks forming at the tip connection point down the road.
- Show Quality: If you are entering your car in a show, a seamless, welded connection looks professional and high-end.
If you opt to weld a new tip on, ensure the installer follows best practices. For instance, when welding stainless steel components, you should use appropriate filler material to prevent premature corrosion, as mentioned in some automotive metallurgy guides from resources like automotive technical publications.
The Appeal of Bolting/Clamping: Flexibility and DIY Friendliness
For the budget-conscious DIY mechanic, bolted or clamped options offer unmatched convenience.
- Easy Swapping: If you buy a new set of polished tips for summer and want to swap back to discrete tips for winter, you can do it in minutes with a socket wrench.
- Adjustment: You can often adjust the depth or angle of the tip easily before tightening the clamp, ensuring perfect alignment relative to your bumper.
- No Heat Risk: You don’t have to worry about extreme heat affecting the connection, as you aren’t melting metal together.
However, always remember that clamps vibrate. If you notice a rattling sound or the tip seems loose after a few months, you will need to re-tighten the clamp. This is normal maintenance for this style.
How to Safely Remove Both Welded and Bolted Exhaust Tips
If you’ve determined your tips need replacing or servicing, the removal process is vastly different depending on how they are attached. Safety first—always work under good light and ensure the exhaust is cold.
Removing Bolted or Clamped Tips (DIY Friendly)
This process is straightforward and usually takes less than 30 minutes.
- Gather Tools: You will typically need a socket wrench set, penetrating oil (like WD-40), and safety glasses.
- Locate the Hardware: Find the clamp bolt or the mounting bolts holding the tip assembly.
- Apply Penetrating Oil: Spray the threads or the clamp hardware generously. Let it sit for 10–15 minutes. Rust and heat bake these connections tight over time.
- Loosen the Clamp: If it’s a clamp, carefully loosen the bolt. You usually don’t have to remove the bolt entirely, just enough to relieve the pressure on the clamp band.|
- Twist and Pull: Once loose, twist the tip sharply in both directions while pulling it toward you. It may slide off easily or require a bit more force.
Removing Welded Tips (Requires Caution or Professional Help)
Removing a welded tip requires cutting the metal. This is where you must decide if you are equipped for the job.
Warning: Cutting metal creates sparks and heat. Always wear a welding mask, heavy gloves, and have a fire extinguisher nearby. Never cut near fuel lines or any flammable materials.
Tools Needed (If Doing It Yourself):
- Angle grinder with a thin cutting/cutoff wheel
- Eye and face protection
- Fire extinguisher
Removal Steps:
- Mark the Cut Line: Draw a clear, straight line around the entire pipe, about 1/4 inch behind the decorative tip, on the main tailpipe section. This gives you room to slip on a new slip-on tip later.
- Cut Slowly: Using your angle grinder, carefully move the cutting wheel along your line. Let the tool do the work; don’t force it, as this can overheat and damage the wheel or surrounding components.
- Separate the Pieces: Once you cut through the bottom, a small amount of grinding on the top seam might be needed to fully separate the tip from the pipe.
- Grind Smooth: Once the old tip is off, use a grinding disc to smooth the cut edge left on your main tailpipe. This prevents sharp edges and prepares the surface for a new clamp-on replacement.
Installing New Exhaust Tips: Welded Aftercare vs. Clamping Installation
The installation process reflects the removal process. If you cut a welded system, you will likely install a new, easier-to-manage bolted/clamped system.
Installing a New Clamped/Slip-On Tip
This is the easiest upgrade path for most beginners.
- Clean the Pipe: Use steel wool or fine sandpaper to clean the exposed end of the existing tailpipe. It must be clean and smooth for a tight seal.
- Slide On: Slide the new tip over the cleaned pipe end. Make sure it is centered and aligned exactly how you want it to look.
- Position the Clamp: Slide the fastening clamp over the pipe so that it sits directly over the seam where the new tip meets the old pipe.
- Tighten Evenly: Tighten the bolt on the clamp just enough so that you cannot move the tip by hand. Over-tightening can sometimes dent the exhaust pipe, creating a weak spot. Check resources on proper torque for these clamps, often found on the manufacturer’s installation sheets.
- Final Check: Double-check the alignment and give the tip a firm shake.
Installing a New Welded Tip
If you are going premium and having a shop weld a tip on, here are the key things to look for in the service to ensure quality.
- Proper Preparation: The welder should clean and grind both the tip’s inner surface and the outer surface of your existing pipe to ensure the best metal-to-metal contact.
- Use Correct Alloys: If your current exhaust is stainless steel (which most modern exhausts are), the welder must use the correct stainless steel filler rod and technique to prevent weak spots prone to rust.
- Full Seam Weld: A quality job will have a continuous weld bead around the circumference, not just two or three small tack welds. Tack welds often fail under thermal expansion and contraction.
Troubleshooting Common Exhaust Tip Issues
No matter the installation method, exhaust tips can sometimes cause minor headaches. Here are quick fixes for common problems.
Problem 1: Vibration and Rattling (Common with Clamps)
If your tip rattles when you idle or accelerate, the clamp has likely loosened.
- Fix: Re-tighten the clamp bolt. If it still rattles, remove the clamp, clean the pipe surface thoroughly, and install an anti-rattle graphite or gasket compound before re-clamping.
Problem 2: Rusting or Discoloration (Common with Welds)
Factory welds can sometimes rust prematurely if low-quality steel was used for the original fitment.
Fix: If the rust is minor surface corrosion, you can try polishing the tip with automotive chrome or stainless steel polish (like Simple Green Extreme Metals Cleaner for a good starting point). If the rust is deep or the weld seam itself is failing, the tip must be cut off and replaced, often resorting to a bolted solution for easier future servicing.
Problem 3: Tip Drifting Out of Alignment
The tip moves or points crookedly, especially after hitting a pothole or during aggressive driving.
Fix (Clamped): If it’s a clamp, loosen it, reposition the tip exactly where you want it, and tighten it down much tighter than before, ensuring you check the positioning from the rear bumper. If it still moves, the clamp might be stripped, and you need a new clamp. Look for heavy-duty locking clamps if you drive on rough roads frequently.
Fix (Welded): If a welded tip drifts, it probably means the weld has cracked. This absolutely requires professional re-welding, as continued use will cause the tip to break completely away from the pipe.
Frequently Asked Questions (FAQs) for Beginners
Q1: Can I legally replace my factory exhaust tip with an aftermarket one?
A: Yes, in most places, replacing just the decorative tip is perfectly legal, as long as the new tip does not significantly change the sound volume beyond legal decibel limits or remove required emissions equipment. Always check local noise ordinances.
Q2: How often should I check my exhaust tip clamps if I have a bolted-on style?
A: It is wise to check your clamps every 3–4 months, especially after driving hard or hitting rough roads. A quick check with a visual inspection and a light twist is usually enough.
Q3: If my tips are welded, do I have to weld new ones back on?
A: Not at all! When removing a welded tip, you cut it off. You can then easily purchase a new, high-quality slip-on tip designed to use a heavy-duty clamp. This is the easiest way to upgrade without hiring a welder again.
Q4: Will a slip-on tip leak exhaust?
A: A correctly fitted and tightened slip-on tip usually won’t cause a significant leak. Some very minor seepage is possible at the seam, but this rarely impacts performance. If you have a large leak, the clamp is either too loose or the pipe end is rusted/damaged.