How to Blackout Motorcycle Exhaust the Right Way
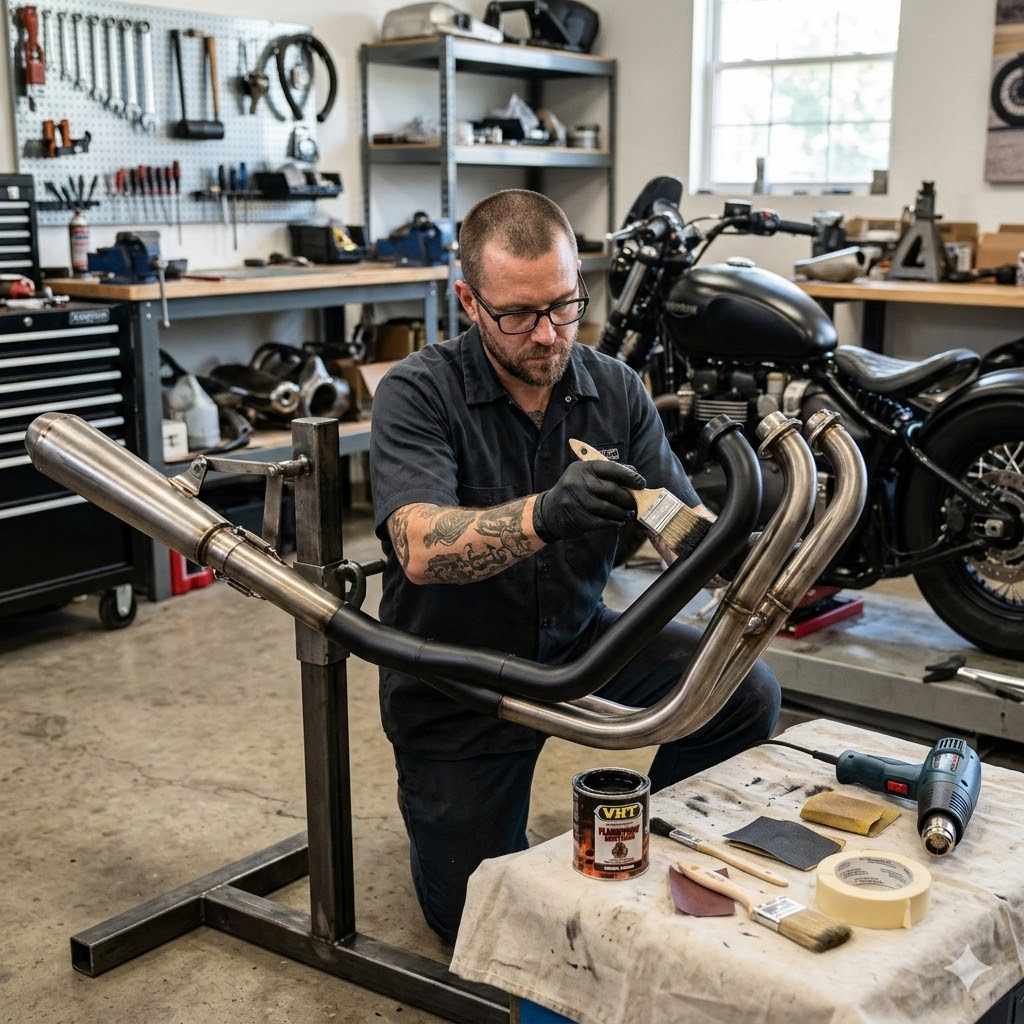
Are you looking to give your motorcycle a tough, custom look? Painting your exhaust pipes black is a popular way to do it. But for many riders, especially beginners, figuring out How to Blackout Motorcycle Exhaust the Right Way can seem tricky.
You might worry about the heat, getting the finish to stick, or making it look good. Don’t sweat it! We’re going to break it all down with simple steps that anyone can follow.
Get ready to make your ride stand out.
Preparing Your Motorcycle Exhaust for Blackout
Getting your exhaust ready is the most important part of making sure your blackout job lasts and looks great. This stage involves cleaning the pipes really well and getting rid of anything that could stop the new paint from sticking. Think of it like getting a wall ready for paint – you wouldn’t paint over dirt, right?
This preparation ensures a smooth, long-lasting finish that can handle the heat and bumps of riding.
Cleaning the Exhaust Pipes
Before you can even think about painting, your exhaust pipes need to be spotless. Any grease, oil, or old grime will ruin the job. You’ll need some good degreaser and a clean cloth.
Make sure to get into all the nooks and crannies.
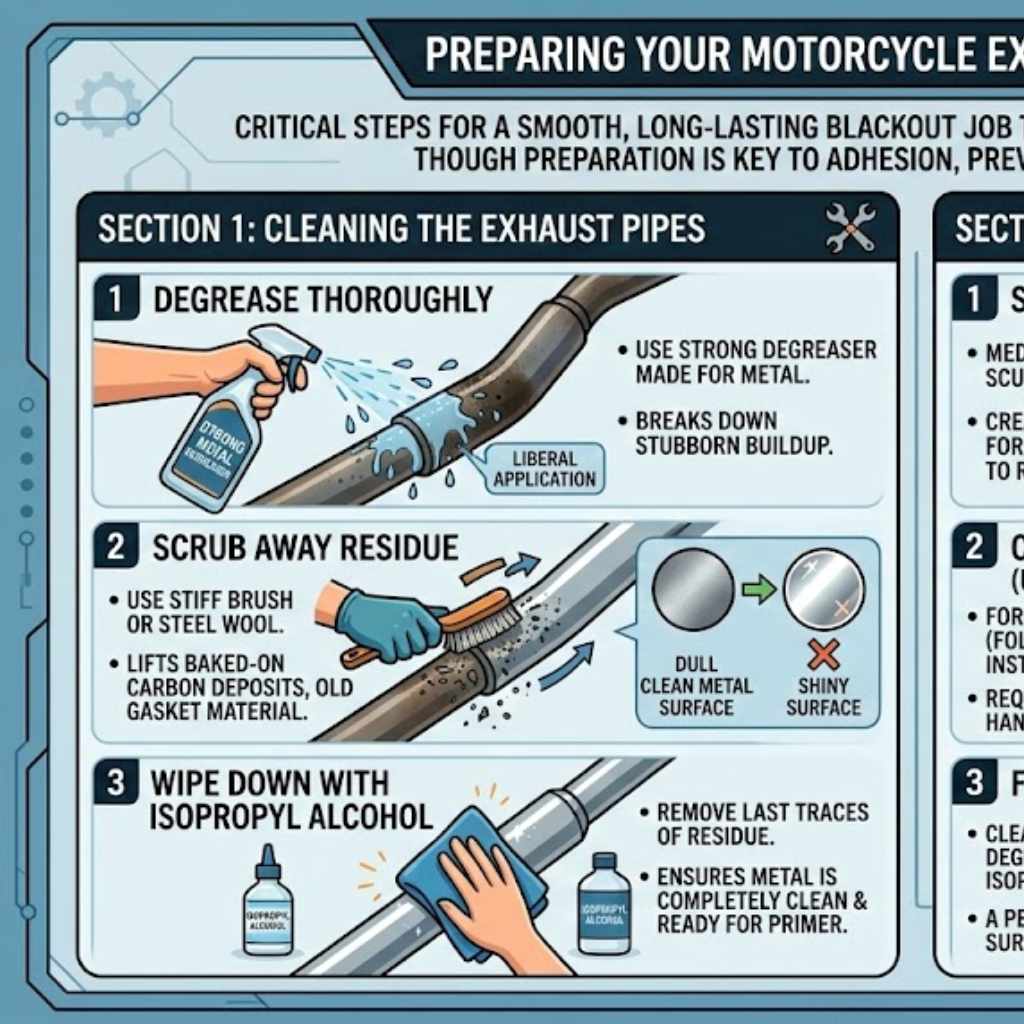
- Degrease ThoroughlyUse a strong degreaser specifically made for metal. Spray it on liberally and let it sit for a few minutes to break down any stubborn buildup. This is key to removing invisible contaminants that can cause paint failure later.
- Scrub Away ResidueUse a stiff brush or steel wool to gently scrub the pipes. This helps lift away any baked-on carbon deposits or old gasket material. You want a clean, dull metal surface, not a shiny one that might still have hidden oils.
- Wipe Down with Isopropyl AlcoholAfter degreasing and scrubbing, wipe the entire surface down with isopropyl alcohol (rubbing alcohol). This is a final step to remove any last traces of residue and ensure the metal is completely clean and ready for primer.
Removing Existing Paint or Coatings
If your exhaust pipes already have a finish, like chrome or faded black paint, you’ll need to remove it. Painting over an old finish without proper preparation will likely lead to peeling and chipping.
- Sanding for AdhesionUse medium-grit sandpaper, around 120 to 220 grit, to scuff up the existing surface. This creates tiny scratches that the new paint can grip onto. You don’t need to remove all the old paint, just make it dull and rough.
- Chemical Strippers (Use with Caution)For tougher finishes, chemical paint strippers can be used. Always follow the product’s instructions carefully, wear gloves and eye protection, and work in a well-ventilated area. These can be very effective but require careful handling.
- Final Wipe DownAfter sanding or stripping, clean the pipes again with degreaser and then isopropyl alcohol to remove all dust and debris. A perfectly clean surface is essential.
Choosing the Right Paint for High-Heat Exhausts
Not just any paint will work on a motorcycle exhaust. The pipes get incredibly hot, and regular spray paint will bake off, discolor, or even catch fire. You need a special type of paint designed for high temperatures, often called “high-heat” or “exhaust” paint.
This paint is formulated to withstand the extreme conditions your exhaust system endures.
Understanding High-Heat Paint Formulations
High-heat paints use special binders and pigments that can resist temperatures of 1000°F (538°C) or even more. This is crucial because exhaust pipes can easily reach these temperatures, especially during hard riding or when the engine is under load. Standard paints would fail long before reaching these levels.
- Ceramic CoatingsMany high-heat paints are ceramic-based. Ceramic is known for its incredible heat resistance and durability. These coatings form a tough barrier that insulates and protects the metal underneath from extreme heat cycles.
- Silicone ResinsOther formulations use silicone resins, which can also withstand very high temperatures. These resins remain flexible even when heated, preventing cracking and chipping that can happen with brittle paints.
- Pigment StabilityThe pigments used in high-heat paints are also specially chosen to resist fading or discoloration under intense heat. This ensures that your black finish stays black and doesn’t turn brown or purple over time.
Types of High-Heat Paints Available
You can find high-heat paints in various forms, each with its own pros and cons. The most common for DIY projects are spray cans.
- Spray Cans (Aerosol)This is the most popular choice for DIYers. Spray cans offer ease of use and allow for even application. Brands like VHT, Dupli-Color, and Krylon offer specific exhaust spray paints.
Look for products labeled for exhaust systems or high temperatures up to 1200°F or higher.
- Brush-On or Aerosol PaintsSome manufacturers also offer brush-on versions of high-heat paint, which can be useful for touch-ups or small areas. However, achieving a perfectly smooth, even finish can be more challenging with a brush compared to a spray can.
Factors to Consider When Buying Paint
When picking your paint, think about how long you want it to last and what kind of look you’re going for.
- Temperature RatingAlways choose a paint with a temperature rating well above what your exhaust is likely to reach. If your exhaust might hit 800°F, get a paint rated for at least 1200°F. This provides a safety margin.
- Color and Finish OptionsMost high-heat paints come in black, but you can find matte, satin, and gloss finishes. Matte black is very popular for a stealthy, aggressive look. Consider the overall aesthetic you want for your motorcycle.
- Brand Reputation and ReviewsCheck reviews from other riders and DIYers. Brands that consistently get good reviews for durability and heat resistance are usually a safe bet. Some products might be easier to apply or offer a better finish than others.
How to Blackout Motorcycle Exhaust the Right Way Application Steps
Now that your pipes are clean and you have the right paint, it’s time to apply the blackout finish. This process requires patience and attention to detail to get a smooth, even coat that will withstand the heat. The key is multiple thin coats rather than one thick one.
Applying Primer (Optional but Recommended)
While some high-heat paints can be applied directly to bare metal, using a high-heat primer can improve adhesion and durability.
- Purpose of High-Heat PrimerHigh-heat primers are designed to bond extremely well to metal surfaces and create an ideal base for the topcoat. They help fill minor imperfections and ensure the final black paint adheres securely, preventing lifting and chipping.
- Application TechniqueApply the primer in thin, even coats, following the instructions on the can. Allow each coat to dry to the touch before applying the next. Usually, two to three thin coats are sufficient.
Applying the High-Heat Black Paint
This is where the transformation happens. Work in a well-ventilated area, away from wind and dust.
- Shake the Can WellBefore you start, shake the spray can vigorously for at least two minutes. This mixes the pigments and propellant properly, ensuring an even spray pattern and consistent color.
- Spray in Light, Even CoatsHold the can about 8-12 inches away from the exhaust pipe. Spray in a consistent, sweeping motion, overlapping each pass slightly. Avoid spraying too close, which can cause drips, or too far, which can lead to a spotty finish.
- Allow Drying Time Between CoatsMost high-heat paints require a specific drying time between coats, usually 10-15 minutes. Check the product instructions. Rushing this step can lead to poor adhesion and an uneven finish.
- Apply Multiple Thin CoatsYou’ll likely need 3-5 thin coats to achieve full coverage and a deep, opaque black. Patience is key here. It’s always better to apply more thin coats than fewer thick ones.
Curing the Paint
This is a vital step that many people overlook. High-heat paints don’t fully harden until they are exposed to heat. This curing process bonds the paint to the metal.
- Initial Air DryingAfter your final coat, let the paint air dry for at least 24 hours. This allows the solvents to evaporate and the paint to set slightly before it’s exposed to heat.
- The Heat Curing ProcessOnce air-dried, you need to cure the paint with heat. This is typically done by running the motorcycle’s engine. Start with short runs at idle (15-20 minutes) for the first few times.
You might notice some smoke or a slight odor as the paint cures – this is normal. Gradually increase the duration and intensity of engine runs over a few days.
- Importance of Proper CuringSkipping or rushing the curing process is the most common reason for exhaust paint failure. Proper curing ensures the paint forms a hard, durable, heat-resistant shell that will last. If the paint isn’t cured correctly, it can flake off or discolor quickly.
Maintaining Your Blacked-Out Exhaust
Once your exhaust is beautifully blacked out, a little bit of care will keep it looking sharp for a long time. The heat and road debris can still take their toll, so knowing how to maintain it is important.
Cleaning Your Blacked-Out Exhaust
Regular cleaning is essential to keep your black exhaust looking its best.
- Gentle Cleaning MethodsUse mild soap and water for routine cleaning. Avoid abrasive cleaners or harsh chemicals, as these can damage the paint. A soft cloth or sponge is ideal for wiping down the pipes.
- Dealing with DiscolorationOver time, especially near the engine, you might see some slight discoloration or browning if the paint wasn’t cured perfectly or if it’s subjected to extreme heat. High-heat ceramic coatings are generally quite resistant to this, but it can happen. For minor spots, a gentle polish might help, but be careful not to scrub too hard.
Touch-Up and Repair
Even with the best preparation and application, minor chips or scratches can occur.
- Spot RepairingIf you get a small chip, you can often repair it by carefully cleaning the area, lightly sanding the edges of the chip, and then applying a very small amount of high-heat black paint using a fine brush or the tip of a spray can nozzle.
- Full Re-ApplicationFor more extensive damage or if the paint is failing significantly, it’s usually best to remove the old paint completely and start fresh with the entire process of preparing, priming, painting, and curing.
Protecting Against Road Grime and Debris
The roads can be tough on your exhaust. A ceramic wax or sealant designed for high-heat surfaces can add an extra layer of protection.
- Ceramic Coatings for ProtectionSome high-end motorcycle detailers offer ceramic coatings for exhaust systems. These are not the same as the paint itself but are applied on top to create a slick, hydrophobic surface that repels dirt and makes cleaning easier.
- Regular InspectionMake it a habit to inspect your exhaust pipes regularly for any signs of damage, rust, or paint failure. Catching issues early makes them much easier to fix.
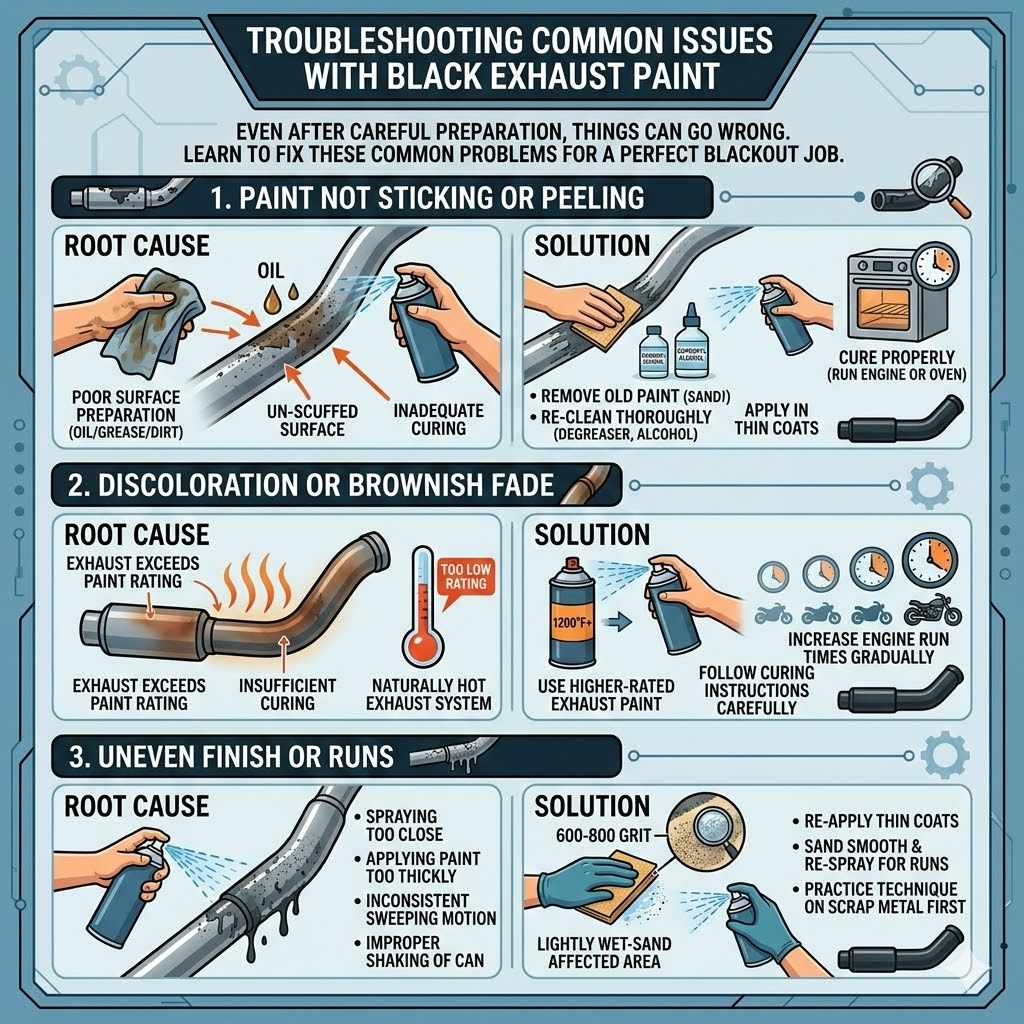
Troubleshooting Common Issues with Black Exhaust Paint
Even when you follow all the steps carefully, sometimes things don’t go perfectly. Here are some common problems and how to fix them when you’re trying to figure out how to blackout motorcycle exhaust the right way.
Paint Not Sticking or Peeling
This is often due to poor surface preparation or inadequate curing.
- Root CauseThe most frequent cause is oil or grease remaining on the surface, or painting over a dirty or un-scuffed surface. Not curing the paint properly can also lead to it peeling away from the metal as it heats and cools.
- SolutionIf the paint is peeling, you’ll likely need to remove it all with a stripper or aggressive sanding. Then, re-clean the pipes thoroughly with degreaser and isopropyl alcohol. Ensure you apply the paint in thin coats and cure it properly by running the engine according to the paint manufacturer’s instructions.
Discoloration or Browning
This can happen if the paint’s temperature rating is too low or if it wasn’t fully cured.
- Root CauseThe exhaust is exceeding the temperature rating of the paint, causing it to break down and turn brown. It can also happen if the paint wasn’t allowed to cure sufficiently through heat cycles. Some exhaust systems are naturally hotter than others.
- SolutionIf the discoloration is minor, it might be acceptable. For more noticeable browning, you may need to use a higher-rated exhaust paint on your next attempt. Make sure to follow the curing instructions very carefully, increasing engine run times gradually over several days.
Uneven Finish or Runs
This usually happens during the application stage.
- Root CauseSpraying too close to the surface, applying paint too thickly, or not using a consistent sweeping motion can lead to drips and uneven patches. Not shaking the can properly can also cause an inconsistent spray pattern.
- SolutionIf the finish is uneven, you can try to lightly wet-sand the affected area with very fine-grit sandpaper (e.g., 600-800 grit) once it’s fully dried and then re-apply thin coats. For runs, you’ll likely need to let it dry completely, sand it smooth, and re-spray. Practice your spray technique on scrap metal first.
Frequently Asked Questions
Question: Can I paint my motorcycle exhaust with regular spray paint?
Answer: No, regular spray paint is not designed for the extreme heat of a motorcycle exhaust. It will burn off, discolor, or even become a fire hazard. You must use paint specifically rated for high temperatures, like exhaust paint.
Question: How many cans of high-heat paint do I need?
Answer: For most standard motorcycle exhaust systems, one to two cans of high-heat spray paint should be sufficient, especially if you are applying multiple thin coats. It’s always a good idea to have a little extra just in case.
Question: Do I need to remove the exhaust from the motorcycle to paint it?
Answer: While you can paint exhaust pipes while they are on the motorcycle, it’s much easier and often results in a better finish if you remove them first. This allows you to clean and paint all sides evenly without obstructions.
Question: How long does high-heat exhaust paint typically last?
Answer: The lifespan of high-heat exhaust paint varies depending on the quality of the paint, the application, proper curing, and riding conditions. A well-applied and cured paint job can last for several years, but it may require touch-ups over time.
Question: What is the best temperature for applying high-heat exhaust paint?
Answer: Most manufacturers recommend applying high-heat paints in moderate temperatures, typically between 60°F and 85°F (15°C and 30°C). Avoid painting in direct sunlight, extreme heat, or very humid conditions, as this can affect the paint’s performance and finish.
Conclusion
Mastering How to Blackout Motorcycle Exhaust the Right Way is achievable with careful preparation and the right materials. Clean your pipes thoroughly, choose specialized high-heat paint, apply it in thin coats, and crucially, cure it properly with engine heat. A little patience goes a long way for a durable, custom look that lasts.