How to Black Out Exhaust Tips Easily
Want to make your car look a bit sleeker without a lot of fuss? Many car owners look for ways to customize their ride, and blacking out exhaust tips is a popular choice for a stealthier look. It might seem tricky at first, especially if you’re new to car care.
But don’t worry! We’re here to show you How to Black Out Exhaust Tips Easily. We’ll walk you through each step simply.
Get ready to learn a quick and effective method that anyone can do.
Why Black Out Your Exhaust Tips
Giving your exhaust tips a sleek black finish can really change the look of your vehicle. It’s a subtle yet impactful modification that many car enthusiasts appreciate for its clean and modern aesthetic. This style often complements darker paint jobs or adds a sharp contrast to lighter colors, giving your car a more aggressive or sophisticated profile.
Beyond looks, it’s a way to express your personal style on your car without undertaking major changes. It’s a simple project that can yield noticeable results, making your car stand out just a little bit more.
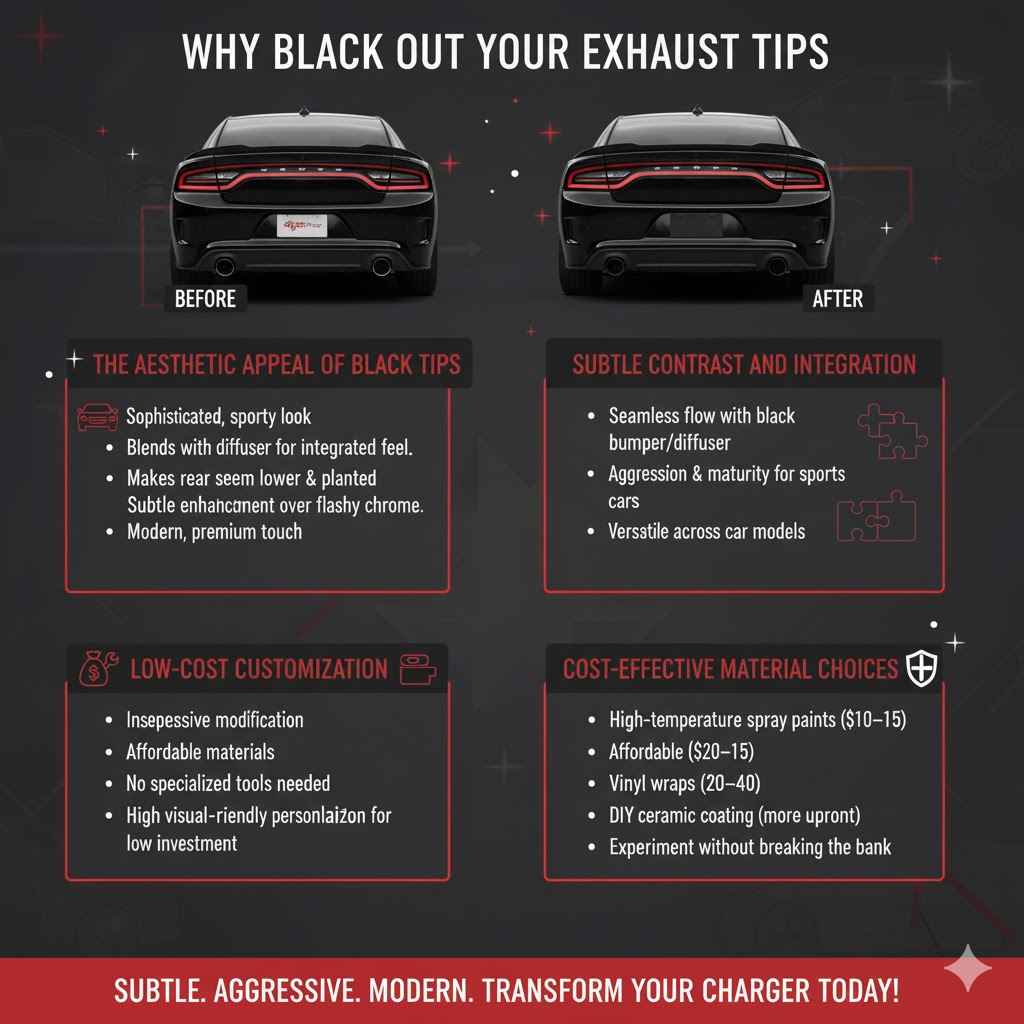
The Aesthetic Appeal of Black Tips
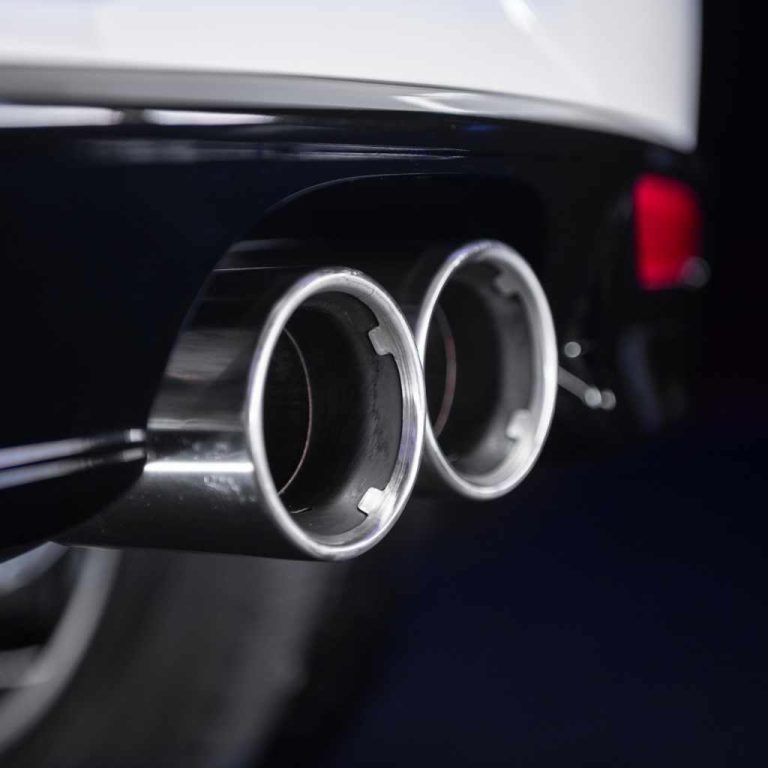
Black exhaust tips offer a sophisticated and often sportier appearance than standard chrome or silver tips. They blend in with the rear diffuser or bumper, creating a smoother, more integrated look. This visual integration can make the rear of the car seem lower and more planted.
For many, this subtle enhancement is more appealing than flashy chrome, offering a refined touch. It’s a design choice that speaks to understated style and attention to detail, making your vehicle look more premium.
Think about a dark-colored sports car. Chrome tips can sometimes look a bit dated or out of place against a deep metallic paint. Black tips, on the other hand, complete the look, making the car appear more purposeful and modern.
This can be a significant upgrade in perceived value and style for the vehicle owner.
Subtle Contrast and Integration
The primary reason people opt for black exhaust tips is for the visual contrast or integration they provide. If your car has a black rear bumper or diffuser, black tips create a seamless flow. This makes the exhaust system less of a focal point and more of a subtle, integrated design element.
For cars with brighter paint, black tips can provide a nice grounding effect, preventing the rear from looking too busy.
Consider a bright red car. While chrome might add a bit of sparkle, black tips can add a touch of aggression and maturity. It’s a way to dial back the flashiness and achieve a more serious, performance-oriented look.
This versatility makes black tips a popular choice across various car models and owner preferences.
Low-Cost Customization
Compared to many other vehicle modifications, blacking out exhaust tips is relatively inexpensive. The materials are generally affordable, and the process itself doesn’t require specialized tools or professional labor, making it a budget-friendly way to personalize your car. This accessibility means that even owners with limited budgets can achieve a custom look.
You can find spray paints, wraps, or ceramic coatings specifically designed for high-heat applications like exhaust systems. These options are readily available at auto parts stores and online retailers. The cost of materials for a DIY job is often under fifty dollars, which is a small investment for a significant visual upgrade.
Cost-Effective Material Choices
The affordability of black exhaust tips comes from several accessible modification methods. High-temperature spray paints are perhaps the most budget-friendly option. A can of specialized exhaust paint can cost as little as $10-$15.
Vinyl wraps designed for automotive exteriors are also an option, though they might require a bit more skill and can cost slightly more, perhaps $20-$40 for enough material. Even professional ceramic coating, while more expensive upfront, is still a fraction of the cost of other exhaust system upgrades.
This cost-effectiveness allows enthusiasts to experiment with their car’s appearance without breaking the bank. It’s a great way to test the waters of car customization and see what you like best for your vehicle.
Methods for Blacking Out Exhaust Tips
There are several ways to achieve that desirable blacked-out look for your exhaust tips. Each method has its own pros and cons in terms of durability, ease of application, and cost. Whether you’re looking for a quick, temporary change or a more permanent, professional finish, there’s likely an option that fits your needs and skill level.
We’ll explore the most common and effective techniques.
High-Temperature Spray Paint
This is probably the most common and straightforward DIY method for blacking out exhaust tips. Specialized spray paints are formulated to withstand the extreme heat generated by exhaust systems. They offer a matte or satin black finish that looks clean and modern.
The key is thorough surface preparation to ensure good adhesion and a smooth, long-lasting finish.
Surface Preparation is Key
Before applying any paint, the exhaust tips must be impeccably clean. This means removing all dirt, grime, rust, and any old coating. You can use a degreaser, an automotive soap, and water.
For tougher spots, steel wool or a wire brush can be effective. After cleaning, wipe down the tips with a solvent like rubbing alcohol or a wax and grease remover. This step is crucial for ensuring the paint adheres properly and doesn’t peel or flake off prematurely.
A clean surface allows the paint molecules to bond directly with the metal.
Imagine trying to paint over grease; the paint just won’t stick well. The same principle applies here, but the heat from the exhaust will accelerate any adhesion problems. Taking your time with cleaning prevents future frustration and ensures a professional-looking result.
Application Technique
Once the tips are clean and dry, you can begin spraying. It’s best to apply several thin coats rather than one thick one. This builds up the color evenly and reduces the chance of drips.
Hold the can about 8-12 inches away from the surface and use a steady back-and-forth motion. Allow each coat to dry for the time recommended on the spray can before applying the next.
Most high-temperature exhaust paints recommend a curing process. This usually involves running the engine for a short period. The heat from the exhaust will bake the paint onto the metal, hardening it and making it more durable.
This curing step is vital for the longevity of the paint job.
Pros and Cons
- Pros: Easy to apply, readily available, cost-effective, good range of finishes (matte, satin). This method is very accessible for beginners and requires minimal tools. The ability to achieve a decent looking finish with just a spray can is appealing for many DIYers.
- Cons: May not be as durable as other methods, can chip or scratch over time, requires reapplication after a period, especially with heavy use or harsh conditions. The paint is a coating, and like any coating, it’s susceptible to damage.
Exhaust Tip Wrap
Exhaust tip wraps, often made from high-temperature resistant materials like silicone or carbon fiber look composites, offer a sleek, uniform black appearance. These wraps are designed to slide over the existing exhaust tips and are secured in place. This method is relatively quick and can give a very clean, integrated look, especially for tips that are exposed and visible.
Choosing the Right Wrap
When selecting an exhaust tip wrap, consider the material and its heat resistance. Silicone wraps are popular for their flexibility and durability. Some wraps are designed to mimic the look of carbon fiber, providing a sporty aesthetic.
Ensure the wrap you choose is specifically rated for exhaust temperatures, as these can get very hot. The size and shape of your exhaust tips will also dictate the type of wrap you need. Some wraps are universal, while others are model-specific.
For example, a wrap designed for a small diameter tip might not fit a large, oval one. Always check the product specifications for compatibility with your vehicle’s exhaust.
Installation Process
Installation typically involves cleaning the exhaust tips thoroughly, just like with painting. Then, the wrap is carefully slid over the tip. Many wraps have an adhesive backing or are secured with small clamps or screws.
Follow the manufacturer’s instructions precisely. Some wraps might require heat from a hairdryer or heat gun to activate an adhesive or ensure a tight fit.
A common scenario is a wrap that slides on easily but needs to be secured at the end. This might involve a small band clamp that tightens around the base of the wrap, ensuring it stays in place even under vibration and heat.
Pros and Cons
- Pros: Quick installation, provides a uniform and clean look, can be a good option for tips that are hard to paint, offers a premium appearance, can be removed if desired. The ability to achieve a factory-like finish without painting is a big plus.
- Cons: Can be more expensive than spray paint, some materials may fade or degrade over time, might not fit all exhaust tip shapes perfectly, could potentially trap moisture if not installed correctly leading to rust. The initial cost might be higher, making it less budget-friendly for some.
High-Temperature Ceramic Coating
For a more durable and professional finish, ceramic coating is an excellent option. This involves applying a special ceramic-based paint that cures to a hard, protective layer. It’s highly resistant to heat, corrosion, and abrasion, offering a long-lasting black finish.
This method is often done professionally but can be a DIY project for those with the right equipment and patience.
Understanding Ceramic Coating
Ceramic coatings are advanced paint formulations that use ceramic particles suspended in a liquid base. When applied and cured, these particles bond together, forming a very tough and heat-resistant layer. They are designed to protect against extreme temperatures, chemicals, and physical wear.
This makes them ideal for exhaust components, which are exposed to some of the harshest conditions on a vehicle. The finish can range from matte to gloss, depending on the specific product used.
Think of it like a high-tech shield for your exhaust tips. Unlike regular paint, it doesn’t just sit on the surface; it forms an integral part of it, offering superior protection and longevity.
Professional vs. DIY Application
Professional ceramic coating offers the best results. Shops have specialized equipment for cleaning, sandblasting (if necessary), precise application, and controlled curing. This ensures a flawless, durable finish.
However, professional services can be costly.
DIY ceramic coating kits are available. These kits usually include the ceramic coating spray or liquid, application tools, and instructions for curing, which often involves high heat. The DIY process demands meticulous preparation, including thorough cleaning and degreasing, and often light sanding or media blasting for optimal adhesion.
The curing process is critical; usually, it requires running the engine for extended periods at increasing temperatures to fully harden the coating.
A DIY scenario might involve carefully cleaning the tips, applying several thin coats of the ceramic spray, and then letting the car idle for 30 minutes, then driving it for 30 minutes, and repeating this cycle several times. This ensures the coating cures properly.
Pros and Cons
- Pros: Extremely durable and long-lasting, highly resistant to heat, corrosion, and chips, provides a premium, professional look, excellent protection for the exhaust tips. This is the premium option for a reason, offering the best in terms of performance and looks.
- Cons: Can be expensive, especially for professional application, requires careful preparation and curing, DIY application can be challenging and may not yield professional results without experience. The investment in time and money is higher, making it less accessible for a quick weekend project.
Detailed Step-by-Step Guide
Let’s break down the most accessible method, using high-temperature spray paint, into easy-to-follow steps. This guide will ensure you get a clean, durable finish.
Step 1 Gather Your Materials
Before you start, make sure you have everything you need. This prevents interruptions and ensures a smooth process. Having all your supplies ready is like preparing for a recipe; you wouldn’t start cooking without your ingredients.
Essential Supplies List
- High-temperature exhaust spray paint (matte or satin black recommended). Ensure it’s rated for at least 1200°F.
- Degreaser or strong automotive soap.
- Clean rags or microfiber towels.
- Rubbing alcohol or wax and grease remover.
- Sandpaper (medium and fine grit, e.g., 220 and 400).
- Wire brush or steel wool.
- Painter’s tape or masking tape.
- Cardboard or newspaper to protect surrounding areas.
- Gloves and eye protection.
Choosing the right paint is important. Brands like VHT, Dupli-Color, and Rust-Oleum offer good quality exhaust paints. Always read the product label to confirm its suitability for your needs.
Step 2 Prepare the Exhaust Tips
This is arguably the most important step for a lasting finish. Thorough cleaning and prep work will make a huge difference in how well the paint adheres and how long it stays on. Don’t rush this part.
Thorough Cleaning
Use your degreaser or soap and water to scrub the exhaust tips clean. Get rid of all road grime, oil, and soot. A wire brush or steel wool can help tackle stubborn dirt or any existing rust spots.
Rinse them off thoroughly with clean water.
After rinsing, dry the tips completely with clean rags. Any residual moisture can interfere with the paint’s adhesion.
Surface Roughening and Degreasing
Once dry, use medium-grit sandpaper (around 220) to lightly scuff the surface of the exhaust tips. This creates a slightly rough texture that paint can grip onto better. Don’t try to remove significant amounts of metal, just a light sanding.
Follow up with fine-grit sandpaper (around 400) to smooth out any rough edges from the initial sanding.
After sanding, wipe down the tips again with rubbing alcohol or a wax and grease remover. This removes any fine dust particles and ensures the surface is perfectly clean and free of contaminants.
Imagine you are preparing a surface for a professional paint job on a wall. You wouldn’t just slap paint on; you’d clean, sand, and prime it. This automotive application requires a similar level of care for the best results.
Step 3 Masking and Protection
Protect the parts of your car you don’t want to paint. Exhaust tips are usually near the bumper and body panels.
Protecting Surrounding Areas
Use painter’s tape to carefully mask off any areas around the exhaust tips that you want to keep clean. This includes the bumper, tail lights, and the underside of the car. If the tips are very close to the paintwork, consider using multiple layers of tape and covering larger areas with newspaper or cardboard.
Ensure the tape is pressed down firmly to prevent paint overspray from getting underneath. This step saves a lot of cleanup time later.
For example, if you have a glossy black bumper, you definitely don’t want any black overspray on it. Careful masking ensures a clean line between the painted tips and the rest of the car.
Step 4 Applying the Paint
Now for the fun part! Follow these tips for an even and durable coat.
Thin, Even Coats
Shake the spray can well for about two minutes before using it. Hold the can about 8-12 inches away from the exhaust tips. Apply the paint in light, sweeping motions, moving back and forth.
Aim for thin, even coats. This prevents drips and ensures full coverage.
Apply the first coat lightly, then wait for about 10-15 minutes before applying the second coat. Continue applying coats until you achieve the desired coverage and depth of color. Most projects will require 2-4 coats.
A common mistake is trying to get full coverage in one go. This usually results in drips and an uneven finish. Patience with thin coats is key to a professional look.
Allowing for Drying and Curing
After the final coat, let the paint dry to the touch for at least 30 minutes to an hour. Most high-temperature exhaust paints require a curing process to reach their full hardness and durability. This typically involves heat.
Check the instructions on your specific spray paint can.
Usually, this involves running the engine for a short period (e.g., 10-15 minutes) or taking the car for a short drive. The heat from the exhaust will bake the paint. You might notice some initial odor or slight smoking during the first curing cycle, which is normal.
Repeat the heating process as recommended by the manufacturer.
Step 5 Final Touches and Inspection
Once the paint is cured, you can admire your work.
Removing Masking and Cleaning Up
Carefully remove the painter’s tape and any masking paper. It’s best to do this when the paint is dry but not fully hardened. Pull the tape away slowly at an angle to avoid peeling the paint.
Clean up any minor overspray with a damp cloth or appropriate solvent.
Inspect the tips for any missed spots or imperfections. If needed, you can touch them up carefully with a small amount of paint, but be aware that re-application might require another curing cycle.
Checking Durability
After the full curing process is complete (which can take 24 hours or more, depending on the paint), check the durability. Try to gently scratch a small, inconspicuous area with your fingernail. If the paint is properly applied and cured, it should feel hard and resistant.
Observe the tips over the next few days and weeks. They should hold their black finish well, even under the heat and vibrations of normal driving. Occasional cleaning with mild soap and water will help maintain their appearance.
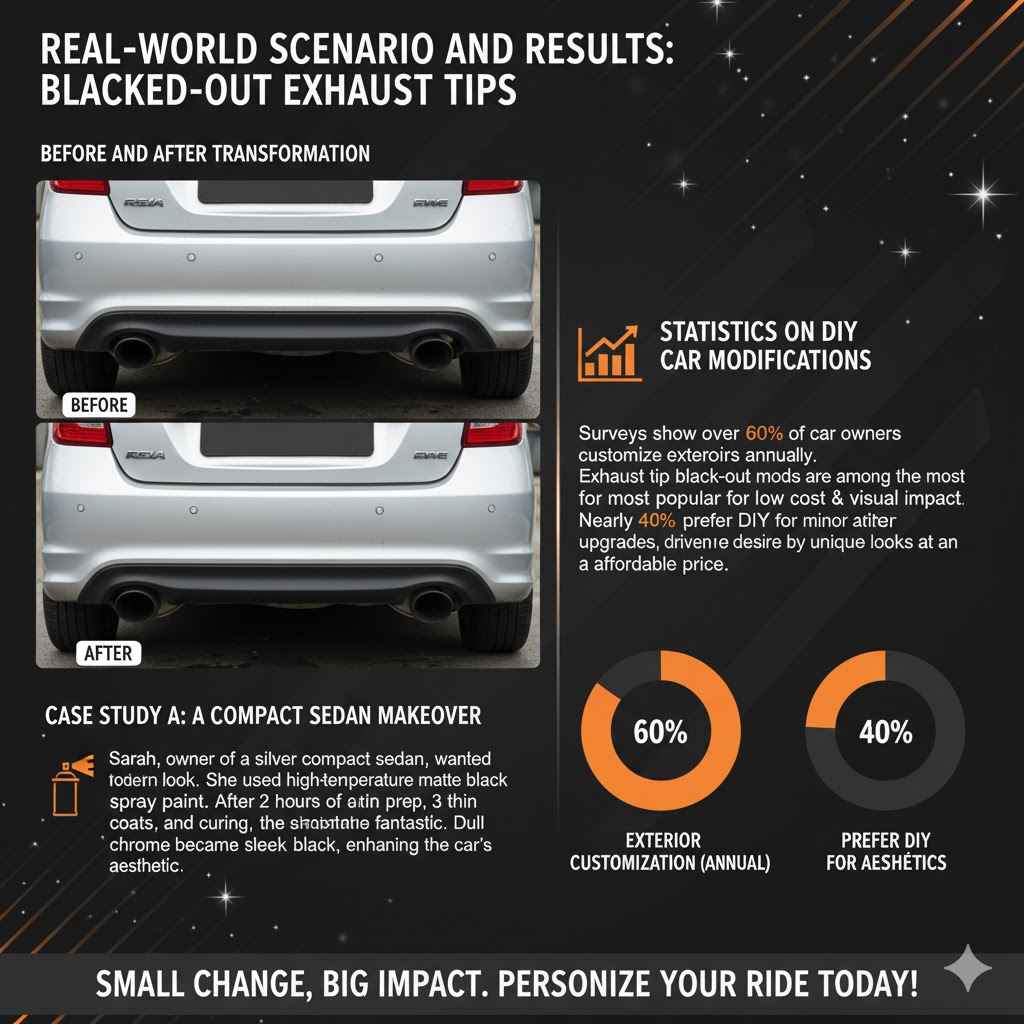
Example Scenario and Results
Let’s look at how this process plays out for a typical car owner.
Before and After Transformation
Imagine a car with standard, slightly dull chrome exhaust tips. They show some water spots and a bit of road grime that’s hard to polish out. After following the steps above, the exhaust tips are now a sleek, matte black.
The car’s rear end now looks more cohesive, especially if it has dark accents. The black tips give it a sportier, more refined appearance. The transformation is subtle but noticeable, enhancing the overall aesthetic of the vehicle without being over the top.
Case Study A A Compact Sedan Makeover
Sarah, an owner of a silver compact sedan, wanted to give her car a more modern look. She decided to black out her exhaust tips using high-temperature spray paint. She spent about two hours on preparation, meticulously cleaning and sanding the tips.
After applying three thin coats of matte black exhaust paint, she followed the curing instructions by idling her car for 20 minutes, then taking it for a 30-minute drive.
The results were fantastic. The dull chrome tips were
Statistics on DIY Car Modifications
Surveys indicate that a significant portion of car owners engage in DIY modifications. For instance, a study by an automotive enthusiast magazine found that over 60% of respondents had performed some form of exterior customization on their vehicles in the past year. Of these, exhaust tip modifications, including blacking them out, were among the most popular for their immediate visual impact and relatively low cost.
Another survey on car maintenance habits revealed that nearly 40% of vehicle owners prefer DIY solutions for minor aesthetic upgrades. This highlights a strong trend towards personalized vehicle aesthetics achieved through accessible methods like painting exhaust tips. The desire for a unique look at an affordable price point drives these trends.
Frequently Asked Questions
Question: How long does black exhaust tip paint usually last?
Answer: With proper preparation and application of high-temperature paint, it can last anywhere from six months to over a year, depending on driving conditions, climate, and how the exhaust tips are cleaned and maintained.
Question: Can I use regular spray paint on my exhaust tips?
Answer: No, regular spray paint is not designed to withstand the extreme heat of exhaust systems. It will quickly burn off, discolor, or peel. Always use paint specifically rated for high temperatures.
Question: How do I clean black exhaust tips without damaging the paint?
Answer: Use mild soap and water with a soft cloth or sponge. Avoid abrasive cleaners, harsh chemicals, or excessive scrubbing, as these can scratch or damage the paint finish.
Question: Will black exhaust tips affect my car’s performance?
Answer: No, blacking out exhaust tips is purely an aesthetic modification and has no impact on your car’s engine performance or exhaust flow.
Question: Is it safe to paint exhaust tips myself?
Answer: Yes, it is safe as long as you follow proper safety precautions, such as wearing gloves and eye protection, working in a well-ventilated area, and allowing adequate drying and curing time before driving.
Conclusion
Transforming your exhaust tips to a sleek black finish is a straightforward DIY project. By following simple steps for preparation, painting, and curing, you can easily achieve a custom look. This method offers a cost-effective way to enhance your car’s aesthetics and personalize its appearance.