How Far On Do I Put Exhaust Tip? Essential Guide
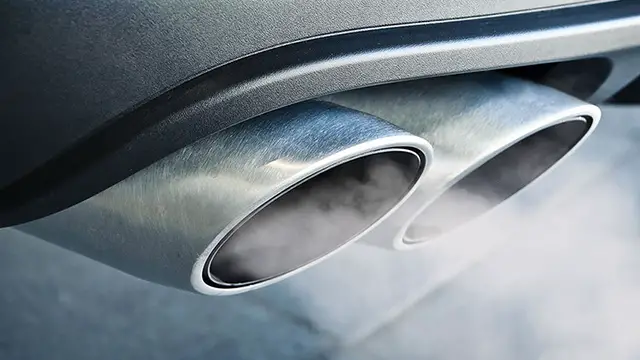
To correctly position your exhaust tip, aim for it to extend about 1/2 inch to 1 inch beyond the rear bumper. This prevents heat damage to your vehicle’s bodywork while maintaining a clean, finished look. Proper placement ensures both aesthetics and safety for your car.
Getting your exhaust tip just right can feel like a puzzle. You’ve got this shiny new tip, and you want it to look great and work perfectly. But how far should it stick out? Too little, and it might look odd or even get too hot near your bumper. Too much, and it could look a bit… much. It’s a common question for many car owners, and it’s totally okay to feel a bit unsure! We’re here to make it super simple. We’ll walk you through exactly how to figure out the perfect spot for your exhaust tip, step by step. Let’s get your car looking its best and performing its safest!
Why Exhaust Tip Placement Matters
Your exhaust tip does more than just look good; its placement has some practical implications. When it’s positioned correctly, it helps to safely vent hot exhaust gases away from your vehicle’s body. This is crucial for preventing damage to paint, plastic, and rubber components that are often found around the rear bumper area. Think of it as giving your car’s bumper a little breathing room from the heat!
Beyond safety, good exhaust tip placement significantly impacts the overall appearance of your vehicle. A tip that’s too far in can look unfinished, almost like an afterthought. Conversely, a tip that sticks out too far can look awkward or even cheap. The goal is a clean, integrated look that complements your car’s design. It’s about achieving that factory-fresh, or sometimes even better-than-factory, aesthetic that makes you proud to drive your car.
Furthermore, correct placement can sometimes subtly influence exhaust flow, though this is less of a concern for typical bolt-on tips and more for custom exhaust setups. However, ensuring there’s no obstruction and that the gases can exit freely is always good practice. We want to make sure everything flows smoothly, both visually and functionally.
Understanding Your Vehicle’s Exhaust System
Before we dive into tip placement, it’s good to have a basic understanding of your car’s exhaust system. This system isn’t just a single pipe leading to a tip. It’s a network designed to quiet engine noise and remove harmful gases safely. Key components include:
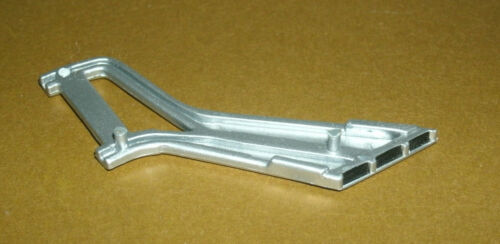
- Exhaust Manifold: Connects to the engine cylinders to collect exhaust gases.
- Catalytic Converter: A vital emissions control device that converts harmful pollutants into less harmful substances.
- Muffler (or Silencer): Reduces the loud noise produced by the engine’s exhaust.
- Resonator: Another component that helps tune the exhaust sound, often for a sportier tone.
- Exhaust Pipes: Connect these components and direct gases to the rear of the vehicle.
- Exhaust Tip: The decorative and functional end piece that you see.
These parts work together to manage your car’s exhaust. The exhaust tip is the final flourish, and its appearance and installation are what most owners focus on. Understanding that it’s the end of a carefully designed path helps us appreciate why its positioning matters.

General Guidelines for Exhaust Tip Placement
The most common and recommended guideline for exhaust tip placement is to have it extend approximately 1/2 inch to 1 inch beyond the rear bumper. This sweet spot offers a balance of aesthetics and practicality.
- Why 1/2 to 1 inch? This small extension is usually enough to keep the exhaust gases from directly impacting the bumper materials. Newer bumpers, especially those made of plastic or with specific paint finishes, can be sensitive to prolonged heat exposure. A slight protrusion helps direct the hot air flow away, preventing discoloration or potential warping.
- Visual Appeal: This range typically provides a clean, finished look without looking too aggressive or too tucked in. It sits in a pleasing proportion to the bumper and the overall rear end of the vehicle.
- Considerations for Different Bumpers: Some bumpers have specific cutouts or designs that might influence the ideal placement. For example, if your bumper has a recessed area for the exhaust, you might aim for the tip to be flush with that recess or slightly beyond.
It’s also important to consider the brand and model of your vehicle. Some cars are designed with exhaust cutouts that naturally guide you to a specific depth. For instance, if your car has a factory opening in the bumper for the exhaust, the tip should ideally align with or slightly protrude from that opening.
Tools You’ll Need
Before starting, gather the necessary tools. Having everything ready makes the process smoother and safer.
Essential Tools:
- New Exhaust Tip: Ensure it’s compatible with your vehicle’s exhaust pipe diameter.
- Measuring Tape or Ruler: For precise measurements.
- Wrench Set or Socket Wrench: To tighten or loosen clamps.
- Screwdriver(s): Flathead and Phillips, depending on your clamp type.
- Safety Glasses: Always wear protection for your eyes.
- Gloves: To keep your hands clean and prevent cuts.
- Wire Brush: To clean the existing exhaust pipe for a good fit.
- Pen or Marker: To mark positions if needed.
Optional, but Helpful Tools:
- Torque Wrench: For ensuring clamps are tightened to the correct specification, preventing over-tightening or under-tightening.
- Penetrating Oil: If the existing exhaust pipe is rusted or stuck, this can help loosen clamps.
- Jack and Jack Stands: If you need to lift the car for better access to the exhaust pipe. Always use these on a level surface and follow proper safety procedures. You can learn more about safe lifting practices from resources like NHTSA’s towing and loading safety guidelines, which often touch on vehicle support.
- Level: To ensure the tip is straight and centered.
Step-by-Step Guide to Installing Your Exhaust Tip
Here’s how to get your new exhaust tip fitted perfectly. Remember to always prioritize safety!
Step 1: Safety First!
Ensure your vehicle is parked on a level surface. If you need to lift the car, use a jack and secure it properly with jack stands. Allow the exhaust system to cool down completely. Exhaust components can get extremely hot and cause severe burns.
Step 2: Inspect the Existing Exhaust Pipe
Locate the end of your existing exhaust pipe. This is where the new tip will attach. Clean the pipe thoroughly with a wire brush. This removes any rust, dirt, or debris, ensuring a snug and secure fit for the new tip. A clean surface helps the clamp grip better.
Step 3: Measure and Mark (If Necessary)
If your new tip doesn’t have a built-in clamping mechanism and uses a separate clamp, slide it onto the exhaust pipe. Now, assess the desired position. Hold your new tip up to the end of the existing pipe and visualize how far it will extend past the bumper. Use your measuring tape to check the 1/2 to 1-inch extension mark. You can use a marker to lightly indicate where the clamp should go if you’re using a slip-on type with a single bolt.
Step 4: Attach the New Exhaust Tip
There are a few common ways exhaust tips attach:
- Clamp-On: These are the most common for aftermarket tips. Slide the tip over the existing exhaust pipe to the desired position. Then, position the clamp over the connection point (or the designated area on the tip) and tighten the bolt(s) with your wrench until the tip is secure. Don’t overtighten, as this can damage the tip or the pipe.
- Bolt-On (Welded Clamps): Similar to clamp-on, but the clamp is often integrated or pre-welded. Align the tip and tighten the bolts.
- Weld-On: These tips require professional welding for a permanent and secure attachment. This is less common for DIY installations.
For most beginner installations, you’ll be using a clamp-on tip. Ensure the tip is centered in the exhaust cutout (if applicable) and straight.
Step 5: Check Alignment and Fit
Once the tip is snug, step back and look at it from different angles. Is it centered? Is it level? Does it extend the desired amount? Make any adjustments needed by slightly loosening the clamp, repositioning, and then re-tightening. A little wiggle room is normal before the final tightening. Ensure the tip doesn’t rub against the bumper or any other part of the car’s body.
Step 6: Final Tightening and Inspection
With everything aligned perfectly, tighten the clamp securely. Give the tip a gentle tug to ensure it’s not loose. It should feel solid. Double-check that the exhaust gases will have a clear path out and won’t be directed at any plastic or painted surfaces on your bumper. For a detailed look at exhaust system maintenance, resources from automotive engineering bodies can offer deeper insights, such as those managed by the SAE International (Society of Automotive Engineers), which often publish standards and research relevant to vehicle components.
Step 7: Clean Up
Remove any tools, rags, or debris from under and around the car. Dispose of any waste properly.
Factors Influencing Exhaust Tip Placement
While the 1/2 to 1-inch rule is a great starting point, several factors might influence the ideal placement for your specific vehicle:
Bumper Design and Material
This is perhaps the most significant factor. Plastic bumpers, common on modern cars, are more susceptible to heat damage from exhaust gases than older metal bumpers. If your bumper has a specific cutout for the exhaust, the tip should align with that opening. Some bumpers have a recessed area or a protective heat shield; pay attention to these features.
Exhaust Pipe Length and Bend
The existing exhaust pipe’s length and any bends leading to the tip can affect how much of the pipe is available for mounting the new tip. If the existing pipe terminates very close to the muffler or has an unusual angle, it might limit how far you can extend the new tip.
Aesthetics and Vehicle Style
While functionality is key, aesthetics are also important. Some owners prefer a more subtle look where the tip is flush or slightly recessed, especially on luxury vehicles. Others might opt for a more aggressive look where the tip extends a bit further, often seen on performance-oriented cars. Your personal preference plays a role, but always balance it with the safety guidelines.
Type of Exhaust Tip
Different types of tips have different mounting methods and lengths. A short, slash-cut tip might look best a certain depth, while a long, rolled-edge tip might look better with more protrusion. Always refer to the manufacturer’s instructions that came with your specific exhaust tip.
Legality and Regulations
In some regions, there might be regulations regarding how far an exhaust tip can extend from the vehicle’s body for safety reasons. While less common for standard tip installations, it’s something to be aware of if you’re going for an extreme custom setup. The Environmental Protection Agency (EPA) provides information on vehicle emissions and their environmental impact, indirectly related to exhaust system design and function.
Visualizing the Perfect Fit: Common Scenarios
Let’s look at a few common scenarios to help you visualize the best placement:
Scenario 1: Standard Bumper with Exhaust Cutout
Your car has a factory-designed opening in the bumper for the exhaust. In this case, the ideal placement is usually to have the tip sit just within or slightly protruding from this cutout. Aim for that 1/2 to 1-inch extension beyond the actual end of the bumper, not just the cutout itself. This ensures heat is directed away from the bumper material.
Scenario 2: No Factory Cutout (Hidden Exhaust)
Your car’s exhaust pipe is tucked away, and you’re adding a tip for looks. Here, you have more flexibility. The 1/2 to 1-inch extension from the rear-most point of the vehicle (often the bumper’s lower edge) is generally the best bet. You want the tip to be visible and look intentional, not hidden away, but also not so far out that it risks damage or looks awkward.
Scenario 3: Sporty/Aggressive Look
If you’re aiming for a more performance-oriented aesthetic, you might prefer the tip to extend slightly more. However, caution is advised. Extending more than 2–3 inches significantly increases the risk of heat damage to your bumper and can look aftermarket in a less desirable way. Always prioritize safety and consult with exhaust specialists if you’re unsure about aggressive extensions.
Table: Exhaust Tip Extension vs. Potential Issues
| Extension Past Bumper | Pros | Cons |
|---|---|---|
| Retracted (Flush or Inside) | Subtle, clean look. Reduced risk of bumper damage from direct tip contact. | Risk of heat damage to bumper interior (paint, plastic). Can look unfinished. |
| 1/2 inch to 1 inch | Ideal balance: Prevents direct heat damage, maintains aesthetics, looks finished. | Minimal. Requires careful measurement. |
| 1 inch to 2 inches | More visible tip, can enhance sporty look. | Slightly increased but still low risk of heat damage. Can look slightly aftermarket depending on styling. |
| 2 inches+ | Very prominent tip, aggressive look. | High risk of heat damage to bumper. Can look unbalanced or “bolted-on.” May draw unwanted attention regarding regulations. |
Common Mistakes to Avoid
Even with clear instructions, beginners can sometimes encounter pitfalls. Here are common mistakes to steer clear of:
- Over-tightening the Clamp: This can deform the exhaust tip, crush the existing pipe, or strip the threads on the clamp bolts, making it impossible to secure the tip properly.
- Under-tightening the Clamp: A loose tip can vibrate, rattle, and eventually fall off, which is dangerous.
- Ignoring Heat Concerns: Mounting a tip too far in, especially on plastic bumpers, is a recipe for discolored or melted plastic. Always ensure there’s adequate space away from sensitive materials.
- Misaligning the Tip: A tip that’s crooked, off-center, or angled incorrectly detracts from the vehicle’s appearance. Take your time to get it straight and centered.
- Not Cleaning the Pipe: Rust and dirt prevent a secure fit. Always use a wire brush to clean the surface where the clamp will grip.
- Forgetting Safety Precautions: Never work on a hot exhaust system. Always use safety glasses and gloves. If lifting the vehicle, ensure it’s stable and on level ground.

Exhaust Tip Types and Their Installation Nuances
While the general principles are the same, different exhaust tip styles might have slight installation considerations:
Rolled Edge Tips
These often have a thicker lip due to the rolled edge. Ensure the clamp is positioned correctly to get a firm grip without interfering with the rolled edge, which could compromise the seal.
Straight Cut Tips
Simpler in design, they usually offer a straightforward clamp or weld-on installation. The key is ensuring they are perfectly straight before securing.
Titanium/Carbon Fiber Tips
These premium materials are lighter but can be more expensive and potentially more fragile to overtightening. Handle with care and follow manufacturer-specific torque recommendations if available.
Exhaust Tips with Internal Resonators or Sound Modifiers
Some tips are designed not just for looks but also to alter the exhaust note. Installation is usually similar, but ensure no internal baffles or components are damaged during the mounting process.
For any exhaust component, it’s always wise to check the manufacturer’s specific installation guide. They might have unique requirements for their products, which can be found on their website or in the product packaging. Reputable automotive parts suppliers often link to these guides.
FAQ: Your Top Exhaust Tip Questions Answered
Here are some common questions beginner car owners ask about exhaust tip placement:
Q1: How far should my exhaust tip stick out from the bumper?
A1: As a general rule of thumb, aim for your exhaust tip to extend about 1/2 inch to 1 inch beyond the rear bumper. This provides a good balance of aesthetics and safety, preventing heat damage.