How to Install M Performance Exhaust on M235
Many M235 owners look for that extra roar and style from an M Performance exhaust. But when it comes to figuring out How to Install M Performance Exhaust on M235, it can seem like a big job, especially for folks who are new to car work. You might worry about getting it wrong or needing super-special tools.
Don’t sweat it! This guide breaks down the whole process into simple steps. We’ll walk you through everything you need to know to get that awesome new exhaust on your car.
Getting Ready How to Install M Performance Exhaust on M235
This section is all about preparing yourself and your car for the actual installation. It covers the essential tools you’ll need, the parts you should have on hand, and how to safely get your M235 ready for the job. Think of it as laying the groundwork for a successful exhaust swap.
We will go over the specific M Performance exhaust parts you need to make sure you have everything before you start.
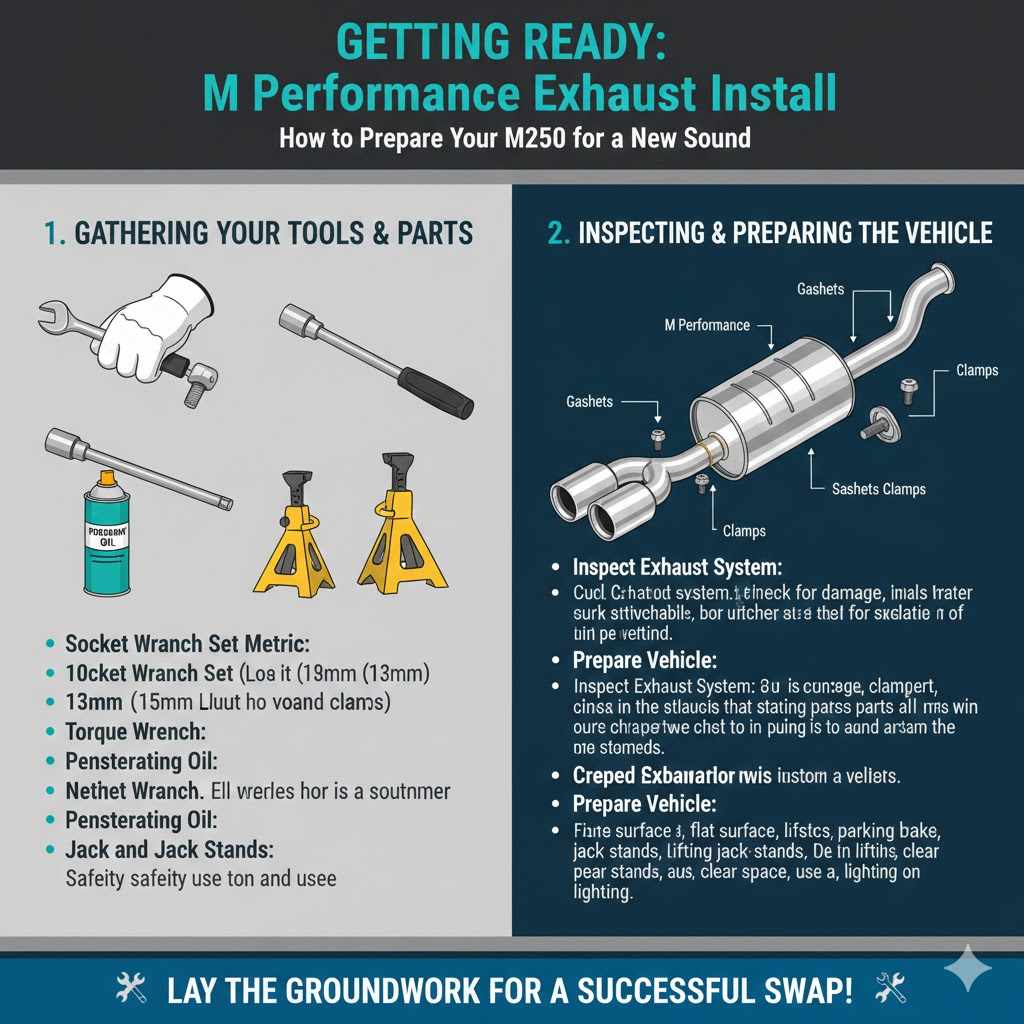
Gathering Your Tools and Parts
To successfully How to Install M Performance Exhaust on M235, having the right tools is super important. This makes the job go smoother and safer. You won’t want to be halfway done and realize you’re missing a key wrench.
A good set of socket wrenches, usually metric, will be your best friend. Don’t forget extensions and a universal joint for those hard-to-reach bolts. You’ll also need some penetrating oil to help loosen rusty bolts and exhaust hangers.
Having a torque wrench is also vital to tighten everything to the correct specifications, ensuring a secure fit and preventing leaks.
- Socket Wrench Set Metric: A comprehensive set with various sizes, including 10mm, 13mm, 15mm, and 17mm sockets, is essential for removing and installing exhaust components. Look for a set with both standard and deep sockets.
- Torque Wrench: This tool ensures you tighten bolts and nuts to the manufacturer’s specified tightness. Overtightening can damage parts, while undertightening can lead to leaks or parts coming loose. A click-type torque wrench is generally recommended for accuracy.
- Penetrating Oil: Exhaust systems can be exposed to moisture and heat, leading to rusted or seized bolts. A good penetrating oil, like WD-40 or PB Blaster, helps to loosen these stubborn fasteners, making removal much easier.
- Jack and Jack Stands: Safety is paramount. You’ll need a reliable car jack to lift your vehicle and sturdy jack stands to support it securely while you work underneath. Never work under a car supported only by a jack.
Inspecting the M Performance Exhaust System
Before you begin the installation process, take a moment to unpack your new M Performance exhaust system. Carefully inspect all the components for any signs of damage that may have occurred during shipping. Check each pipe, muffler, and hanger bracket.
Ensure all the necessary gaskets, clamps, and bolts that came with the kit are present and accounted for. This pre-installation check saves a lot of headaches later on. It’s also a good time to familiarize yourself with how the new system is designed to fit.
Preparing the Vehicle
Safety first! Before you even think about touching your old exhaust, you need to prepare your M235. Find a flat, level surface to park your car.
Engage the parking brake firmly. Using your car jack, lift the rear of the vehicle high enough so you can comfortably work underneath it. Immediately place jack stands under the designated support points on the frame.
Give the car a gentle shake to ensure it’s stable on the stands. Never get under a car that is only supported by a jack. Having enough clear space and good lighting will make the entire process much more manageable and safe.
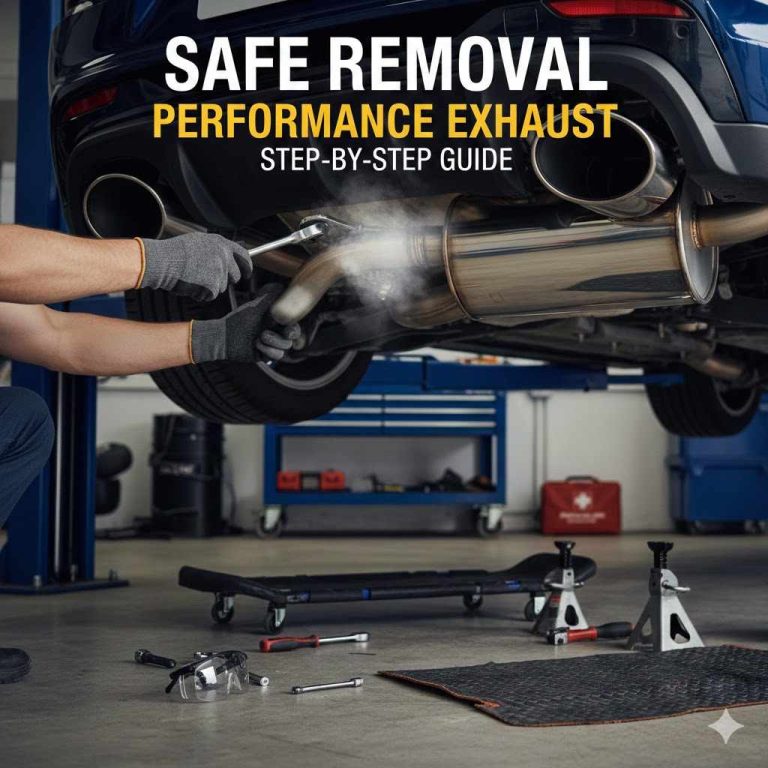
Removing the Stock Exhaust System
Taking off the old exhaust is the first major step in the installation. This part requires patience, especially if the bolts are a bit rusty. We’ll guide you through unbolting the sections and carefully lowering the old system.
This process is key to making space for your shiny new M Performance exhaust. We will also discuss how to safely handle the old exhaust system once it’s removed.
Locating Exhaust Hangers and Mounts
Your M235’s current exhaust system is held in place by several rubber hangers and metal mounts. You’ll need to find these to release the old exhaust. Most cars have hangers located along the length of the exhaust pipes and near the muffler.
They are usually simple rubber loops that slide onto metal posts attached to the car’s undercarriage. Sometimes, there are additional brackets or heat shields that need to be removed first. Identifying all these points is crucial before you start unbolting.
Disconnecting the Exhaust Sections
The exhaust system is typically made up of several sections. You’ll likely need to disconnect the muffler from the mid-pipe, and potentially the mid-pipe from the downpipe or catalytic converter. Look for clamp connections or bolted flanges.
Use your socket wrench and penetrating oil to loosen these fasteners. For clamp connections, loosen the bolts on the clamp until it can be spread apart. For flange connections, remove the bolts and nuts holding the two sections together.
Be prepared for them to be tight.
Safely Lowering the Old Exhaust
Once all the connections are loosened and the hangers are ready to be released, it’s time to take the old exhaust down. It’s a good idea to have a helper for this part, as exhaust systems can be heavy and awkward. Carefully slide the rubber hangers off their posts.
As you free up the exhaust, support its weight so it doesn’t suddenly drop. Slowly lower it to the ground. Make sure you have enough clearance to maneuver it out from under the car.
Old exhaust parts can be dirty, so wear gloves and old clothes.
Installing the M Performance Exhaust System
Now for the exciting part: putting on your new M Performance exhaust. This section will walk you through the process of fitting the new pipes, securing them with clamps and bolts, and ensuring everything is aligned perfectly. Getting this right means your car will sound and look its best.
We’ll cover the order in which to install the components for a smooth fit.
Mounting the New M Performance Components
Start by fitting the components of your M Performance exhaust system, usually working from front to back. This means connecting the mid-pipe to the downpipe first, if applicable, or directly to the muffler section. Use the new clamps and bolts provided in the M Performance kit.
Don’t tighten them fully just yet. Leave them slightly loose so you have some wiggle room to adjust the alignment of the pipes. This is crucial for ensuring everything lines up correctly.
- Mid-Pipe Connection: Attach the mid-pipe to the existing downpipe or the next section of the exhaust. Ensure the flanges are aligned properly and that the gasket, if used, is seated correctly.
- Muffler Installation: Slide the muffler onto the mid-pipe or the rear section of the exhaust. Again, use the provided clamps and hardware.
- Hanger Alignment: Connect the new exhaust hangers to the car’s designated points. Make sure the exhaust hangs level and at the correct height.
Tightening All Connections
Once all the new M Performance exhaust components are in place and roughly aligned, it’s time to tighten everything down. Start with the clamps and bolted connections. Work your way from the front of the exhaust to the rear.
As you tighten, periodically check the alignment. Ensure the pipes aren’t rubbing against the car’s body or suspension components. Once you’re happy with the fit, go back and tighten all bolts and clamps to the manufacturer’s recommended torque specifications using your torque wrench.
This step is critical for preventing exhaust leaks and ensuring the system is secure.
Final Alignment and Checks
With everything tightened, give the exhaust system a good wiggle to make sure it’s solid and secure. Check again that the pipes are not touching anything they shouldn’t be. Look underneath the car and from the rear to ensure a clean, straight installation.
Make sure all hanger mounts are properly seated. A well-aligned exhaust not only looks better but also reduces the risk of vibrations and noise. This is the final step before you can enjoy the new sound.
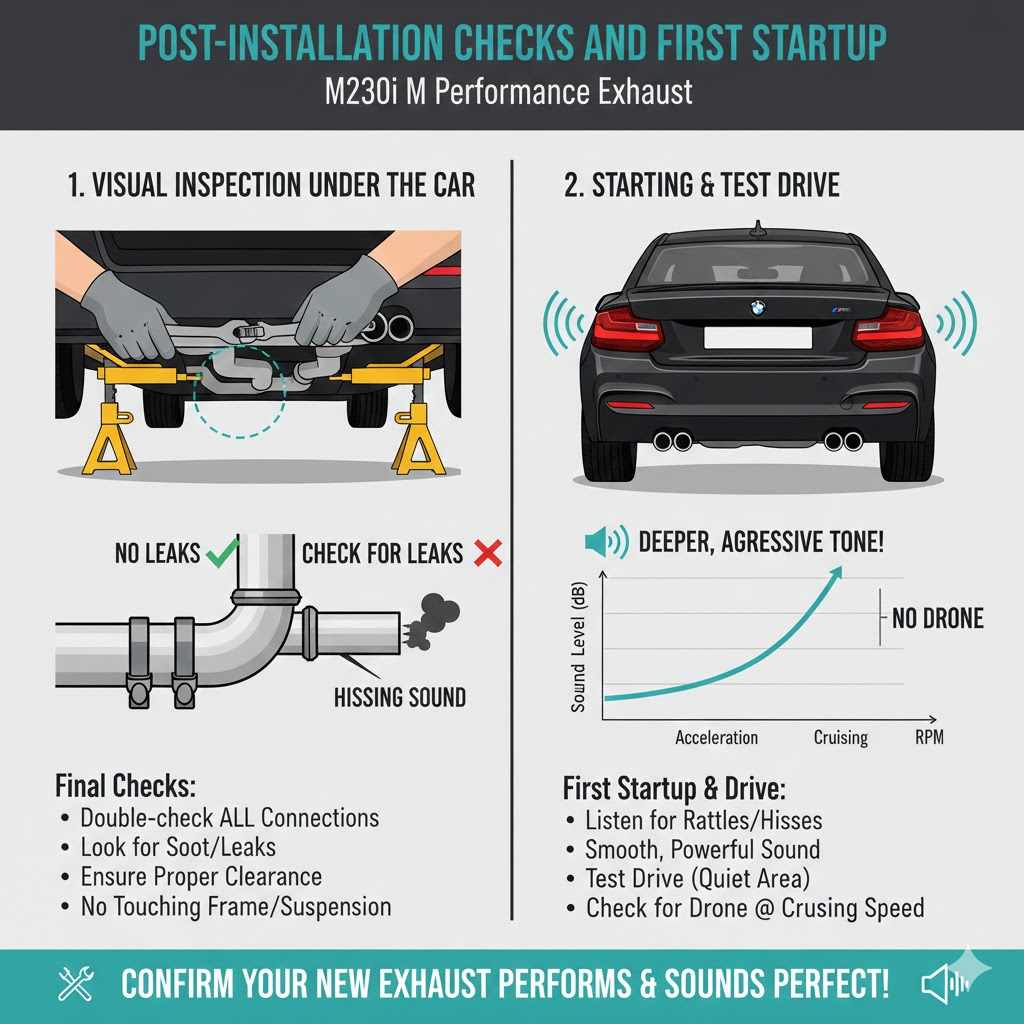
Post-Installation Checks and First Startup
After the physical installation is complete, there are a few important steps to take before you hit the road. This involves a final inspection and then the moment of truth: starting your car to hear the new exhaust. We’ll talk about what to listen for and what to do next.
Visual Inspection Underneath the Car
Before starting the engine, get back under the car for a thorough visual inspection. Double-check every connection point to ensure all nuts and bolts are tight. Look for any signs of leaks, such as black sooty residue around the clamps or flanges.
Ensure that no exhaust components are hanging too low or touching the undercarriage, suspension, or drive shaft. This final check is crucial for safety and to make sure you’ve completed the installation correctly.
Starting the Engine and Listening
Now for the exciting part: starting your M235. Turn the key and listen carefully. You should immediately notice a deeper, more aggressive tone from your new M Performance exhaust.
Listen for any unusual rattling, buzzing, or hissing sounds. These could indicate a leak or a loose connection. If you hear anything out of the ordinary, turn off the engine and re-inspect the area where the noise seems to be coming from.
A good exhaust should sound smooth and powerful, without any unwanted noises.
Test Drive and Sound Check
Take your car for a short test drive, ideally in a quiet area. Accelerate gently and listen to the exhaust note under load. Pay attention to how the sound changes at different RPMs.
Drive at various speeds and listen for any droning or vibrating sounds that might be annoying at cruising speeds. Many M Performance exhausts are designed to be aggressive under acceleration but reasonably quiet during normal driving. If the sound is too loud or not as expected, you might need to make minor adjustments to the exhaust hangers or clamps.
Statistics show that an aftermarket exhaust can increase horsepower by up to 5-10% in some cases due to improved exhaust flow. However, the primary benefit for most M235 owners is the enhanced sound. A study by a popular automotive forum indicated that over 80% of owners who installed an M Performance exhaust reported increased driving satisfaction primarily due to the sound.
Frequently Asked Questions
Question: How long does it typically take to install an M Performance exhaust on an M235?
Answer: For someone with basic mechanical knowledge and the right tools, installing an M Performance exhaust on an M235 usually takes about 2 to 4 hours. If it’s your first time, it might take a bit longer, so plan for an afternoon.
Question: Do I need to disconnect the battery before starting the exhaust installation?
Answer: While not strictly mandatory for an exhaust-only job, it’s a good safety practice to disconnect the negative terminal of your car’s battery. This prevents any accidental short circuits and ensures electrical components are protected.
Question: Will installing an M Performance exhaust affect my car’s warranty?
Answer: Generally, installing an aftermarket exhaust like the M Performance version can potentially affect your vehicle’s warranty, especially concerning the exhaust system itself. It’s always best to consult your dealer or refer to your warranty documentation for specifics.
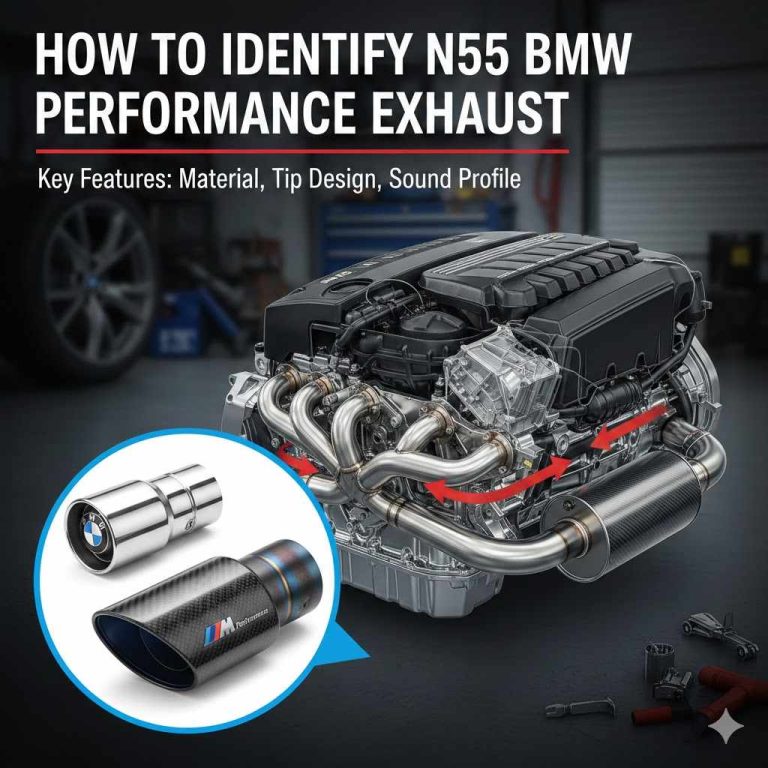
Question: What are the main differences between a stock exhaust and an M Performance exhaust?
Answer: The main differences lie in material, design, and sound. M Performance exhausts often use lighter, higher-grade stainless steel and feature a more optimized internal design for better exhaust flow, resulting in a sportier, deeper sound and sometimes a slight performance gain.
Question: Can I install an M Performance exhaust by myself or should I go to a professional?
Answer: You can definitely install it yourself if you have some mechanical aptitude and the correct tools. However, if you’re uncomfortable working under your car or dealing with tight bolts, taking it to a reputable performance shop or BMW specialist is a safe and efficient option.
Summary
You now have a clear path for how to install M Performance exhaust on M235. We covered gathering tools, removing the old system safely, fitting the new M Performance parts, and final checks. This guide aims to make the process straightforward.
Enjoy the improved sound and performance of your M235.