How To Add Deadmau5 Resonance: Essential Guide
Adding Deadmau5 resonance involves fine-tuning your audio setup to achieve that signature, deep, and rumbling bass sound. It’s about careful EQ and potentially adding specific sub-bass frequencies, not a physical modification, creating a powerful low-end presence accessible to any producer or sound designer.
Ever tried to get that incredible, deep bass sound that makes you feel the music in your chest? You know, that signature low-end rumble that artists like Deadmau5 do so well? If you’ve been chasing that perfect bass tone and finding it a bit elusive, you’re not alone. Many producers struggle to capture that powerful resonance without making their tracks muddy or overpower everything else. It can be frustrating when your low-end just doesn’t hit as hard as you want it to.
But don’t worry! Getting that “Deadmau5 resonance” is totally achievable, and it’s less about a secret piece of gear and more about understanding how to shape your sound. We’ll break it down step-by-step, making it easy for you to understand and implement, no matter your current experience level. Get ready to transform your basslines!
Understanding Deadmau5’s Signature Sound
When we talk about “Deadmau5 resonance,” we’re not referring to a specific piece of hardware or a plugin he exclusively uses. Instead, it’s a characteristic of his sound design, particularly in his bass and kick drum elements. This resonance is a deep, often sustained, sub-bass frequency that gives his music a powerful, physical impact. It’s a warm, enveloping low-end that feels both massive and controlled.
Think of it as the feeling you get when a massive truck rumbles by. That deep vibration is what we aim for in the low-end of electronic music. Deadmau5 is a master at creating this sensation without making the mix sound boomy or undefined. It requires a careful balance of frequencies, often leaning heavily into the 30-60 Hz range, but always with precision.
Key Elements of Deadmau5’s Bass Resonance
- Deep Sub-Bass Presence: The core is a strong foundation in the sub-bass frequencies (typically below 60 Hz).
- Warmth and Fullness: It’s not just sub-bass; there’s a pleasing warmth that makes it audible on various speaker systems.
- Controlled Rumble: The low-end feels powerful but doesn’t create muddiness or interfere with other elements in the mix.
- Slight Saturation/Distortion: Often, a touch of saturation or harmonic distortion is applied to allow the sub-bass to be heard on systems without dedicated subwoofers, adding harmonics in the mid-range.
- Careful EQing: Precise equalization is crucial to carve out space and emphasize the desired frequencies.

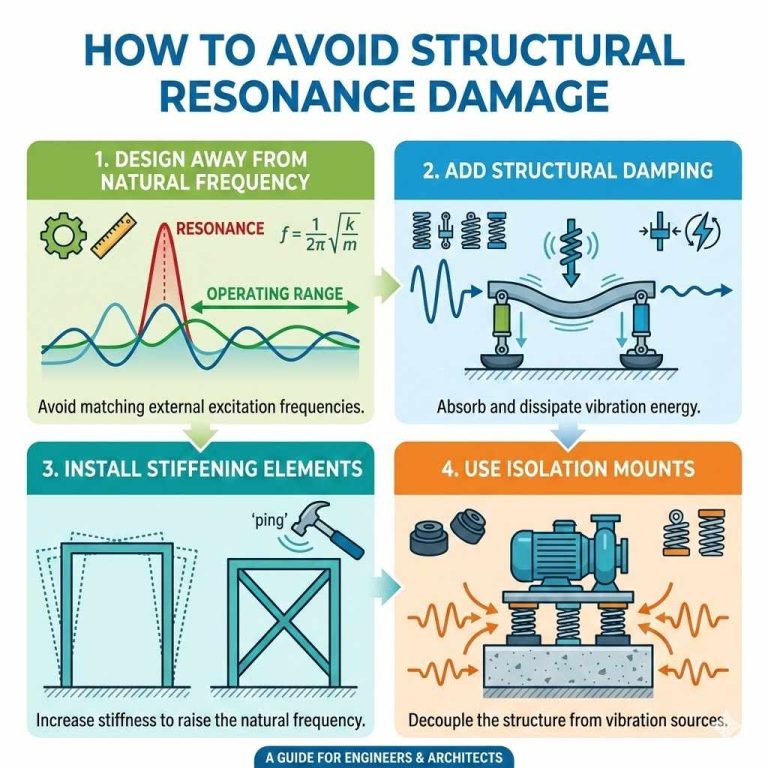
The Science Behind Bass Resonance
Resonance in audio refers to the tendency of a system to oscillate with greater amplitude at certain frequencies than at others. In the context of sound, particularly bass, this means certain frequencies are emphasized, making them more prominent and impactful. For Deadmau5’s sound, this is achieved by skillfully boosting and shaping frequencies in the sub-bass and low-mid ranges.
The frequencies we’re talking about are often felt rather than heard, especially with sub-bass. The range from approximately 20 Hz to 60 Hz is considered sub-bass. However, a truly resonant and impactful low-end often extends slightly higher, into the fundamental frequencies of many bass instruments and kick drums, typically between 60 Hz and 150 Hz.
To achieve this resonance, we often use equalization (EQ) to boost specific frequency bands. It’s like turning up the volume dial for certain notes more than others. Mastering this requires understanding how different frequencies affect the overall perceived loudness and fullness of your sound. Tools like spectrum analyzers are invaluable here, showing you which frequencies are dominant in your audio.
Essential Tools for Achieving Deadmau5 Resonance
You usually don’t need a hardware studio the size of Deadmau5’s to get his sound. Modern digital audio workstations (DAWs) and plugins provide all the tools you need. Here’s what you’ll likely be working with:
- Digital Audio Workstation (DAW): The software where you’ll be editing and mixing your music (e.g., Ableton Live, FL Studio, Logic Pro X, Cubase).
- Equalizer (EQ) Plugin: This is your primary tool for shaping frequencies. Many DAWs come with excellent EQs, or you can use third-party options like FabFilter Pro-Q 3, Waves SSL E-Channel, or T-RackS 5 EQ.
- Spectrum Analyzer: Essential for visualizing your audio’s frequency content. Most DAWs include one, or you can use dedicated plugins. This helps you see where the energy is.
- Subtle Distortion or Saturation Plugin: To add harmonics and make the sub-bass present on more systems. Options include iZotope Trash 2, Decapitator by Soundtoys, or even simple saturation built into your DAW.
- Subtle Compressor: To manage dynamics and give the bass a more consistent perceived loudness.
- Good Studio Monitors or Headphones: Crucial for accurately hearing the low-end frequencies. Without this, you’re mixing blind. If you can’t invest in good monitors, investigate headphone response curves and consider acoustic treatment for your room if possible. For more on acoustic treatment fundamentals, check out resources from the Acoustical Society of America.
Step-by-Step: How to Add Deadmau5 Resonance
Let’s get practical. This guide focuses on applying these techniques to a bass sound or a kick drum patch within your DAW. The principles are the same for either. Remember, the goal is a deep, impactful, and controlled low-end.
Step 1: Start with a Suitable Sound Source
The raw sound you start with is important. For Deadmau5-style resonance, you generally want a sound with a solid foundation in the low frequencies. This could be a synthesized sine wave bass, a heavily processed sample, or a punchy kick drum.
If you’re synthesizing, focus on creating a sound with a strong fundamental frequency in the 40-100 Hz range. If using samples, choose ones that already have that deep character. You can also layer sounds – for instance, a sine wave for sub-bass and a punchier sound for the mid-range attack and character.
Step 2: Analyze Your Sound with a Spectrum Analyzer
Before you make any changes, load up a spectrum analyzer on your bass track. Play the sound and observe where most of its energy lies. You’re looking for that dominant fundamental frequency and any harmonic content. This gives you a baseline.
Key things to note:
- Is there sufficient energy below 100 Hz?
- Where is the primary peak (fundamental frequency)?
- Are there unwanted resonances (sharp, narrow peaks) that might cause muddiness?
Step 3: Gentle EQ – Boosting for Resonance
This is where the magic happens. We’ll use EQ to boost the frequencies that create that deep, resonant feel. Remember to boost subtly – often, a few decibels can make a huge difference.
- Identify the Fundamental Area: Based on your analysis, find the core frequency of your sound (often between 40 Hz and 100 Hz for deep bass).
- Apply a Gentle Boost: Use a parametric EQ band to create a relatively wide boost (low Q value) in this fundamental area. Start with a +3 dB to +6 dB boost. Sweep the frequency around to find what sounds best. For a Deadmau5 vibe, you might target somewhere between 50 Hz and 80 Hz, depending on the sound.
- Add Sub-Bass (Optional but Recommended): If your sound lacks true sub-bass, you can add a clean sine wave in the 30-50 Hz range. You can generate this with a synth or a dedicated sine wave generator plugin. If you add it, ensure it’s phase-aligned or it can cause cancellations.
- High-Pass Filter: Use a gentle high-pass filter (low-cut) to remove unnecessary sub-sonic frequencies (below 20-30 Hz) that eat up headroom and aren’t audible but can cause distortion. A slope of 12 dB/octave is often sufficient.
Step 4: Sculpting the Mid-Range and Removing Muddiness
A bassline that’s too resonant in the wrong places can sound muddy. We need to clean up the low-mids (around 200-500 Hz) where muddiness often lives.
- Identify Muddy Frequencies: Use your spectrum analyzer and your ears. Boost a narrow band of EQ and sweep it through the 200-500 Hz range. Wherever it sounds particularly offensive or boxy, you’ve found a problem area.
- Cut the Mud: Apply a moderate cut (e.g., -3 dB to -6 dB) with a medium Q value at these problematic frequencies. This cleans up the low-end and makes the fundamental and sub-bass frequencies more apparent.
- Enhance Presence (Optional): If your bass needs more definition to cut through the mix, a small, narrow boost in the 1-3 kHz range can help.
Step 5: Adding Harmonic Excitement (Saturation/Distortion)
Pure sub-bass can be inaudible on systems without dedicated subwoofers. Adding subtle harmonic distortion or saturation creates overtones in the mid-range that make the bass audible on smaller speakers and add character.
- Choose Your Tool: Select a saturation or distortion plugin. Start with something designed for subtle warmth.
- Apply Sparingly: Insert the plugin on your bass track. Turn up the drive or input gain very gradually until you hear the desired subtle warmth and harmonics. The key here is subtlety. You want to add character, not make it sound distorted.
- EQ After Saturation (Optional): You might want to EQ again after saturation to refine the balance of harmonics or to further clean up any unwanted freqencies that the saturation introduced.
Step 6: Compression for Consistency
Compression helps to even out the dynamics of your bass sound, ensuring that the resonant frequencies hit with a consistent impact. This makes the bass feel more solid and present throughout your track.
- Set a Low Ratio: Start with a low ratio, like 2:1 or 3:1.
- Adjust Threshold: Set the threshold so that the compressor engages just a few decibels (2-4 dB GR – Gain Reduction) on the loudest parts.
- Control Attack and Release: A slower attack time can allow the initial transient (punch) of the bass to come through before compression kicks in. A medium release time often works well, allowing the compressor to recover between bass notes.
- Listen for Glue: The goal is to make the bass sound more “glued” together and consistent, not squashed.
Step 7: Check in Mono and with Different Playback Systems
This is a crucial final check. Low-end frequencies can behave unpredictably in stereo and can disappear entirely on certain playback systems.
- Check in Mono: Briefly sum your mix to mono. This is important because bass frequencies can cause phase cancellation issues in stereo, paradoxically weakening your low-end. If your mono bass sounds significantly weaker, you might have phase problems that need addressing, perhaps by adjusting the timing of layered sounds or using a phase alignment tool.
- Listen on Different Speakers/Headphones: Test your track on your studio monitors, headphones, laptop speakers, and even a smartphone. Does the resonance translate? Does it sound muddy on some systems? This helps you find the right balance that works everywhere.
- Reference Tracks: Compare your bass sound’s resonance to that of professional tracks you admire, especially those by Deadmau5 or similar artists. Listen to how their bass hits, how it holds up in the mix, and how it feels.
Table: EQ Settings for Deadmau5 Resonance (Example)
Here’s a general example of how you might EQ a bass sound to achieve resonance. Remember, these are starting points and will vary greatly depending on your source material.
| Frequency Range | Operation | Q Value (Bandwidth) | Gain | Purpose |
|---|---|---|---|---|
| 20 – 30 Hz | High-Pass Filter | 12 dB/octave (Slope) | – Inf dB | Remove sub-sonic rumble, save headroom |
| 40 – 80 Hz | Bell Boost | 0.7 – 1.5 (Wide) | +3 to +6 dB | Enhance fundamental frequency for deep resonance |
| 250 – 400 Hz | Bell Cut | 1.0 – 2.0 (Medium) | -3 to -6 dB | Reduce muddiness and boxiness |
| 1 – 3 kHz | Bell Boost (Optional) | 1.5 – 2.5 (Medium-Narrow) | +1 to +3 dB | Add presence and clarity so bass can be heard on smaller speakers |
Common Pitfalls to Avoid
While chasing that perfect low-end, it’s easy to fall into common traps. Being aware of these can save you a lot of mixing headaches.
- Over-Boosting: Adding too much gain in the low frequencies. This leads to a muddy, undefined bass that overpowers everything else and sounds terrible on most systems. Less is often more.
- Ignoring Mono Compatibility: Not checking your low-end in mono. Phase cancellation can make your bass disappear or sound weak when summed to mono, which is common in club PAs, car stereos, and even some home systems.
- Not Listening on Different Systems: Relying solely on your studio monitors. What sounds good in your treated room might sound completely different (and often worse) on consumer-grade speakers or headphones.
- Too Much Sub-Bass: Pushing frequencies below 40 Hz too hard. While they add physical weight, they can easily cause distortion and consume valuable headroom without adding much audible value for many listeners.
- Lack of Saturation: Relying only on pure sine wave sub-bass. This results in a sound that’s hard to hear on anything less than a full-range system, which is impractical for most music consumption.
- Not Carving Out Space: Not cutting conflicting frequencies in other instruments. Your bass needs its own sonic space. Sometimes, the solution isn’t just boosting the bass, but slightly cutting low frequencies in other elements that occupy the same frequency range.

Creative Applications and Variations
The “Deadmau5 resonance” concept isn’t just for one type of bass sound. You can apply these principles with variations to:
- Kick Drums: To give kick drums more weight and thump, focus on boosting the fundamental frequency (often 50-100 Hz) and gently saturating for presence. Cutting mud around 200-500 Hz is also crucial here for punch.
- Synth Basslines: Whether it’s a driving acid bass or a deep pad, enhancing its fundamental and adding subtle harmonics can make it more impactful.
- Sub Bass Layers: You can layer a pure sine wave specifically for sub-bass (e.g., at 40 Hz) and then process a separate sound for the mid-range character, blending them together.
- Creative Effects: Experiment with resonant filters in your synths or plugins. Sometimes a filter sweep with a high resonance setting can create interesting movement and tonal character in the low end, though this is more about effect than foundational resonance.
For examples of advanced sound synthesis techniques that Deadmau5 himself might employ or inspire, exploring resources from platforms like Ableton’s blog or reputable sound design tutorials can offer deeper insights into complex synthesis and effects chains.
FAQ: Mastering Bass Resonance
Q1: What is Deadmau5 resonance?
A1: “Deadmau5 resonance” refers to the deep, powerful, and controlled sub-bass and low-frequency impact characteristic of Deadmau5’s music. It’s achieved through precise EQ, careful sound selection, and often subtle saturation to enhance physical presence and audible warmth.