How to Add Device to Resonance Soundboard: Effortless Guide
Adding a device to Resonance Soundboard is a straightforward process. This guide will walk you through connecting your microphone or other audio input, ensuring seamless integration for high-quality sound sharing. Follow these simple steps for effortless setup.
Welcome, fellow car enthusiasts! If you’ve ever tinkered with your car’s exhaust, you know how a little bit of knowledge can go a long way. Today, we’re shifting gears from the roar of an engine to a different kind of sound – the audio you share. You might be wondering how to add a device to your Resonance Soundboard. It’s a common question, especially if you’re new to sophisticated audio setups. Sometimes, getting new gear to talk to your existing system feels like trying to decode a secret language. But don’t worry! We’re going to break it down, step-by-step, in a way that’s as easy as checking your tire pressure. By the end, you’ll be confidently connecting your devices and enjoying crystal-clear audio, ready for any project or stream.
Understanding Your Resonance Soundboard
Before we start adding devices, let’s get a basic grasp of what a Resonance Soundboard is and why you’d want to connect extra gear to it. Think of your soundboard as the central hub for all your audio. It takes different sound sources, manipulates them, and sends them where you want them to go – perhaps to your computer for recording, to speakers for listening, or to a streaming setup.
The “device” you’ll likely want to add is often a microphone, but it could also be an instrument, a DJ mixer, or another audio output from a different piece of equipment. Connecting these devices means you can capture higher-quality audio, add new sounds to your mix, or have more control over your sound output. It’s all about expanding your audio capabilities. Just like upgrading your car’s exhaust can improve performance, adding a good microphone enhances your audio.
Why Add a New Device?
There are several great reasons to connect a new device to your Resonance Soundboard:
- Improved Audio Quality: Often, built-in microphones aren’t the best. Adding a dedicated microphone can dramatically boost the clarity and richness of your sound.
- More Input Options: Need to record an instrument or connect a second microphone for a co-host? Adding a device gives you more flexibility.
- Specific Sound Effects: Some devices can generate unique sounds or effects that you can then mix into your main audio.
- Professional Streaming/Recording: If you’re streaming games, creating podcasts, or recording music, integrated, high-quality audio is crucial.
Enhanced Gaming Experience: Some gamers use soundboards with specialized input devices to trigger in-game sounds or voice effects, immersing themselves and their audience further. For more on audio in gaming, resources like this article from Excelsior University offer great insights.

Types of Devices You Can Add
Resonance Soundboards are quite versatile. The most common devices people add are audio inputs, but the possibilities extend further. Here’s a look at what you might connect:
1. Microphones
This is the big one. Microphones capture your voice, instruments, or ambient sounds. There are a few main types:
- USB Microphones: These are incredibly easy to set up. They plug directly into a USB port on your computer, and often the soundboard can receive this USB signal.
- XLR Microphones: These are more professional-grade and require an audio interface or an XLR input on your soundboard. They typically offer superior sound quality.
- 3.5mm Jack Microphones: Smaller, often lavalier or headset mics, these use a standard headphone-style jack.
2. Instruments
If you’re a musician, you might connect a guitar, keyboard, or other instrument directly to your soundboard. This usually requires specific input jacks or an instrument-to-line-level converter.
3. Other Audio Sources
This could include:
- A DJ mixer
- The audio output from another computer or phone
- A stereo system component
Essential Tools You Might Need
For most basic setups, you won’t need a whole toolbox. However, having a few key items can make the process much smoother. Think of these as your essential wrenches and sockets for audio connectivity!
Here’s a checklist of what might come in handy:
- The Device Itself: Your microphone, instrument, or audio source.
- Connecting Cables: This is crucial! Make sure you have the right cables for both your device and your soundboard (e.g., USB, XLR, 3.5mm aux, RCA, or 1/4-inch jacks).
- Audio Interface (if needed): If your soundboard doesn’t have direct inputs for your type of device (like XLR mics), you’ll need an audio interface. This box converts different audio signals into a format your soundboard can understand.
- Power Adapters: Some devices and audio interfaces need their own power supply.
- Computer or Device Running Resonance: This is where the software is installed and controlled.
- Your Resonance Soundboard Software: Make sure it’s installed and up-to-date.
Step-by-Step Guide: How to Add Device to Resonance Soundboard
Now, let’s get down to business. Connecting a new device to your Resonance Soundboard involves a few physical and software steps. We’ll cover the most common scenario: adding a microphone.
Step 1: Power Down and Prepare
This is like a pre-flight check before you start working on your car’s engine. It’s always best practice to ensure everything is powered off before plugging or unplugging anything. This prevents accidental electrical surges that could damage your equipment.
- Turn off your Resonance Soundboard.
- Turn off your computer.
- Unplug any power cables from the soundboard, computer, and the new device if it requires external power.
Step 2: Connect the Device Physically
This is where you actually link your new device to your soundboard or computer. The method will vary depending on the type of device and soundboard you have.
Scenario A: USB Microphone to Computer (Resonance Software on PC)
This is often the simplest setup.
- Plug your USB microphone directly into an available USB port on your computer.
- If your microphone requires external power, connect its power adapter.
- Connect your Resonance Soundboard to your computer. This might also be via USB, or it could be via a separate audio cable if your soundboard interfaces with your computer’s audio in/out ports.
Scenario B: XLR Microphone to Audio Interface, then to Computer/Soundboard
This is common for higher-quality audio.
- Connect your XLR microphone to an XLR input on your audio interface using an XLR cable.
- If your microphone is a condenser mic that requires phantom power, ensure your audio interface’s phantom power (+48V) is turned on for that channel. Refer to your audio interface manual for details.
- Connect your audio interface to your computer. This is usually via USB.
- Connect your audio interface to your Resonance Soundboard if they are separate units and you are not routing audio directly through the computer. This might involve RCA or 1/4-inch cables, depending on your hardware.
Scenario C: 3.5mm Jack Device to Soundboard/Computer
This is for headset mics or line-level audio inputs.
- Plug the 3.5mm cable from your device into the appropriate 3.5mm input jack on your Resonance Soundboard or computer.
- If connecting to a computer, ensure it’s the microphone/line-in jack and not the headphone out.
Step 3: Power Up and Configure Software
Now that everything is physically connected, it’s time to bring your system to life and tell the software what’s happened.
Step 3a: Power On Sequentially
- Turn on your external power adapters for any devices that need them.
- Power on your Resonance Soundboard.
- Turn on your computer.
Step 3b: Configure Resonance Soundboard Software
This is the core part where you make Resonance aware of your new device.
- Open the Resonance Soundboard application on your computer.
- Navigate to the Settings or Preferences menu. This is usually found at the top of the application window or in a gear icon.
- Look for an Audio Settings, Input Devices, or Sound Sources section.
- In this section, you should see a list of available audio input devices detected by your computer.
- Select your newly connected device (e.g., “USB Microphone,” “Audio Interface Input,” or a specific name for your device) as the primary input source or as an available channel within Resonance.
- If you are using an audio interface and it has its own control panel software, you may need to open that as well to ensure the correct inputs are routed to the correct outputs that Resonance can access.
- Save your settings.
Step 4: Test Your New Device
Before you rely on it, you must test it! This is like taking your car for a test drive after an upgrade.
- In your Resonance Soundboard software, find the area where you can monitor input levels or trigger sounds from your new device.
- Speak into your microphone or play a sound from your connected device.
- Watch the input meters in the Resonance software. You should see the levels reacting to the sound.
- If you have assignable buttons or pads on your soundboard, try assigning a sound to be triggered by your new device’s input, or directly playing a sound file through that input.
- Listen carefully through your headphones or speakers connected to your soundboard. Do you hear your device clearly? Is the sound quality good?
Step 5: Troubleshoot Common Issues
If it’s not working perfectly right away, don’t panic. Many common issues can be fixed easily. Think of this as typical car maintenance – sometimes a small adjustment is all that’s needed.
Issue: No Sound Detected
- Check Cables: Ensure all cables are firmly plugged in at both ends. Try a different cable if possible.
- Volume Levels: Make sure the volume on your device, the soundboard, and in the Resonance software is turned up.
- Correct Input Selected: Double-check that you’ve selected the exact correct device in Resonance’s audio settings. Sometimes there are multiple similar-sounding inputs.
- Device Power: Is the device turned on and receiving power?
- Phantom Power: If using an XLR condenser mic, is phantom power enabled on your audio interface or soundboard?
- Driver Issues: For USB devices or audio interfaces, sometimes drivers need to be reinstalled or updated. Visit the manufacturer’s website for the latest drivers.
Issue: Distorted or Noisy Sound
- Gain Staging: The “gain” or “input level” might be too high. Lower it until the sound is clear without peaking (going into the red on meters).
- Cable Quality: Lower-quality or damaged cables can introduce noise.
- Interference: Keep audio cables away from power cables and other sources of electromagnetic interference.
- Microphone Placement: For microphones, ensure it’s not too close to a noisy fan or computer component.
Issue: Device Not Appearing in Resonance Software
- Computer Recognition: Does your computer itself recognize the device? Check your operating system’s sound settings (Windows Sound Settings or macOS Sound Preferences). If the computer doesn’t see it, Resonance won’t either.
- Restart: Try restarting the Resonance software, your computer, or both.
- USB Port: If using USB, try a different USB port. Sometimes certain ports are better than others, or a port might be malfunctioning.
Setting Up Input Channels in Resonance
Once your device is recognized, you’ll likely want to assign it to a specific channel within the Resonance software for easier management. The exact process depends on Resonance’s interface, but generally, it involves:
- Mapping: Finding a menu that allows you to map physical inputs to virtual channels in the software.
- Naming Channels: Giving your new input channel a descriptive name (e.g., “Main Mic,” “Co-Host Mic,” “Guitar Input”).
- Bus Assignment: Deciding which output buses (e.g., main mix, headphone mix) this input channel should send audio to.
This organizational step is key to a professional workflow. It’s like labeling your tools so you know exactly which one to grab for the job.
Comparing Common Connection Methods
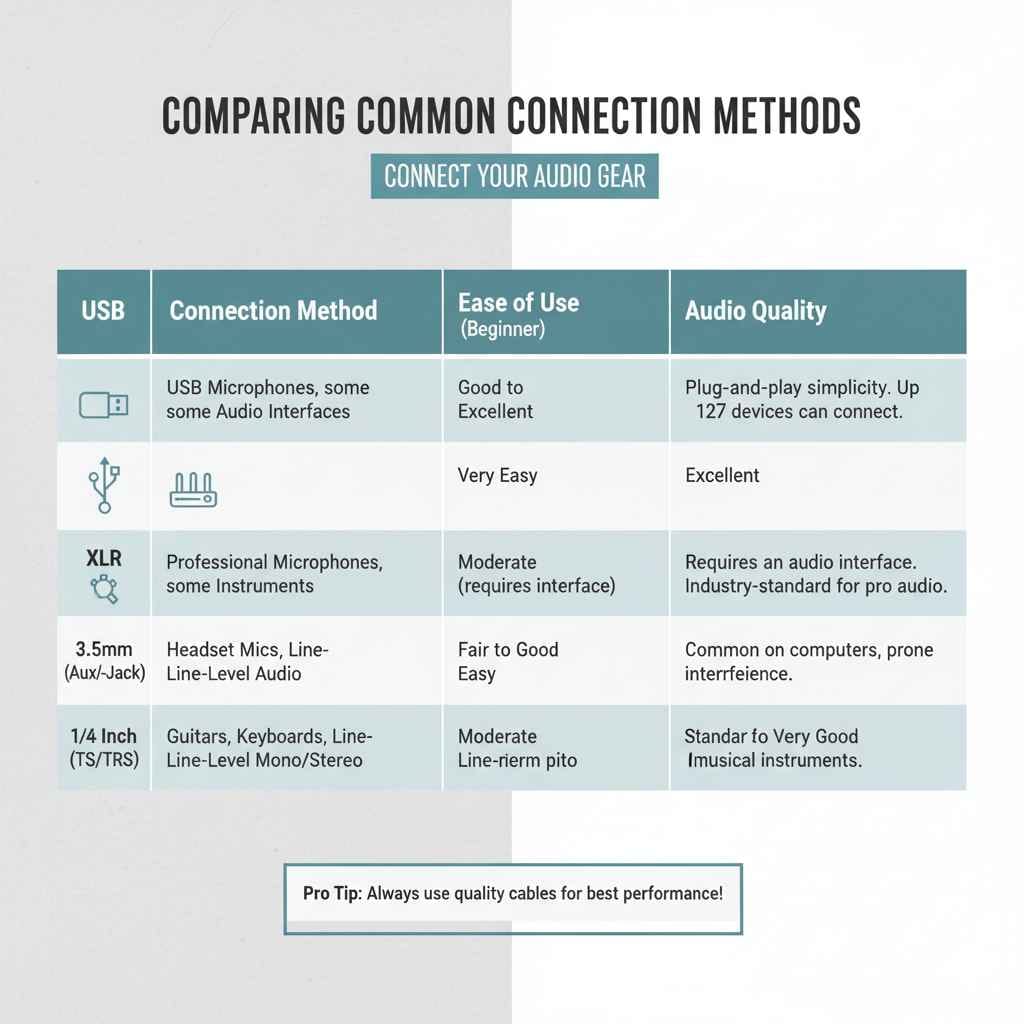
To help you visualize the different ways devices connect, here’s a simple table comparing some popular methods.
| Connection Method | Typical Devices | Ease of Use (Beginner) | Audio Quality | Notes |
|---|---|---|---|---|
| USB | USB Microphones, some Audio Interfaces | Very Easy | Good to Excellent | Plug-and-play simplicity. Up to 127 devices can be connected to a single USB bus. |
| XLR | Professional Microphones, some Instruments | Moderate (requires interface) | Excellent | Requires an audio interface or soundboard with XLR inputs. Industry-standard for pro audio. |
| 3.5mm Jack (Aux/Mini-Jack) | Headset Mics, Line-Level Audio Input | Easy | Fair to Good | Common on computers and smaller devices, but can be prone to interference. |
| 1/4 Inch (TS/TRS) | Guitars, Keyboards, Line-Level Mono/Stereo | Moderate | Good to Very Good | Standard for musical instruments and line-level signals. |
Best Practices for Optimal Sound
Just like ensuring your car’s exhaust system is properly sealed and routed for optimal sound and performance, setting up your audio devices correctly makes a big difference.
- Use Quality Cables: Cheap, flimsy cables are a major source of noise and signal degradation. Invest in decent shielded cables. For more on cable quality and types, resources like Sengpiel audio’s technical pages can offer deep dives, though we’ll keep it simple here!
- Manage Gain: This ties back to troubleshooting. Set your input gain appropriately. Aim for a healthy signal level that isn’t clipping (distorting) or too quiet.
- Minimize Background Noise: Position your microphone away from fans, air conditioners, or other noisy equipment.
- Know Your Inputs: Be aware if your input is “Mic Level,” “Line Level,” or “Instrument Level.” Connecting a “Line Level” source to a “Mic Level” input without proper attenuation can cause distortion. Your soundboard manual is your best friend here.
- Keep Software Updated: Resonance Soundboard and any audio interface drivers should be kept up-to-date for bug fixes and compatibility improvements.
Frequently Asked Questions (FAQ)
Q1: Do I need an audio interface to add a microphone to my Resonance Soundboard?
It depends on your microphone and soundboard. If you have a USB microphone, and your soundboard connects to your computer via USB, you likely don’t need a separate interface. However, for professional XLR microphones, an audio interface is usually necessary unless your soundboard already has dedicated XLR inputs.
Q2: How do I know which cable to use?
Check the output port on your device and the input port on your Resonance Soundboard (or audio interface). Match the connector types. Common pairings include USB to USB, XLR to XLR, and 3.5mm to 3.5mm. Your device and soundboard manuals are the best resources for this information.