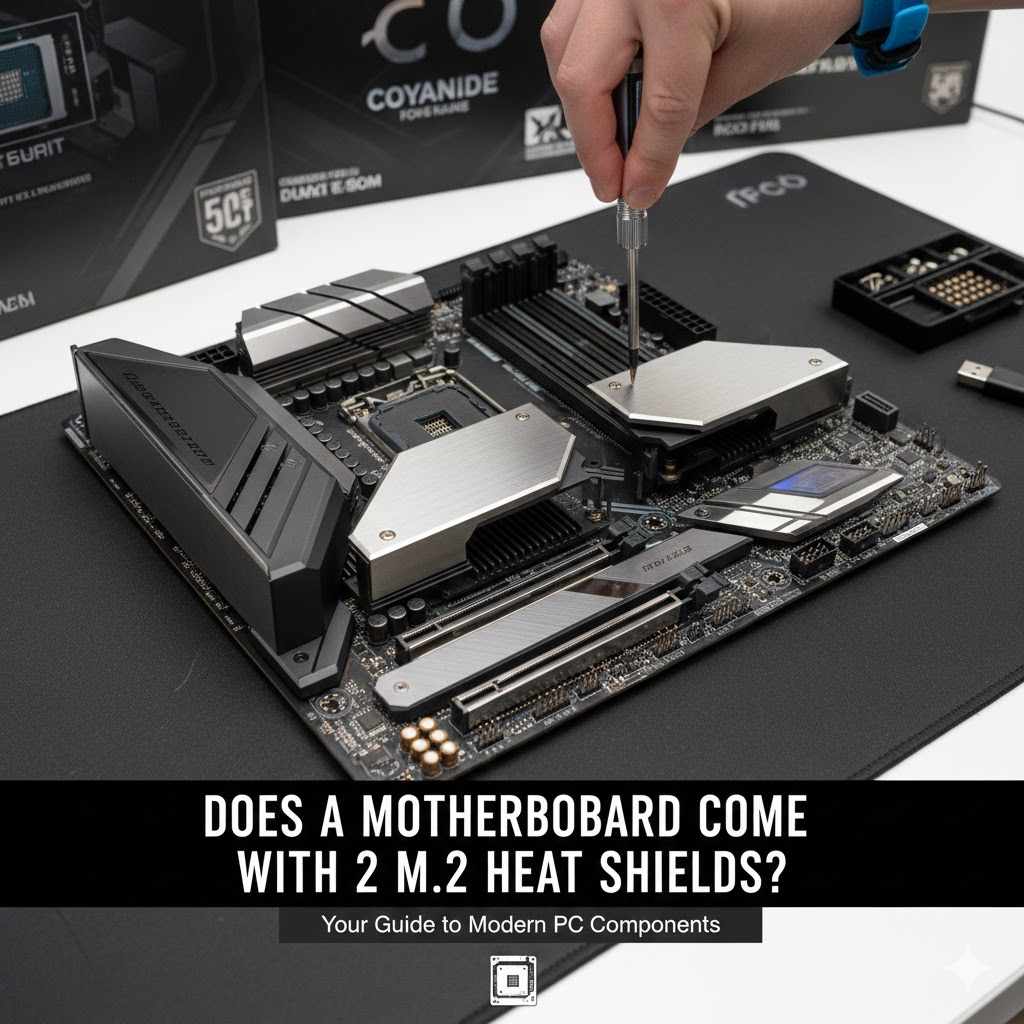
Does a Motherboard Come with 2 M.2 Heat Shields?
When building a new computer, many beginners wonder about the smaller parts. One common question is, Does a Motherboard Come with 2 M.2 Heat Shields? This can be a bit confusing because not all motherboards are the same. Some do, some don’t, and sometimes they are included but not obviously marked.
Don’t worry, it’s not as tricky as it sounds. We will break it down simply so you know exactly what to expect.
Understanding M.2 Slots and Heat Shields
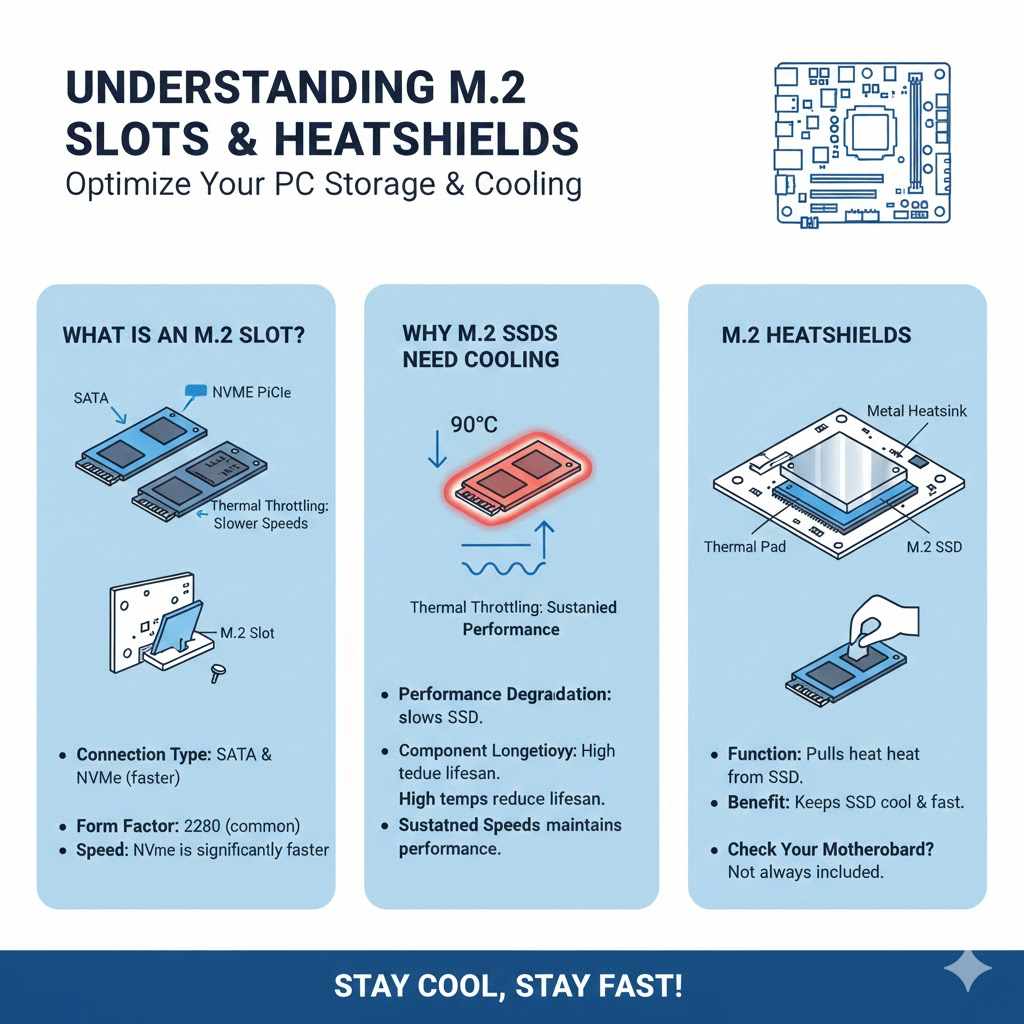
Motherboards are the main circuit boards in your computer. They connect all the other parts, like the processor, memory, and storage. M.2 slots are a modern way to connect fast storage devices called M.2 SSDs.
These SSDs are like tiny sticks that plug directly into the motherboard. They are super quick for loading games and programs. Because they are so fast, they can get quite warm during heavy use.
This is where heat shields, also called heatsinks, come in. A heat shield is a piece of metal that sits on top of the M.2 SSD. Its job is to pull heat away from the SSD, keeping it cool.
This helps the SSD perform better and last longer. Not all motherboards have them built-in, and it’s important to know if yours does.
What is an M.2 Slot?
An M.2 slot is a physical connector on your motherboard that accepts M.2 form factor storage devices, most commonly M.2 Solid State Drives (SSDs). Before M.2, we mostly used SATA connections with 2.5-inch SSDs or older hard drives. M.2 drives are much smaller and can connect using different interfaces.
Some M.2 drives use the SATA interface, but many modern ones use NVMe (Non-Volatile Memory Express). NVMe is a protocol designed specifically for flash storage, allowing for much faster data transfer speeds compared to SATA. M.2 slots themselves can vary in their support for NVMe or SATA, and some also support Wi-Fi cards or other add-in modules.
The physical connector looks like a small slot with notches, and the SSD slides in at an angle and is then secured with a small screw.
The speed advantage of NVMe M.2 SSDs is significant. Typical SATA SSDs can reach sequential read speeds of around 550 megabytes per second (MB/s). In contrast, entry-level NVMe SSDs can easily hit 2,000 MB/s, while high-end models can exceed 7,000 MB/s or even reach 12,000 MB/s in newer generations.
This dramatic increase in speed means that your operating system will boot faster, applications will launch almost instantly, and large file transfers will be completed in a fraction of the time. This performance boost makes M.2 NVMe SSDs ideal for demanding tasks like video editing, gaming, and data-intensive professional work. The compact form factor also helps with cable management inside your computer case, contributing to a cleaner build.
- Connection Type: M.2 slots can support SATA and NVMe protocols. NVMe is much faster.
- Form Factor: M.2 drives come in various lengths, like 2242, 2260, 2280, and 22110. The “22” refers to the width in millimeters (22mm), and the numbers after (42, 60, 80, 110) refer to the length in millimeters. 2280 is the most common size for SSDs.
- Speed: NVMe M.2 SSDs offer significantly higher read and write speeds than traditional SATA drives.
Why M.2 SSDs Need Cooling
As mentioned, M.2 NVMe SSDs generate heat due to their high-speed operation. When an SSD is constantly reading and writing large amounts of data, its controller and NAND flash memory can get quite hot. If the temperature rises too high, the SSD’s controller will initiate a process called thermal throttling.
This means the SSD will intentionally slow down its performance to prevent damage from overheating. While this is a protective measure, it defeats the purpose of having a high-speed NVMe drive. Thermal throttling can lead to noticeable slowdowns, especially during extended gaming sessions, large file transfers, or intensive work tasks like video rendering.
Keeping an M.2 SSD within its optimal temperature range ensures it performs at its advertised speeds consistently.
The ideal operating temperature for most M.2 NVMe SSDs is typically between 0°C and 70°C (32°F to 158°F). However, many drives can operate at temperatures up to 85°C (185°F). The concern arises when the SSD frequently reaches the higher end of this spectrum, leading to sustained thermal throttling.
Some studies and user experiences show that under heavy loads, uncooled M.2 NVMe SSDs can reach temperatures exceeding 70°C within minutes. This is why manufacturers often recommend or include heatsinks. A good heatsink can help dissipate heat more effectively, potentially lowering operating temperatures by 10°C to 30°C or more, thereby preventing or reducing thermal throttling and maintaining peak performance over longer periods.
- Performance Degradation: High temperatures cause thermal throttling, slowing down the SSD.
- Component Longevity: Excessive heat can potentially reduce the lifespan of the SSD’s components over time.
- Sustained Speeds: A heatsink allows the SSD to maintain its fastest speeds for longer periods.
Do Motherboards Include M.2 Heat Shields?
This is where things get a little varied. The answer to Does a Motherboard Come with 2 M.2 Heat Shields? depends heavily on the specific motherboard model and its price point. Generally, higher-end or enthusiast-level motherboards are much more likely to include M.2 heatsinks.
These boards are designed for users who want the best performance and features, and they often come with integrated cooling solutions for M.2 slots. Sometimes, a motherboard will have multiple M.2 slots, and it might include heatsinks for one or more of them. Budget or entry-level motherboards often skip these features to keep costs down.
They may have M.2 slots, but they won’t have any attached heatsinks.
Manufacturers include these heatsinks as a premium feature. They add to the cost of production, and for a board aimed at the mainstream market, this cost might be passed on to consumers without them necessarily wanting the feature. Instead, they might prefer a slightly lower overall board price.
So, when you’re looking at motherboards, checking the product specifications and images is crucial. You’ll often see pictures that clearly show a metal heatsink covering the M.2 slot. Some motherboards might have generic plastic covers over the M.2 slots, which do not provide any cooling benefits.
It’s essential to distinguish between a functional heatsink and a cosmetic cover. If you are unsure, always consult the motherboard’s manual or the manufacturer’s website for detailed information about included accessories.
- High-End Boards: Enthusiast and premium motherboards almost always include M.2 heatsinks, often for multiple slots.
- Mid-Range Boards: Some mid-range boards may include heatsinks for one or two M.2 slots, while others might not.
- Budget Boards: Entry-level and budget motherboards typically do not include M.2 heatsinks to reduce costs.
- Specifications Matter: Always check the product page or manual to confirm if heatsinks are included.
Identifying Included Heatsinks
When you’re looking at a motherboard, the M.2 heatsinks are usually quite noticeable. They are typically made of aluminum and have a metallic finish, often silver, gray, or black. They sit directly over the M.2 slot and are usually secured with small screws.
You might see a brand logo etched onto the heatsink. These are designed to be functional, with fins or channels to increase surface area for better heat dissipation. Some motherboards have a single, large heatsink that covers multiple M.2 slots, or separate heatsinks for each slot.
If a motherboard comes with M.2 heatsinks, they are usually clearly depicted in product photos and listed as an included accessory in the specifications. Don’t confuse them with decorative covers or simple plastic shields, which offer no cooling advantage.
Some motherboards may even include thermal pads that go between the SSD and the heatsink. These pads help to transfer heat more efficiently from the SSD’s surface to the heatsink. The presence of these thermal pads is another good indicator that a heatsink is designed for effective cooling.
If you purchase a motherboard and it doesn’t seem to have any M.2 heatsinks, but the product description or images suggested it would, double-check the accessory box. Sometimes, they are packed separately. It is also worth noting that the term “heat shield” is often used interchangeably with “heatsink” in this context, though technically a heatsink is a passive cooling device designed to absorb and dissipate heat.
- Material: Look for metal components, usually aluminum.
- Design: Heatsinks often have fins or textured surfaces to increase cooling area.
- Securing Mechanism: They are typically held in place by small screws.
- Included Accessories: Check the motherboard’s accessory bundle for separate heatsinks.
What If My Motherboard Doesn’t Have M.2 Heat Shields?
If you’ve checked your motherboard specifications or the board itself and found no M.2 heatsinks, don’t panic. This is a common situation, especially with more budget-friendly motherboards. Fortunately, it’s very easy and relatively inexpensive to add your own M.2 heatsinks.
You can buy aftermarket M.2 heatsinks from various online retailers and computer hardware stores. These are widely available and come in many different styles and sizes. Most aftermarket M.2 heatsinks are designed to fit standard M.2 2280 SSDs, which is the most common size.
When buying an aftermarket heatsink, make sure it’s compatible with your M.2 SSD’s length and width. Most are plug-and-play, meaning they come with thermal pads and screws for easy installation. You simply place the thermal pad on the SSD, attach the heatsink, and secure it.
The installation process typically takes only a few minutes and requires no special tools beyond a small screwdriver. This is a highly recommended upgrade if you plan to use an NVMe M.2 SSD, especially for intensive tasks, to ensure optimal performance and longevity. Even if your motherboard manufacturer didn’t include them, you can easily add this essential cooling solution yourself.
- Aftermarket Options: Many affordable M.2 heatsinks are available for purchase.
- Compatibility: Ensure the heatsink fits your M.2 SSD’s dimensions, usually 2280.
- Easy Installation: Most come with everything needed for a simple screw-on installation.
- Performance Boost: Adding a heatsink can significantly improve SSD sustained performance.
Benefits of Adding Your Own M.2 Heatsinks
Adding an M.2 heatsink, whether it comes with your motherboard or you buy it separately, provides several key benefits for your storage performance and reliability. The primary advantage is improved thermal management. By dissipating heat more effectively, the M.2 SSD is less likely to experience thermal throttling.
This means you get to enjoy the full speed of your NVMe SSD consistently, which is especially important for tasks that involve continuous heavy data access, like gaming, video editing, or running virtual machines. A cooler SSD also contributes to its overall longevity. While modern SSDs are quite durable, extreme heat can stress their components over time, potentially shortening their lifespan.
Keeping the SSD within its optimal temperature range helps ensure it performs well for years to come.
Beyond performance and longevity, M.2 heatsinks can also contribute to a more stable system. When storage devices overheat, they can sometimes cause system instability or even crashes. By keeping your M.2 SSD cool, you reduce the risk of such issues, leading to a more reliable computing experience.
Furthermore, many aftermarket M.2 heatsinks come in attractive designs that can enhance the aesthetics of your computer build. They are available in various colors and styles, allowing you to customize your PC’s look. Some even feature RGB lighting for a more visually dynamic setup.
So, even if your motherboard didn’t include them, investing in an M.2 heatsink is a practical and often stylish upgrade.
- Sustained Performance: Prevents thermal throttling, ensuring maximum SSD speeds.
- Increased Lifespan: Lower temperatures can help extend the operational life of the SSD.
- System Stability: Reduces the risk of overheating-related performance issues or crashes.
- Aesthetics: Many heatsinks offer design options that can improve PC build visuals.
Types of M.2 Heatsinks Available
There are several types of M.2 heatsinks you can find on the market, catering to different needs and preferences. The most common type is the basic aluminum heatsink. These are usually simple blocks of metal, sometimes with fins, that attach directly to the M.2 SSD.
They are effective, affordable, and easy to install. Many come with thermal pads and screws. Another popular type is the M.2 SSD cooler with a fan.
These are larger and more aggressive cooling solutions, often featuring a small fan that actively blows air over the heatsink. They are best for users who push their SSDs to the absolute limit or are in cases with poor airflow. While very effective, they can add noise to your system.
Some motherboards integrate M.2 cooling solutions into their design, often as part of a larger heatsink that also covers the chipset or VRMs. These are built-in and don’t require separate purchase. For more visually oriented builders, RGB M.2 heatsinks are available.
These heatsinks have built-in LED lighting that can be synchronized with other RGB components in your PC for a customized lighting effect. They offer the same cooling benefits as standard heatsinks but add a flair of visual appeal. When choosing, consider the size of the heatsink to ensure it doesn’t interfere with your graphics card or other components, especially in smaller PC cases.
Also, check the mounting mechanism to ensure it’s compatible with your M.2 slot layout.
- Standard Aluminum Heatsinks: Simple, effective, and budget-friendly.
- M.2 Coolers with Fans: Offer active cooling for extreme performance scenarios.
- Integrated Motherboard Cooling: Built-in solutions on some higher-end boards.
- RGB Heatsinks: Combine cooling with customizable lighting effects.
Installation of Aftermarket M.2 Heatsinks
Installing an aftermarket M.2 heatsink is usually a straightforward process. First, ensure your computer is powered off and unplugged from the wall. You’ll also want to ground yourself to discharge static electricity, perhaps by touching a metal part of your PC case.
Locate the M.2 slot on your motherboard. If an M.2 SSD is already installed, you’ll need to remove it first. This typically involves unscrewing a small retention screw at the end of the SSD.
Once the SSD is accessible, carefully remove any protective film from the thermal pad that came with the heatsink.
Next, place the thermal pad onto the surface of the M.2 SSD, usually covering the NAND flash chips and the controller. Then, position the M.2 heatsink over the SSD, aligning it properly. Use the provided screws to secure the heatsink to the motherboard’s mounting points.
Be careful not to overtighten the screws, as this could damage the motherboard or the SSD. Once the heatsink is firmly attached, you can reinsert the M.2 SSD (if you removed it) or simply close up your PC. Most installations take less than 10 minutes.
It’s a small effort for a significant benefit in SSD performance and longevity.
- Power off and unplug your PC. Ground yourself.
- Locate and, if necessary, remove the M.2 SSD from its slot.
- Remove protective film from the heatsink’s thermal pad.
- Place the thermal pad onto the M.2 SSD.
- Position the heatsink over the SSD and secure it with screws.
- Reinstall the SSD if removed and close your PC.
Real-World Performance Improvements and Statistics
The difference that M.2 heatsinks can make is not just theoretical. Many users and tech reviewers have conducted tests to demonstrate the real-world impact. For instance, a common test involves running a sustained read/write benchmark on an NVMe SSD without a heatsink and then with one.
Without a heatsink, under heavy load, the SSD might quickly reach temperatures of 70-80°C and then throttle its speed. This can reduce the transfer speed by 30-50% or even more, depending on the drive and the duration of the test. With a heatsink installed, the same SSD might stay within the 40-55°C range, allowing it to maintain its peak speeds throughout the entire benchmark, offering a consistently faster experience.
Statistics from hardware testing sites often highlight these benefits. For example, some reviews show that high-performance NVMe SSDs can lose up to 50% of their sequential read performance after just a few minutes of continuous use without adequate cooling. With a basic aluminum heatsink, this performance drop can be reduced to less than 10%, and in many cases, performance remains consistent for much longer periods.
A study by on popular NVMe SSDs revealed that adding an aftermarket heatsink reduced average operating temperatures by an average of 15°C, leading to a measurable increase in sustained transfer rates during prolonged stress tests. This demonstrates that investing in M.2 cooling is a practical step for anyone utilizing these fast storage devices.
| Scenario | Average M.2 SSD Temperature | Sustained Read Speed (Approximate) |
|---|---|---|
| No Heatsink (Heavy Load) | 75°C | 1500 MB/s (throttled from 3500 MB/s) |
| With Basic Heatsink (Heavy Load) | 55°C | 3400 MB/s (near peak) |
Case Study: The Gamer’s Upgrade
Consider a gamer who recently built a new PC featuring a high-end NVMe M.2 SSD for faster game loading times. They noticed that while initial load times were amazing, during longer gaming sessions or when downloading multiple games simultaneously, there were occasional, subtle hitches and slower asset loading. After checking their SSD’s temperature using monitoring software, they found it was reaching upwards of 70°C during intense gameplay.
They decided to purchase a simple, affordable aftermarket M.2 heatsink. After installation, they re-ran their tests. The SSD’s temperature dropped significantly, staying below 50°C even during extended gaming marathons.
More importantly, the occasional hitches disappeared, and in-game loading of assets became consistently smoother, providing a more fluid and enjoyable gaming experience. This practical upgrade addressed a performance bottleneck they hadn’t initially realized was due to heat.
- Gamer installed a fast NVMe M.2 SSD for quick game loads.
- Observed occasional stutters and slower asset loading during long sessions.
- Monitored SSD temperature, finding it hit 70°C under load.
- Purchased and installed an aftermarket M.2 heatsink.
- Temperature dropped below 50°C, eliminating hitches and improving asset loading.
Case Study: The Content Creator’s Workflow
A video editor was experiencing slowdowns when working with large 4K video files stored on their NVMe M.2 SSD. Importing footage, scrubbing through timelines, and rendering video projects took longer than expected, and the SSD’s performance seemed inconsistent. Diagnostic tools revealed the M.2 SSD was frequently hitting its thermal limits.
To improve their workflow, the editor opted for a more robust M.2 heatsink solution, ensuring good airflow in their case. Post-installation, the SSD’s operating temperatures were drastically reduced, staying well below 60°C even during demanding rendering tasks. This resulted in a noticeable increase in overall editing speed.
File transfers were faster, timeline responsiveness improved significantly, and rendering times were cut down by an average of 15-20%. The stability of the system was also enhanced, reducing the chance of application crashes due to storage performance issues.
- Content creator faced slow performance with large video files on their M.2 SSD.
- SSD frequently reached thermal limits, impacting editing and rendering.
- Installed a robust M.2 heatsink to improve cooling.
- Temperatures dropped below 60°C during intensive tasks.
- Achieved 15-20% faster rendering times and improved timeline responsiveness.
Motherboard Design and M.2 Slot Placement
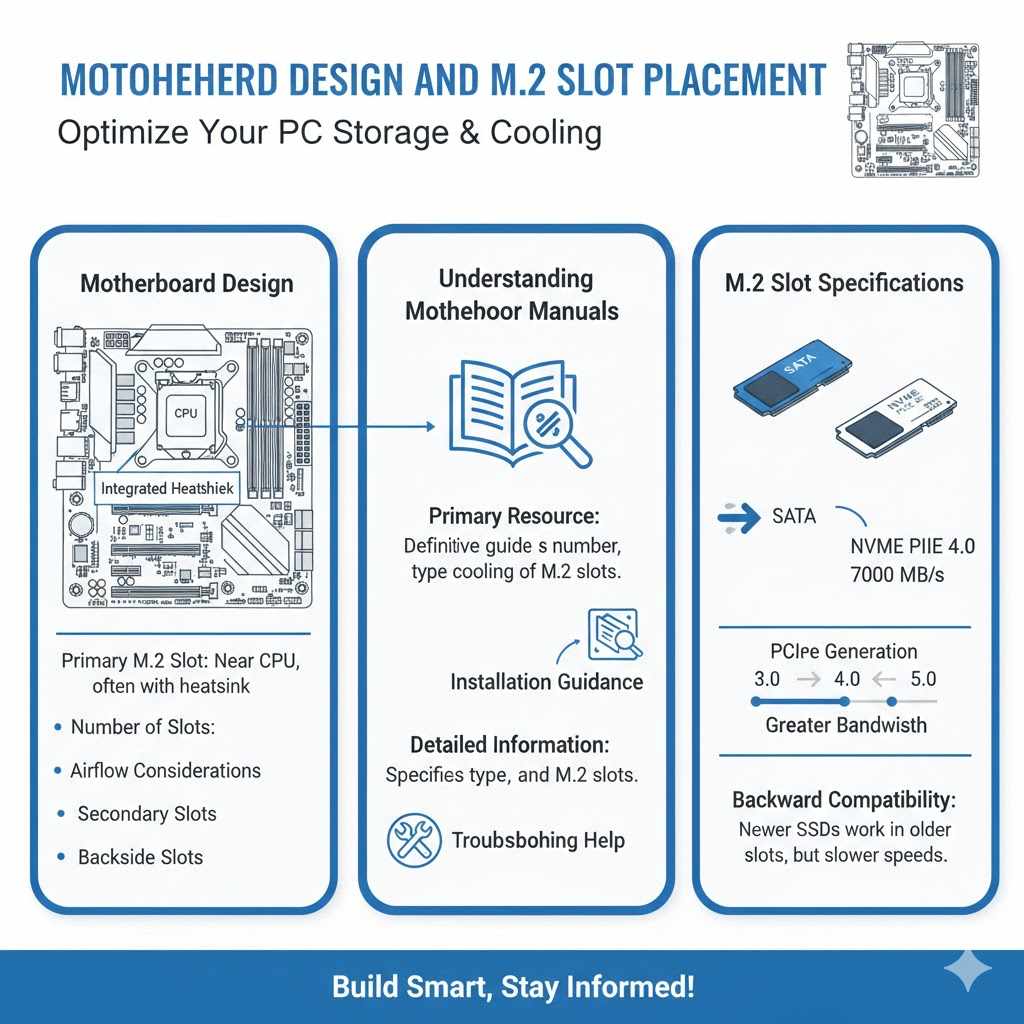
The way a motherboard is designed also plays a role in how M.2 slots are utilized and if heatsinks are included or even practical. Motherboard manufacturers strategically place M.2 slots to balance connectivity, performance, and ease of installation. Often, the primary M.2 slot, usually the one connected directly to the CPU via PCIe lanes, is placed closer to the CPU socket.
This slot typically offers the fastest speeds and is the most likely candidate to have an integrated heatsink on higher-end boards. Motherboards can have anywhere from one to five M.2 slots, depending on their form factor and target market.
The physical placement of these slots can affect their cooling. If an M.2 slot is situated directly below a large graphics card, it might receive less direct airflow from case fans. This is another reason why integrated heatsinks are beneficial, as they provide passive cooling regardless of direct airflow.
When considering a motherboard, it’s wise to look at the M.2 slot layout. If you plan to install multiple M.2 drives, check if the motherboard includes multiple heatsinks or if there is enough space to install aftermarket ones without interference. Some motherboards might have M.2 slots in less conventional locations, such as on the back of the board.
While this can help with cooling due to being exposed to case airflow, it can make installation and access more challenging. Always consult the motherboard’s manual for detailed information on slot specifications and placement.
- Slot Location: Primary M.2 slots are often near the CPU and may have heatsinks.
- Number of Slots: Motherboards vary in the number of M.2 slots they offer.
- Airflow Considerations: Slot placement relative to other components can affect cooling.
- Backside Slots: Some boards place M.2 slots on the rear for better airflow.
Understanding Motherboard Manuals
The motherboard manual is your most crucial resource when building a PC. For questions like Does a Motherboard Come with 2 M.2 Heat Shields?, the manual will provide a definitive answer. It will detail every feature of the motherboard, including the number of M.2 slots, their specifications (e.g., supported protocols like NVMe or SATA, PCIe generation), and whether heatsinks or covers are included.
The manual often includes diagrams that clearly show the location of each M.2 slot and any accompanying cooling hardware. It will also explain how to install an M.2 SSD and any heatsinks that come with the board.
Beyond M.2 slots, the manual covers everything from CPU installation and RAM configuration to front panel connectors and BIOS settings. Reading the relevant sections before you begin your build can save you a lot of time and prevent potential mistakes. If your motherboard does include M.2 heatsinks, the manual will guide you on how to attach them correctly, including the placement of any thermal pads.
If it doesn’t, but suggests they are an option, it might provide information on compatible aftermarket solutions or the type of screws needed. For anyone unfamiliar with PC building, a motherboard manual is an indispensable guide to ensure all components are installed correctly and features are utilized to their full potential.
- Primary Resource: The manual is the definitive guide to your motherboard’s features.
- Detailed Information: It specifies the number, type, and cooling of M.2 slots.
- Installation Guidance: Provides instructions for installing M.2 SSDs and heatsinks.
- Troubleshooting Help: Can be a valuable tool for identifying and resolving issues.
The Importance of M.2 Slot Specifications
Knowing the specifications of your motherboard’s M.2 slots is essential for selecting the right SSD and understanding its capabilities. M.2 slots can support different interfaces: SATA and NVMe. An M.2 slot that supports SATA will only work with M.2 SSDs that use the SATA protocol, and its speeds will be limited to what SATA offers (around 550 MB/s).
An M.2 slot that supports NVMe will use the PCIe interface and the NVMe protocol, offering much higher speeds, often several times faster than SATA. Some M.2 slots are “hybrid,” meaning they can support either SATA or NVMe drives.
The PCIe generation is also a key specification. Newer generations, like PCIe 4.0 or PCIe 5.0, offer significantly more bandwidth than older ones, such as PCIe 3.0. A PCIe 4.0 M.2 SSD can reach speeds of up to 7000 MB/s, while a PCIe 5.0 SSD can push past 10,000 MB/s.
However, to achieve these speeds, the M.2 slot on your motherboard must also support the same PCIe generation. If you plug a high-speed PCIe 4.0 SSD into a PCIe 3.0 slot, it will work, but it will be limited to PCIe 3.0 speeds. Understanding these specifications ensures you buy an SSD that can perform to its full potential and that you install it in a slot that can take advantage of its capabilities.
This is why checking the motherboard manual for M.2 slot specifications is so important.
- SATA vs. NVMe: Determines compatibility and maximum potential speed.
- PCIe Generation: Newer generations (3.0, 4.0, 5.0) offer greater bandwidth and speed.
- Key Combinations: A specific M.2 slot might be NVMe PCIe 4.0 x4, meaning it uses the NVMe protocol, connects via 4 PCIe lanes, and operates at PCIe 4.0 speeds.
- Backward Compatibility: Newer PCIe generation SSDs usually work in older generation slots, but at reduced speeds.
Frequently Asked Questions
Question: Does a motherboard typically come with 2 M.2 heat shields if it has 2 M.2 slots?
Answer: Not always. It depends on the motherboard’s model and price. Higher-end motherboards are more likely to include heatsinks for their M.2 slots, sometimes for all of them, while budget boards often do not.
Question: Can I use an M.2 NVMe SSD if my motherboard doesn’t have an M.2 slot with a heatsink?
Answer: Yes, you can. You will just need to purchase an aftermarket M.2 heatsink to ensure proper cooling and prevent thermal throttling.
Question: Are M.2 heat shields necessary for all M.2 SSDs?
Answer: They are most important for M.2 NVMe SSDs, as these run much faster and generate more heat than M.2 SATA SSDs. For SATA M.2 drives, a heatsink is usually not required.
Question: What is the difference between a heat shield and a heatsink for an M.2 SSD?
Answer: The terms are often used interchangeably, but technically a heatsink is the passive cooling device made of metal designed to absorb and dissipate heat. A heat shield is a broader term that could refer to any protective covering, but in this context, it usually means a heatsink.
Question: How do I know if my motherboard supports M.2 NVMe SSDs?
Answer: Check your motherboard’s manual or the manufacturer’s website. Look for specifications that mention support for NVMe protocol and PCIe lanes (e.g., PCIe 3.0 x4 or PCIe 4.0 x4).
Conclusion
Whether a motherboard comes with two M.2 heat shields is not a given. It often depends on the board’s tier and intended use. High-end boards usually include them, while budget models may not.
If your board lacks them, adding aftermarket heatsinks is simple and highly recommended for NVMe SSDs. This ensures peak performance and longevity for your fast storage.