Does 2000 Mercury Grand Marquis Have 2 Oxygen Sensors? Your Pro Guide
A 2000 Mercury Grand Marquis actually has four oxygen sensors, not two. There are two “upstream” sensors before the catalytic converters to monitor engine performance and two “downstream” sensors after the converters to check emissions system efficiency. This setup is standard for vehicles with dual exhaust systems from that era.
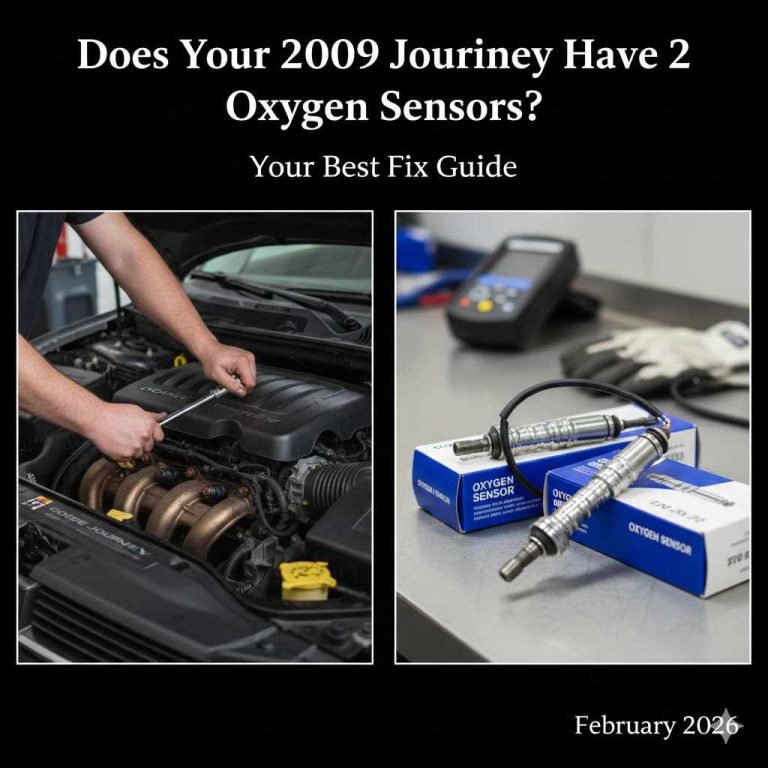
Is your check engine light glowing on the dashboard of your 2000 Mercury Grand Marquis? You might have heard that a bad oxygen sensor is a common cause. But then the confusion starts. How many sensors does it have? Some say two, some say more. It can feel frustrating when you just want a straight answer to get your car running right again.
You’re in the right place. I’m Monowar Shohag, and I’m here to make your car’s exhaust system easy to understand. We’re going to clear up the confusion about your Grand Marquis’s oxygen sensors. This guide will show you exactly how many sensors your car has, where to find them, and how you can even replace one yourself. Let’s get that check engine light turned off for good.
What is an Oxygen Sensor and Why Does Your Car Need It?
Think of an oxygen sensor, or O2 sensor, as a tiny nose for your car’s exhaust system. Its job is to “sniff” the unburned oxygen in the exhaust fumes coming from your engine. It then sends a signal to your car’s main computer, the Engine Control Unit (ECU). This signal tells the computer if the engine is burning fuel efficiently.
Why is this important? The ECU uses this information to adjust the air-to-fuel ratio in real-time. A perfect ratio means:
- Better Fuel Economy: Your engine uses just the right amount of fuel, saving you money at the pump.
- Lower Emissions: A clean-burning engine produces fewer harmful pollutants, which is better for the environment and helps you pass emissions tests.
- Smooth Performance: Your car runs smoother, with better power and less hesitation.
When an O2 sensor starts to fail, it sends bad information to the computer. This can lead to poor engine performance, high fuel consumption, and, of course, that annoying check engine light.

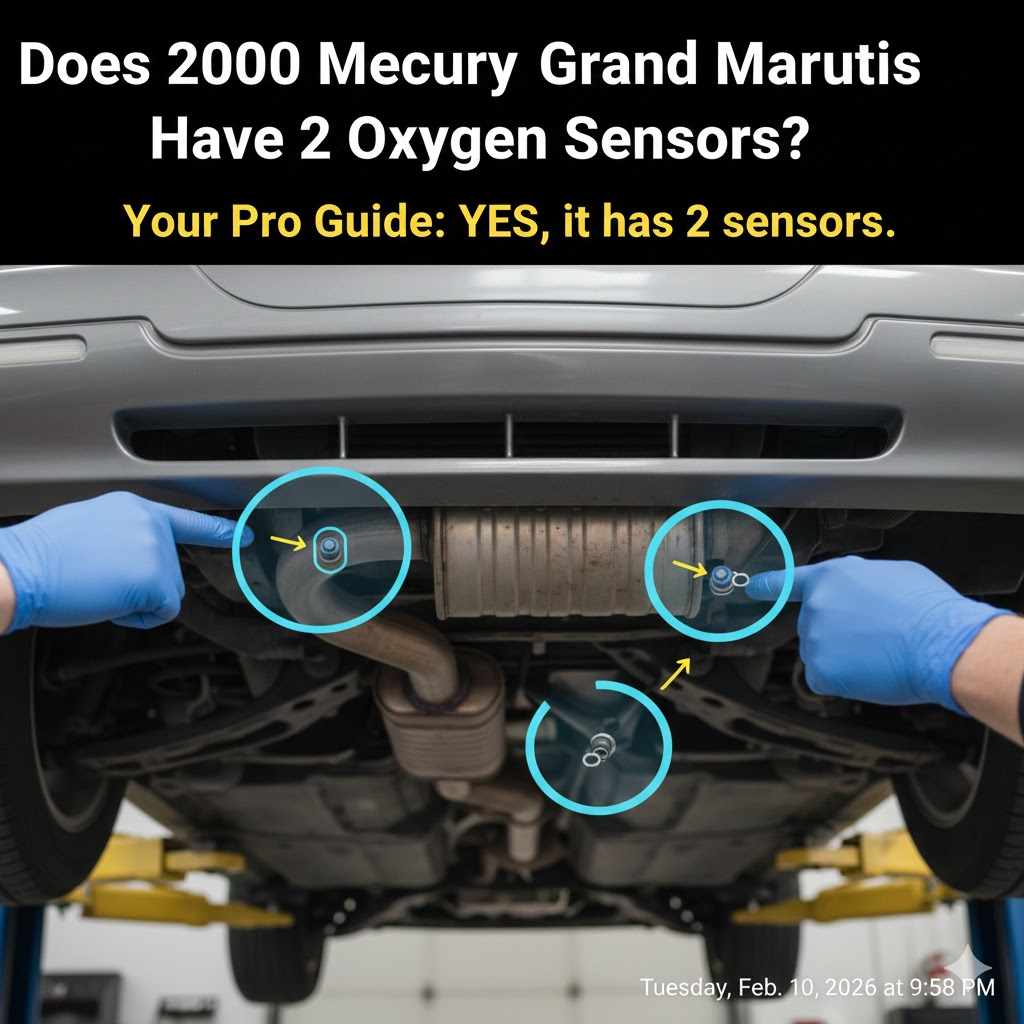
The Answer: Your 2000 Grand Marquis Has Four Oxygen Sensors
Let’s clear this up right away. The 2000 Mercury Grand Marquis, with its V8 engine and dual exhaust system, is equipped with four oxygen sensors. The confusion often comes from older or simpler vehicles that only had one or two. But for your car to meet emissions standards and run efficiently, it needs four distinct sensors working together.
These four sensors are split into two groups: “upstream” and “downstream.” They are also assigned to a specific side of the engine, known as “Bank 1” and “Bank 2.”
- Bank 1 is always the side of the engine that contains cylinder #1. On the Grand Marquis’s 4.6L V8 engine, this is the passenger side.
- Bank 2 is the opposite side of the engine, which is the driver’s side.
Upstream vs. Downstream: What’s the Difference?
The terms “upstream” and “downstream” refer to the sensor’s location relative to the catalytic converters. Your Grand Marquis has two catalytic converters, one for each bank of cylinders.
Upstream Oxygen Sensors (Sensor 1)
These are the most important sensors for engine performance. Located in the exhaust manifold or the pipe just before the catalytic converter, their job is to measure the raw exhaust gases coming directly from the engine. They provide the primary feedback to the car’s computer to adjust the air-fuel mixture. A faulty upstream sensor can directly cause poor performance and bad gas mileage.
Downstream Oxygen Sensors (Sensor 2)
These sensors are located after the catalytic converter. Their only job is to check the efficiency of the converter itself. They measure the oxygen content of the exhaust after it has been “cleaned” by the converter. The computer compares the reading from the downstream sensor to the upstream sensor. If the catalytic converter is working correctly, the downstream reading will be much more stable. If it’s failing, the readings will be similar, triggering a check engine light.
A Clear Breakdown of Your Four O2 Sensors
To make it even simpler, here is a table that breaks down the name, location, and purpose of each of the four oxygen sensors on your 2000 Mercury Grand Marquis.
| Sensor Name | Location | Primary Function |
|---|---|---|
| Bank 1, Sensor 1 (B1S1) | Passenger Side, Before Catalytic Converter | Measures engine exhaust to control the air-fuel ratio for that bank. Crucial for performance and fuel economy. |
| Bank 1, Sensor 2 (B1S2) | Passenger Side, After Catalytic Converter | Monitors the efficiency of the passenger side catalytic converter. Primarily an emissions control sensor. |
| Bank 2, Sensor 1 (B2S1) | Driver’s Side, Before Catalytic Converter | Measures engine exhaust to control the air-fuel ratio for that bank. Crucial for performance and fuel economy. |
| Bank 2, Sensor 2 (B2S2) | Driver’s Side, After Catalytic Converter | Monitors the efficiency of the driver’s side catalytic converter. Primarily an emissions control sensor. |
How to Tell if an Oxygen Sensor is Bad
Your car will usually give you a few warning signs when an O2 sensor is starting to fail. If you notice any of these, it’s a good idea to investigate further.
Common Symptoms of a Failing O2 Sensor:
- Check Engine Light: This is the most common sign. A specific trouble code related to the O2 sensor or fuel system will be stored in the car’s computer.
- Poor Fuel Economy: If you notice you’re filling up your gas tank more often, a bad upstream sensor could be the culprit. The engine might be running too “rich,” meaning it’s using too much fuel.
- Rough Idle or Misfiring: An incorrect air-fuel mixture can cause the engine to run erratically, especially when idling.
- Failed Emissions Test: The O2 sensors are critical components of the emissions system. A bad sensor is a very common reason for failing a smog check.
- Sluggish Performance: Your car might feel hesitant or sluggish when you accelerate if the engine isn’t getting the right fuel mixture.
Using an OBD-II Scanner to Confirm the Problem
The best way to know for sure if you have a bad O2 sensor is to use an OBD-II scanner. This is a simple, affordable tool that plugs into a port under your dashboard. It reads the diagnostic trouble codes (DTCs) that your car’s computer has stored.
You can buy a basic scanner online or at any auto parts store. Many stores will even scan your codes for free. For more information on how these systems work, the U.S. Environmental Protection Agency provides a great overview of OBD basics.
Here are some common codes that point to a faulty oxygen sensor:
- P0130 to P0135: Problems with Bank 1, Sensor 1
- P0136 to P0141: Problems with Bank 1, Sensor 2
- P0150 to P0155: Problems with Bank 2, Sensor 1
- P0156 to P0161: Problems with Bank 2, Sensor 2
The code will tell you exactly which of the four sensors is causing the problem, so you don’t have to guess.
A Beginner’s Guide to Replacing an Oxygen Sensor
Feeling adventurous? Replacing an oxygen sensor is a very manageable job for a beginner. With a few basic tools and a little patience, you can save a lot of money on labor costs. Here’s a step-by-step guide to get it done safely.
Tools and Materials You’ll Need
- Safety Glasses and Gloves
- Jack and Jack Stands (for accessing downstream sensors)
- Ratchet with Extension
- Oxygen Sensor Socket (this special socket has a slit for the wire)
- Penetrating Oil (like PB Blaster or WD-40)
- Wire Brush
- New Oxygen Sensor (make sure it’s the correct one for the position)
- Anti-Seize Compound (most new sensors come with it pre-applied)
- OBD-II Scanner (to clear the code afterward)
Step-by-Step Replacement Instructions
- Safety First! Make sure your car is parked on a flat, level surface and that the engine is completely cool. The exhaust system gets extremely hot. Wear your safety glasses and gloves.
- Disconnect the Battery: As a precaution, disconnect the negative terminal from your car’s battery.
- Locate the Faulty Sensor: Use your OBD-II code to identify which sensor needs replacing (e.g., Bank 1, Sensor 2). The upstream sensors are near the top of the engine, while the downstream sensors will be underneath the car, past the catalytic converters. You may need to safely lift the car with a jack and support it with jack stands to reach them.
- Unplug the Electrical Connector: Follow the wire from the sensor to its electrical plug. There is usually a small tab you need to press to release the connector. Be gentle to avoid breaking the plastic clip.
- Apply Penetrating Oil: O2 sensors can be very tight from years of heat cycles. Spray a generous amount of penetrating oil where the sensor screws into the exhaust pipe. Let it soak for at least 15-20 minutes. You can even apply it the night before for really stubborn sensors.
- Remove the Old Sensor: Place the O2 sensor socket over the sensor, making sure the wire fits through the slot. Attach your ratchet (you may need an extension) and turn it counter-clockwise to loosen. It may take some force to break it free.
- Prepare the New Sensor: Compare the new sensor to the old one to ensure they match. Most new sensors come with anti-seize compound already applied to the threads. If not, apply a small amount to the threads, being careful not to get any on the sensor tip.
- Install the New Sensor: Carefully thread the new sensor into the exhaust pipe by hand to avoid cross-threading. Once it’s hand-tight, use your socket and ratchet to snug it down. Do not overtighten it—check the manufacturer’s specification, but generally, about a quarter to a half turn past hand-tight is sufficient.
- Reconnect and Re-Check: Plug the new sensor’s electrical connector back in until it clicks. Reconnect your car’s battery.
- Clear the Code and Test Drive: Use your OBD-II scanner to clear the trouble code. Start the car and take it for a test drive. The check engine light should stay off, and you may notice improved performance and fuel economy.
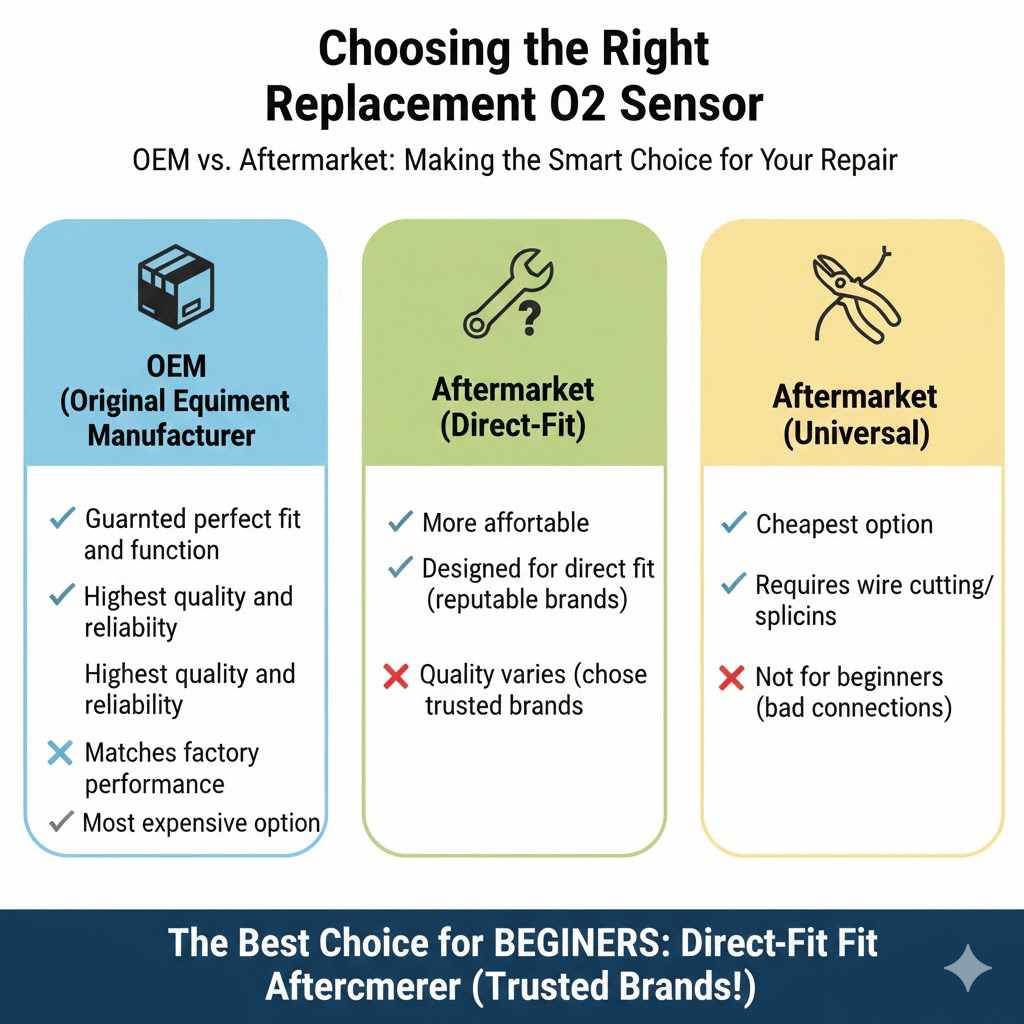
Choosing the Right Replacement Sensor
When you shop for a new O2 sensor, you’ll see options from the original equipment manufacturer (OEM) and various aftermarket brands. Which one should you choose?
| Sensor Type | Pros | Cons |
|---|---|---|
| OEM (Original Equipment Manufacturer) | Guaranteed to be an exact fit and match for your vehicle. Highest quality and reliability. | Usually the most expensive option. |
| Aftermarket (Direct-Fit) | Often less expensive than OEM. Designed to be a direct replacement with the correct plug. Reputable brands like Bosch or Denso are very reliable. | Quality can vary between brands. May not last as long as an OEM part. |
| Aftermarket (Universal) | The cheapest option available. | Requires you to cut the old plug off and splice it onto the new sensor’s wires. Not recommended for beginners as a bad connection can cause issues. |
For a beginner, a direct-fit aftermarket sensor from a well-known brand offers the best balance of price and ease of installation. Just be sure to double-check that the part number is correct for your vehicle’s year, model, and sensor location.
Frequently Asked Questions (FAQ)
1. How much does it cost to replace an O2 sensor on a 2000 Grand Marquis?
If you do it yourself, the only cost is the part, which typically ranges from $30 to $80 depending on the brand and location. If you take it to a mechanic, you can expect to pay between $150 and $300 for parts and labor.
2. Can I drive with a bad O2 sensor?
You can, but it’s not recommended for long. A bad sensor will cause your car to burn more fuel and produce more pollution. Over time, it can lead to more expensive damage to your catalytic converters, which can cost over a thousand dollars to replace.
3. How long do oxygen sensors last?
Oxygen sensors are considered a wear-and-tear item. They typically last anywhere from 60,000 to 100,000 miles. Their lifespan can be shortened by engine issues like oil or coolant leaks that contaminate the exhaust.
4. Do I really need a special O2 sensor socket?
Yes, it’s highly recommended. The slot on the side of the socket allows it to fit over the sensor’s pigtail wire. While you might be able to use a regular wrench on some sensors, the socket provides a much better grip and prevents you from rounding off the hex nut, which can make a simple job very difficult.
5. Will replacing the sensor guarantee the check engine light turns off?
If the OBD-II code points directly to a faulty sensor, then yes, replacing it should solve the problem and the light will stay off after you clear the code. However, if the light comes back on, there may be an underlying issue, such as a vacuum leak or an exhaust leak, that is causing the sensor to give a bad reading.
6. Are all four oxygen sensors on the Grand Marquis the same part?
No, they are often different. The upstream and downstream sensors are almost always different part numbers because they perform different functions. Sometimes, the length of the wire is also different between the driver’s and passenger’s side. It’s crucial to buy the specific sensor for the specific location you are replacing.
7. What’s the difference between “rich” and “lean”?
These terms describe the air-fuel mixture. A “rich” mixture means there is too much fuel and not enough air. A “lean” mixture means there is too much air and not enough fuel. The upstream O2 sensors help the car’s computer keep this mixture perfectly balanced.
Conclusion: You’ve Got This!
So, does a 2000 Mercury Grand Marquis have two oxygen sensors? No—it has four, and now you know exactly why. You understand the difference between upstream and downstream, how to spot the signs of a failing sensor, and where to find each one on your car. The exhaust system might seem complex, but by breaking it down, it becomes much more approachable.
Tackling a project like replacing an oxygen sensor can be incredibly rewarding. It not only saves you money but also builds your confidence as a car owner. With the right tools, a bit of patience, and the knowledge you’ve gained today, you are more than capable of handling this job yourself. Your Grand Marquis will thank you with smoother performance, better mileage, and a clear, unlit dashboard. Happy wrenching!