
How to Find a Leaking Header Gasket
A leaking header gasket often makes a sharp tick that gets louder on cold start and may leave soot at one flange. Confirm it by isolating the noise with a cold-engine paper-towel or smoke test before replacing parts. Guessing wrong wastes money and can leave you chasing misfires, burned valves, or cracked manifolds. This guide shows the telltale signs, lookalike noises, and the fastest checks that prove the leak source.
Leaking header gasket decision table


| Symptom | Likely cause | Quick check | Confidence level | Next step |
|---|---|---|---|---|
| Sharp ticking that rises with RPM, strongest cold | Header gasket leak | Listen cold, then check for soot at one runner or flange edge | High | Inspect flange flatness, studs, and gasket condition |
| Ticking that follows engine speed but comes from the top of the engine | Valve train tick | Use a non-contact listen near the valve cover area, not the exhaust flange | Medium | Separate top-end noise before touching exhaust parts |
| Fast, light tick that stays very regular and local to an injector | Injector tick | Compare all injectors and listen for a uniform clicking pattern | Medium | Do not replace exhaust parts yet |
| Black soot around a joint, but not at the head flange | External exhaust joint leak | Trace soot to the clamp, slip joint, or weld seam | High | Repair the joint, clamp, or pipe section |
| Tick plus burnt smell, smoke under hood, or heat stain at the flange | Header gasket leak | Inspect the flange with a bright light and a compact inspection mirror at cold idle | High | Confirm before removing parts |
| Loud pinging or cracking from the manifold area, soot on one side only | Cracked manifold/header flange | Look for cracks, warpage, elongated bolt holes, or broken studs | High | Repair the flange or replace the manifold/header |
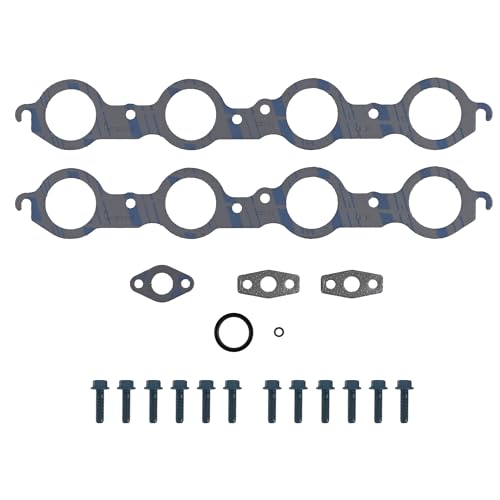
A header gasket seals the exhaust manifold or header to the cylinder head. When it leaks, the usual clues are ticking, soot, exhaust smell, and heat discoloration at the joint. The leak may show only cold or only under load before the parts expand and close the gap.
What a header gasket leak sounds and smells like
A true header gasket leak often starts as a sharp tick on cold start. The sound usually rises with RPM because exhaust pulses escape once every cycle, and the note often fades as metal heats and expands. Exhaust smell near the hood edge or wheel well can follow if the leak reaches an open path.
Cold-start ticking versus hot-running noise
Cold-start behavior matters because expansion changes seal load. A small leak may be loud for the first minute, then quiet down once the flange, gasket, and fasteners heat up. On high-mileage vehicles, the pattern can reverse after shutdown heat soak, then return on the next cold start.
Picture a 4-cylinder engine that ticks at idle for 30 seconds, then becomes hard to hear. If the noise follows engine speed and the sound is loudest near one runner, that points more toward an exhaust leak than a top-end mechanical tick.
Soot, odor, and heat marks at the joint
Black soot at one flange edge is one of the best visual clues. Burn marks usually point away from the leak source because exhaust exits and stains the surface in the flow direction. Heat discoloration at the joint, especially around one runner, also supports a leak at the gasket or flange.
Wipe the joint with a rag and a little degreaser first if access allows. Fresh soot stands out on bare metal, and a dark line at the gasket edge is easier to trust than a layer of old grime.
How do you tell it from valve train tick?
Start with cadence and location. A header gasket leak usually sounds like a sharper exhaust tick from the side of the engine or low in the bay, while valve train tick comes from the top end and often tracks camshaft and valvetrain motion more directly. Listen cold, because exhaust leaks are often loudest then.
Use a non-contact listening method. A mechanic’s stethoscope can be useful only when kept away from hot metal and moving belts, so a hose, length of tubing, or a remote listening setup is safer near the exhaust flange. Keep hands, sleeves, and tools clear of belts, fans, and the manifold.
Why injector tick and exhaust leaks get confused
Injector tick is usually a light, fast, repetitive click that sounds similar on each injector. It often stays very uniform and is easiest to hear near the fuel rail rather than at one exhaust runner. Exhaust leaks tend to be louder at one flange corner, under a specific runner, or at a broken stud.
Suppose one bank has a louder tick on a cold morning, but the sound disappears when you move your ear higher near the injectors. That leans toward injector noise. If the sound grows louder at the lower exhaust joint and leaves soot there, the header gasket stays on the suspect list.
How do you inspect the flange and studs?
Inspect the exhaust manifold or header flange for the mating-surface condition, not only the gasket itself. Cracks, warpage, elongated bolt holes, and broken studs can reduce proper clamping force and may make a new gasket fail again. The leak is often loudest at cold start when the joint has not expanded yet.
-
Clean the joint first.
Remove loose carbon and oil film from the flange, runners, and nearby head surface so the leak trail stays visible. A clean joint makes fresh soot, burn marks, and hairline cracks easier to spot. -
Inspect with light and mirror.
Aim a bright flashlight across the flange and use a small inspection mirror to check the lower edge, rear side, and each runner from different angles. Look for soot trails, a burn mark pointing away from the source, and gasket material escaping at one side. -
Check stud and hole condition.
Look for broken studs, stretched threads, and elongated bolt holes. If a fastener cannot clamp evenly, the gasket may leak even if the gasket itself is new. -
Assess flange flatness.
If the surface shows visible warp, pitting, or a crack, the mating faces may no longer seal. A warped flange can turn a simple gasket job into a manifold or header repair.
A common first-timer mistake is spotting soot and assuming the gasket alone failed. If one stud is broken or a flange ear is cracked, the joint can leak no matter how good the gasket looks.
How to confirm a small exhaust leak
A small leak is often best confirmed with a cold-idle hand or paper test and, when needed, a smoke machine or pressure leak test. The key is to test the exhaust path itself. Smoke or pressure that enters the wrong opening can create false positives at nearby joints.
-
Start with a cold idle.
Let the engine idle from cold so the leak is most likely to show. Keep clear of belts, fans, and hot surfaces. -
Use a paper-towel test.
Hold a thin paper towel or strip near the suspected joint without touching hot parts. A fluttering or pulsing movement at one flange edge can point to escaping exhaust, especially on a cold idle. -
Move to smoke testing.
If the leak is small or hidden, introduce smoke into the exhaust path and watch the header-to-head joint, the flange, and nearby seams for escaping vapor. Seal or account for other open points so smoke does not exit somewhere unrelated and mislead the diagnosis. -
Confirm before removal.
Repeat the test after cleaning the surface if the result is unclear. If the source stays fixed at one runner or the flange face, the diagnosis is much stronger than a guess based on sound alone.
Smoke machines are a shop-grade aid because they help confirm where vapor escapes. They are especially useful when the leak is too small to hear clearly or buried behind shields. Pressure-based exhaust-path testing can do the same job when applied carefully and with the correct sealing points.
Thermal cycling changes the diagnosis
Thermal cycling can make a leak appear only cold or only hot. As metal expands, clamping load changes across the flange and gasket, so a marginal seal may stop leaking once warm. On older vehicles, bolt torque can also shift after repeated heat cycles.
That is why a leak should be checked more than once. If the noise vanishes after warm-up but returns on the next cold start, do not dismiss it. The joint may still be leaking and only sealing temporarily under expansion.
What to do before replacing parts
Clean the area, repeat the test, and decide whether the fault is the gasket, the flange, or the manifold/header itself. A header gasket leak is only one possible failure mode. If the flange is warped, cracked, or missing clamp load from broken studs, the gasket alone will not fix it.
-
Verify the source again.
Recheck the soot pattern, listen cold, and repeat the paper or smoke test. Confirm the leak location before buying parts. -
Inspect clamping hardware.
Check for broken studs, stripped fasteners, and bolt-hole elongation. Missing clamping force can mimic a failed gasket. -
Choose the repair path.
Use a gasket repair when the flange is sound and the fasteners clamp evenly. Move to flange repair or manifold/header replacement if cracks or warpage are present. -
Plan for access difficulty.
If access is poor, rust is heavy, or fasteners are seized, a shop diagnosis can save time. Exhaust hardware can fail during disassembly, which turns a simple gasket job into a larger repair.
Never work under a vehicle supported only by a jack. Follow the vehicle manual, never work under a vehicle held only by a jack, never exceed the vehicle’s rated roof/hitch/tow limit, keep items out of airbag zones and the driver’s view, and check local laws. The same caution applies around hot exhaust parts and spinning accessories.
Frequently asked questions
Can a header gasket leak sound like an exhaust tick?
Yes. A header gasket leak often sounds exactly like a sharp exhaust tick, especially when the engine is cold. The difference is location and pattern: the noise usually comes from one runner or flange corner and may fade as the metal expands.
What tools do you use to find an exhaust leak at the header?
A flashlight, mirror, paper towel or strip for a cold-idle airflow check, and a smoke machine or pressure test are the main tools. A non-contact listening method helps too. Keep clear of hot metal and moving belts while you inspect.
What causes a header gasket to leak?
Common causes include heat cycling, loose or uneven bolt torque, warped flange surfaces, cracked manifolds or headers, elongated bolt holes, broken studs, and gasket material wear. Any one of these can reduce clamping force and let exhaust escape past the seal.
How do you fix a header leak?
Fix the actual failure point. If the gasket is damaged and the flange is flat, replace the gasket and restore even clamp load. If the flange is cracked, warped, or missing stud clamping, repair or replace the manifold or header first, then reseal.
Is it safe to drive with a leaking header gasket?
Short trips may be possible, but a leak can grow, get louder, and damage nearby parts from heat and escaping exhaust. If the leak is near the cabin, very loud, or tied to broken studs or a cracked flange, it should be repaired sooner rather than later.