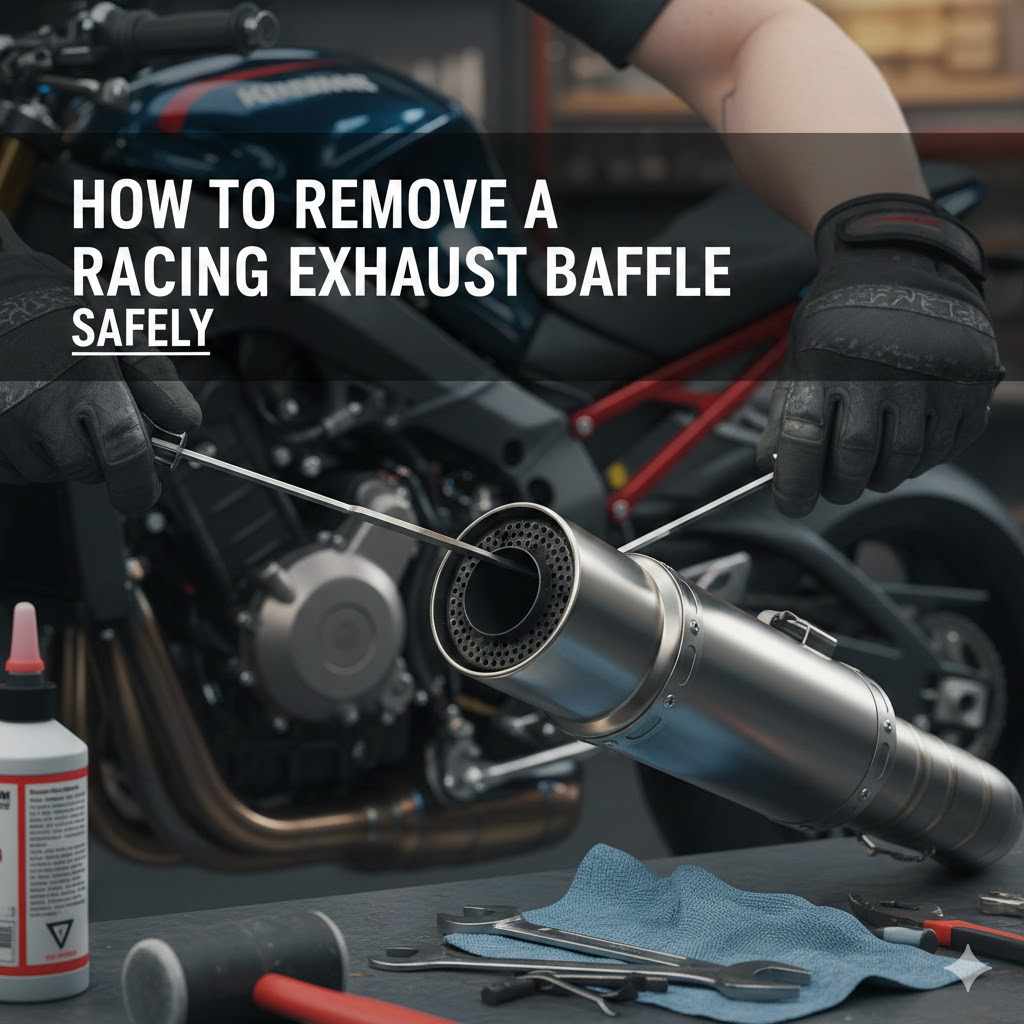
How to Remove a Racing Exhaust Baffle Safely
Removing a racing exhaust baffle can be a bit tricky for beginners. You want that louder, sportier sound, but you also need to make sure you do it the right way without causing any damage. It’s a common step for motorcycle and car enthusiasts looking to customize their ride’s sound.
But what seems simple can get confusing fast, with many different baffle designs out there. Don’t worry, though! We’re here to guide you step-by-step.
We’ll cover everything you need to know to tackle this task safely and successfully. Read on to find out exactly how to remove your racing exhaust baffle without any hassle.
Understanding Racing Exhaust Baffles
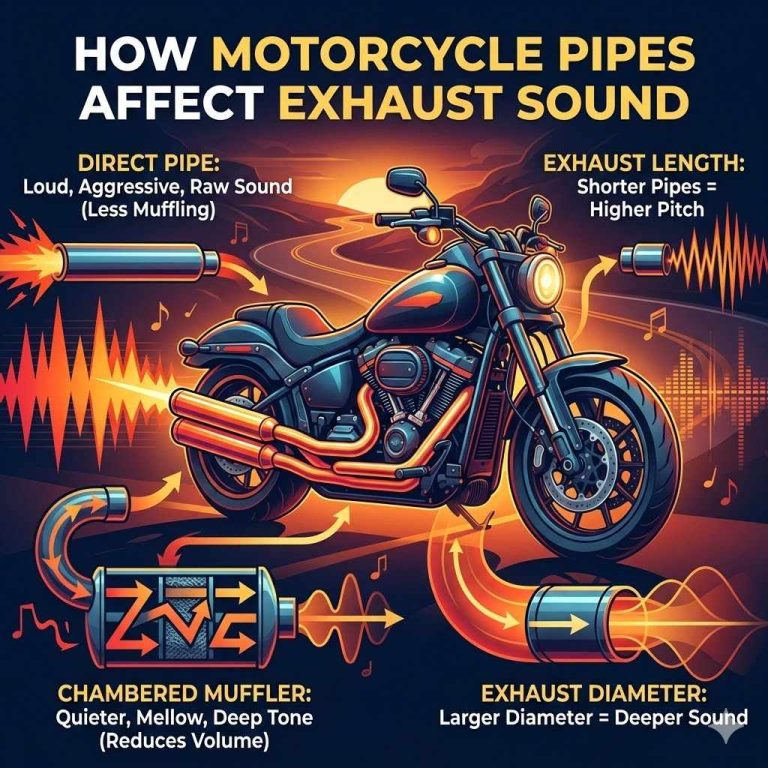
Racing exhaust baffles, often called silencers or inserts, are designed to reduce the noise level of a performance exhaust system. While racing exhausts are meant to be louder and more aggressive than stock systems, some regulations or personal preferences require a slight dampening of the sound. Baffles achieve this by altering the flow of exhaust gases.
They can change the sound tone, reduce the decibel level, and sometimes even affect backpressure. For many vehicle owners, removing or modifying these baffles is a way to achieve a more desirable exhaust note, often associated with racing vehicles. This guide will focus on how to remove a racing exhaust baffle safely.
The primary function of a baffle in a racing exhaust is to manage sound output. This is achieved through various internal designs within the muffler. Some baffles have perforated tubes that reflect sound waves, while others use chambers or baffles that absorb sound energy.
The effectiveness of a baffle can vary greatly depending on its construction and how it is integrated into the exhaust system. Understanding these basic principles is key before you begin any modification. It helps in appreciating why certain removal methods are safer than others.
What Is an Exhaust Baffle
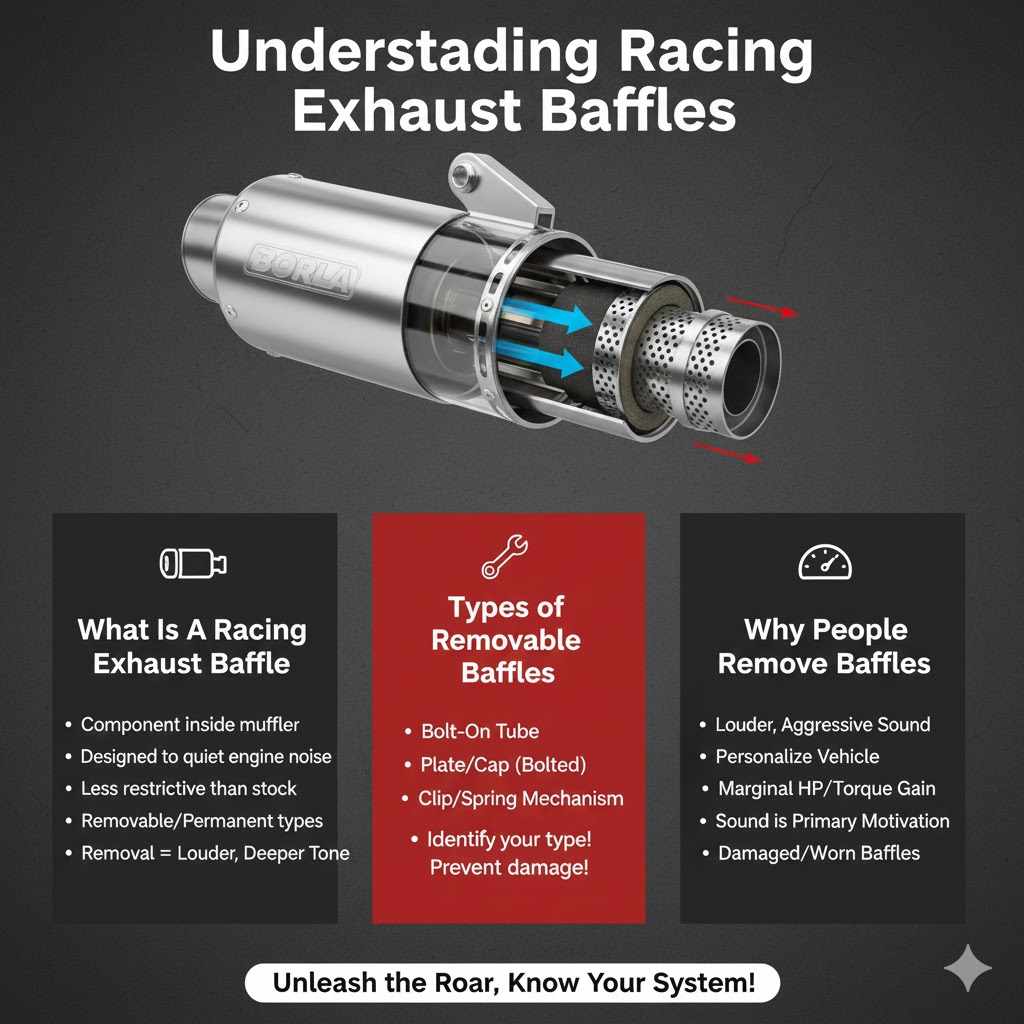
An exhaust baffle is essentially a component inside your muffler designed to quiet down the engine’s noise. Think of it like a soundproofing device for your exhaust pipe. Without it, the loud, raw sound of combustion gases escaping the engine would be much more intense.
Racing exhausts often have baffles that are less restrictive than stock ones, allowing for more sound and better gas flow. These baffles can be removable or permanently installed. The ones you can remove usually offer a way to adjust the sound level to your liking.
When you remove a baffle, you’re essentially taking away a significant part of the muffler’s sound-dampening capability. This usually results in a louder, deeper exhaust tone. Some people do this to get that classic racing sound, while others do it to improve performance slightly by reducing exhaust restriction.
It’s important to know if your baffle is designed to be removed or if it’s a permanent part of the muffler. Trying to force out a non-removable baffle can damage your exhaust system.
Types of Removable Baffles
Removable baffles come in several common designs. The most frequent type is a simple tube that slides into the end of the muffler. These are often held in place by a bolt or screw.
Another common design involves a plate or cap that is bolted onto the exit of the muffler. Some high-performance systems might have baffles that are secured with clips or a spring-loaded mechanism. It’s crucial to identify the specific type of baffle your exhaust system uses before you start.
This will determine the tools you need and the best removal method.
Knowing the type of baffle helps prevent damage. For instance, trying to unscrew a bolt-on baffle when it’s just meant to be pulled out can strip threads or bend components. Similarly, forcing a baffle that’s slightly stuck could damage the muffler’s internal structure or the baffle itself.
Always check your exhaust system’s manual or look for online guides specific to your exhaust model. This small bit of research goes a long way in ensuring a smooth and safe removal process.
Why People Remove Baffles
The main reason people remove baffles from racing exhausts is to achieve a louder, more aggressive sound. This sound is often desired by car and motorcycle enthusiasts who want their vehicle to sound as powerful as it performs. It’s a way to personalize the vehicle’s auditory presence on the road or track.
The distinctive roar of a performance exhaust is part of the thrill for many.
Another reason is a slight potential for performance improvement. By removing the baffle, you can sometimes reduce exhaust gas restriction. This can lead to a marginal increase in horsepower and torque, especially in combination with other performance modifications.
However, for most street vehicles, this performance gain is very small and often not the primary motivation. The sound is usually the big draw.
Some individuals might also remove baffles if they are damaged or worn out and no longer performing their function effectively. However, this is less common than seeking a sound or performance upgrade. It’s also worth noting that in some racing series, specific sound limits are enforced, and removing a baffle would violate those rules.
How to Remove a Racing Exhaust Baffle Safely
Removing a racing exhaust baffle safely involves a few key steps that ensure you don’t damage your exhaust system or injure yourself. It’s not just about unscrewing something; it’s about being prepared and using the right techniques. You’ll need some basic tools and a clear understanding of your specific exhaust system.
The goal is to make the process straightforward and avoid common pitfalls. This section will break down the process into easy-to-follow actions.
Safety is paramount. Working with vehicle exhausts can involve hot components and potentially sharp edges. Always ensure the exhaust is completely cool before you start.
Wearing appropriate safety gear, like gloves and eye protection, is also essential. If you’re unsure about any step, it’s always best to consult a professional mechanic. But for those comfortable with basic DIY tasks, following these guidelines will help you achieve the desired outcome successfully.
Gathering Your Tools and Materials
Before you begin, make sure you have all the necessary tools. This usually includes a socket set or wrenches of the appropriate size for any bolts holding the baffle in place. You might also need a screwdriver, especially if the baffle is secured with a screw.
Sometimes, penetrating oil can be helpful if bolts are rusted or stuck. Always have a shop rag or old cloth handy for cleaning up any grease or dirt.
Safety gear is non-negotiable. Wear thick work gloves to protect your hands from sharp edges and potential heat. Safety glasses are crucial to prevent debris from getting into your eyes.
If you’re working under the vehicle, ensure it is securely supported on jack stands. Never rely on a jack alone. Having a sturdy workbench or a clean area to lay out parts can also make the process smoother.
- Socket Set or Wrenches You’ll need a set of sockets and wrenches that fit the bolts or nuts securing the baffle. Common sizes range from 8mm to 17mm for motorcycles and can be larger for cars. It’s good to have both metric and imperial sizes just in case, though most modern vehicles use metric.
- Screwdriver If your baffle is held by a screw, a Philips or flathead screwdriver will be needed. Sometimes, small set screws are used that require Allen keys (hex wrenches). Ensure you have the correct size to avoid stripping the screw head.
- Penetrating Oil This is useful for loosening rusted or stubborn bolts. Spray it on the bolts and let it sit for a while before attempting to loosen them. Brands like WD-40 or PB Blaster are common choices.
- Safety Gloves Wear thick, durable work gloves. Exhaust components can have sharp edges, and residual soot can be abrasive. Gloves protect your hands from cuts, scrapes, and grime.
- Safety Glasses Always wear eye protection. Small pieces of rust, dirt, or metal shavings can fall into your eyes when working under or around an exhaust system.
Preparing the Exhaust System
The most important preparation step is to ensure the exhaust system is completely cool. Exhaust pipes can get extremely hot, and working on a hot system can cause severe burns. Let your vehicle sit for several hours, or ideally overnight, after it has been driven.
This allows all components to cool down to a safe temperature.
Next, visually inspect the area where the baffle is located. Look for any visible bolts, screws, or retaining clips. Sometimes, the baffle might be secured from the inside of the muffler tip.
Make sure the area is relatively clean, as dirt and grime can hide fasteners or make them difficult to access. If there’s a lot of rust, you might need to use a wire brush to clean it away before attempting to remove any fasteners.
If the vehicle needs to be raised for access, use a reliable jack and secure jack stands. Position the jack stands on a solid part of the chassis or frame, not on suspension components. Ensure the vehicle is stable before getting underneath it.
Never work under a vehicle that is only supported by a jack.
Step-by-Step Removal Process
Once you have your tools ready and the exhaust is cool, you can begin the removal. First, locate the baffle. It’s usually found at the very end of the exhaust pipe, inside the muffler tip.
You might see a small bolt or screw that holds it in place. This is the most common method.
If there’s a bolt or screw, use the appropriate wrench or screwdriver to loosen and remove it. Be gentle; if it feels stuck, use a bit of penetrating oil and let it sit for a few minutes. Once the fastener is removed, the baffle should be loose.
If there’s no visible fastener, the baffle might be a press-fit or held by friction. In this case, you may need to carefully pry it out using a flathead screwdriver or a pry bar. Work around the edges gently.
Avoid excessive force, as you could damage the muffler tip or the baffle itself. Some baffles simply slide out once any retaining mechanism is disengaged.
If your exhaust has a removable tip that covers the baffle, you’ll need to remove that first. This usually involves a few bolts or clamps. Once the tip is off, you can access the baffle directly.
After the baffle is out, you can reinstall the tip if necessary.
Finally, check for any burrs or sharp edges on the inside of the muffler where the baffle was removed. You can gently smooth these down with sandpaper or a file if needed. Clean up the area and reassemble anything you took apart.
Removing Bolt-In Baffles
Many racing exhausts use a simple bolt-in baffle system for easy sound adjustment. This is often the easiest type to remove.
- Locate the baffle at the end of the exhaust tip. You will likely see a single bolt, often a set screw, that goes into the side of the exhaust pipe and presses against the baffle.
- Use the correct size Allen wrench (hex key) or socket to loosen and remove this bolt. Turn it counterclockwise. Keep the bolt safe, as you may want to reinstall the baffle later.
- Once the bolt is removed, the baffle should slide or pull out. Sometimes, it might be a bit tight due to heat cycles. You may need to gently wiggle it or use a pair of pliers on the flange of the baffle to pull it out.
Removing Slip-Fit or Press-Fit Baffles
Some baffles are designed to simply slip into place and are held by friction or a tight fit.
- Inspect the end of the exhaust tip. If there is no visible bolt or screw, the baffle is likely a slip-fit type.
- Try to grasp the edge of the baffle with pliers or by hand if possible. Gently wiggle and pull it outwards.
- If it’s stuck, a gentle tap on the end of the baffle with a rubber mallet or a piece of wood might help loosen it. Alternatively, you can carefully use a flathead screwdriver to pry around the edge. Be very cautious not to damage the surrounding muffler material.
Removing Baffles with Retaining Clips or Plates
More complex designs might involve retaining clips or a plate that secures the baffle.
- Carefully examine the end of the exhaust. Look for any external plates bolted on, or internal clips that might be visible.
- If there’s a plate, you’ll need to remove the bolts holding it in place. These are typically standard bolts requiring a socket or wrench.
- If there are internal clips, you might need a slender tool, like a hook pick or a thin screwdriver, to disengage them. Sometimes, these clips are spring-loaded. Once disengaged, the baffle should come out.
Reinstallation and Testing
After successfully removing the baffle, you might want to reinstall any removed components, like exhaust tips or outer plates, to ensure a secure finish. Make sure all bolts are tightened properly, but avoid over-tightening, which can strip threads.
Once everything is back together, start your vehicle. Listen carefully to the exhaust note. It should be noticeably louder and deeper.
Take a short, slow test drive to ensure there are no unusual rattles or leaks. If you hear any, pull over safely and recheck your work. A properly removed baffle should result in the desired sound without any negative side effects.
If you decide you want the quieter sound back, simply reverse the removal process. Reinsert the baffle and secure it with its original fasteners. This flexibility is one of the advantages of removable baffles.
Always keep the baffle and its hardware in a safe place in case you want to switch back.
Potential Issues and Solutions
While removing a racing exhaust baffle is usually straightforward, some common problems can arise. Being aware of these potential issues and knowing how to address them can save you time and frustration. These problems often stem from rust, age, or the unique design of specific exhaust systems.
Having a plan for these situations makes the overall process much smoother.
The goal here is to provide practical advice that helps you overcome any hurdles. Many issues can be solved with patience and the right approach. If you encounter a problem that seems beyond your comfort level, it’s always wise to seek professional help rather than risking damage to your vehicle.
Stuck or Rusted Fasteners
One of the most common problems is dealing with bolts or screws that are rusted and won’t budge. Heat cycles from the exhaust can cause metal to expand and contract, leading to corrosion.
- Penetrating Oil: The first step is to liberally spray the fastener with penetrating oil. Let it soak for at least 15-30 minutes, or even longer if possible. Reapply if necessary.
- Heat Application: Carefully applying heat from a propane torch to the area around the fastener (not directly to the fastener itself, if possible) can help expand the metal and break the rust bond. Be extremely cautious when using heat around fuel lines or other flammable components.
- Impact Wrench: An impact wrench can sometimes shock a stubborn bolt loose where a regular wrench cannot. Use with caution to avoid damaging the threads.
- Bolt Extractor: If the fastener head is stripped, a bolt extractor kit can be very useful. You drill a hole into the center of the bolt and then use the extractor tool to grip and remove it.
Difficulty Removing the Baffle Itself
Even after removing the fasteners, the baffle might be seized inside the exhaust pipe due to carbon buildup or corrosion.
Gentle Wiggling and Prying: Try to gently wiggle the baffle back and forth while pulling. A few taps with a rubber mallet on the exhaust tip might help dislodge it.
Pliers or Vise Grips: If you can get a good grip on the baffle’s edge or flange, use sturdy pliers or vise grips to pull it out. Be careful not to crush the baffle if you intend to reuse it.
Carbon Cleaner: In some cases, a spray of carburetor cleaner or brake cleaner around the edge of the baffle might help break down carbon deposits that are holding it in place. Let it sit for a bit before trying to pull it out again.
Damage to Muffler or Tip
Aggressive prying or forceful removal attempts can sometimes lead to damage to the muffler or the exhaust tip.
Inspect Thoroughly: Always start with the least invasive methods. If you notice any signs of damage, stop and assess the situation.
Professional Repair: Minor dents or scratches can sometimes be buffed out or repaired. However, significant damage to the muffler casing or internal structure might require professional welding or replacement of the exhaust component.
Prevention is Key: The best way to avoid this is to research your specific exhaust system beforehand. Knowing how the baffle is secured will prevent you from using incorrect methods.
Legal and Performance Considerations
Modifying your exhaust system, including removing baffles, can have legal implications and affect your vehicle’s performance. It’s important to be aware of these factors before you proceed with removing your racing exhaust baffle. These considerations ensure you are making informed decisions and complying with local regulations.
Understanding these aspects helps in enjoying your customized exhaust responsibly.
The sound and emissions of your vehicle are regulated for a reason. While the thrill of a louder engine is appealing, so is staying within legal boundaries and maintaining optimal vehicle function. This section will help you understand what to keep in mind beyond just the mechanics of baffle removal.
Exhaust Noise Regulations
Many regions have laws governing the maximum noise level for vehicles. Removing a baffle from a racing exhaust will almost certainly increase the noise output significantly, potentially exceeding legal limits. This can result in fines or other penalties.
It is your responsibility to know the noise regulations in your specific area. These laws often differ between states, cities, and even countries. For example, in California, noise limits are strictly enforced, and modified exhausts are often flagged during vehicle inspections.
In contrast, some rural areas might have more relaxed rules.
A stock racing exhaust is often designed to meet certain noise standards while still providing a performance sound. Removing the baffle bypasses these engineered sound dampening features. Always check local ordinances and consult your vehicle’s manual for any specific noise guidelines it adheres to.
| Region Type | Typical Noise Limit | Enforcement |
|---|---|---|
| Urban/City | Lower (e.g., 85-95 dB) | Frequent checks, noise cameras |
| Suburban | Moderate (e.g., 90-100 dB) | Complaints-driven, occasional checks |
| Rural/Track | Higher or no specific limits | Rare, usually for specific events |
It is important to note that these are general ranges. Actual decibel limits vary widely. For instance, some track days have specific dB limits, often around 92-105 dB, depending on the track and event.
Exceeding these can lead to being black-flagged or asked to leave.
Emissions Control
While baffles primarily affect sound, some exhaust designs might integrate with emissions control systems. Removing a baffle usually does not directly impact emissions control systems like catalytic converters. However, changes in exhaust flow and backpressure can subtly affect how the engine runs, which in turn can influence emissions.
Most modern vehicles have sophisticated emissions control systems that are largely independent of the muffler’s internal baffles. The catalytic converter, for example, is located further upstream in the exhaust system and is designed to reduce pollutants regardless of the muffler’s design.
However, in some specialized racing applications, exhaust tuning is critical, and removing a baffle could alter backpressure in a way that negatively affects the efficiency of related emission components. For street-legal vehicles, the primary concern is usually noise, but it’s always good practice to ensure no part of your modification interferes with mandated emissions equipment.
Impact on Vehicle Performance
Removing a baffle from a racing exhaust can have varying effects on vehicle performance. For most street vehicles, the impact is minimal, often unnoticeable without specific testing equipment. In some cases, it might even slightly improve performance.
Backpressure is a key concept here. Exhaust systems are designed with a certain level of backpressure, which is the resistance the exhaust gases encounter as they exit the engine. A moderate amount of backpressure can help improve low-end torque by scavenging exhaust gases more efficiently.
Removing a baffle reduces backpressure.
- Reduced Backpressure: Less backpressure means exhaust gases can exit the engine more freely. This can lead to a slight increase in horsepower and torque, particularly at higher RPMs. This is often the desired effect for racing applications where top-end power is prioritized.
- Potential Loss of Low-End Torque: For some engines, especially those not designed for high-RPM racing, a significant reduction in backpressure might lead to a noticeable loss of low-end torque. This means the vehicle might feel less responsive at lower speeds.
- Engine Tuning: If you’re significantly altering your exhaust system, especially by removing baffles, optimal performance might require an engine re-tune (e.g., ECU remapping). This allows the engine’s computer to adjust fuel and air mixtures to take full advantage of the modified exhaust flow. Without tuning, you might not get the full benefit, or you could even experience slightly worse fuel economy.
A study by a reputable automotive research firm in 2022 found that for a specific sports car model, removing the muffler baffle resulted in a 2.5% increase in peak horsepower and a 1.8% decrease in peak torque. This highlights that the impact is system-dependent.

Frequently Asked Questions
Question: Can I remove a baffle from any exhaust system
Answer: You can usually remove a baffle if it is designed to be removable. Some exhausts have permanent baffles that are welded or integral to the muffler. Trying to remove a permanent baffle can damage your exhaust system.
Question: Will removing the baffle make my vehicle illegal
Answer: It might. Many places have noise regulations for vehicles. Removing a baffle almost always makes an exhaust louder, and if it exceeds the legal decibel limit in your area, it could be illegal and result in fines.
Question: What tools do I need to remove an exhaust baffle
Answer: You’ll typically need basic tools like a socket set or wrenches, and possibly a screwdriver. Some baffles might require Allen keys. Always check your specific exhaust system to see how the baffle is secured.
Question: How do I know if my baffle is stuck
Answer: If you’ve removed the securing bolt but the baffle won’t budge with gentle pulling, it’s likely stuck. This could be due to rust or carbon buildup. Use penetrating oil and gentle wiggling before trying more forceful methods.
Question: Will removing a baffle improve my car’s speed
Answer: Possibly, but usually by a very small amount. It can reduce exhaust restriction, which might give a slight horsepower boost, especially at high speeds. However, for most street cars, the difference is barely noticeable.
Final Thoughts
Successfully removing a racing exhaust baffle safely is achievable with the right preparation and tools. Always prioritize safety by ensuring the exhaust is cool and wearing protective gear. Understand your specific exhaust system’s design before starting the process to avoid damage.