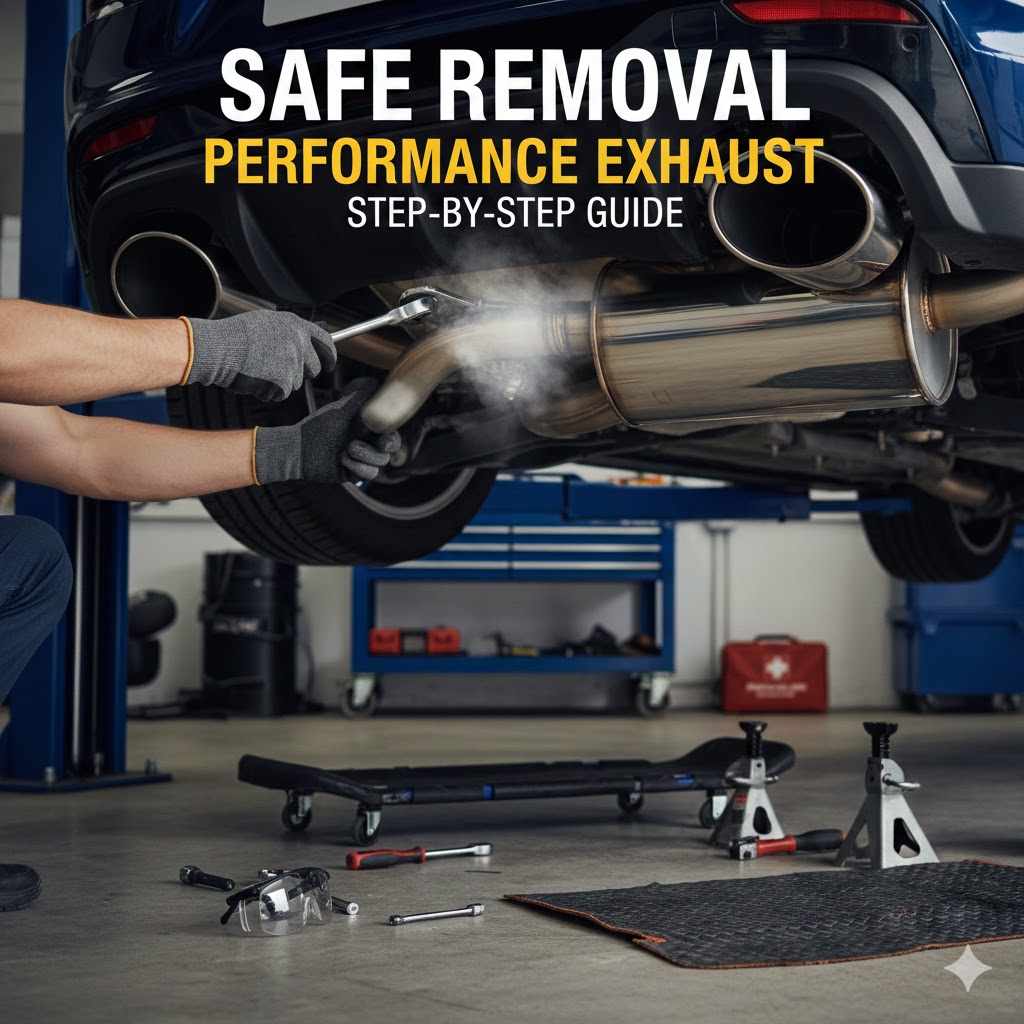
How to Remove a Performance Exhaust Safely
Taking off a performance exhaust might seem tricky, especially if you’re new to working on cars. There are lots of parts and things to watch out for. But don’t worry!
This guide will walk you through How to Remove a Performance Exhaust Safely, step by step. We’ll make it easy to follow so you can get the job done right.
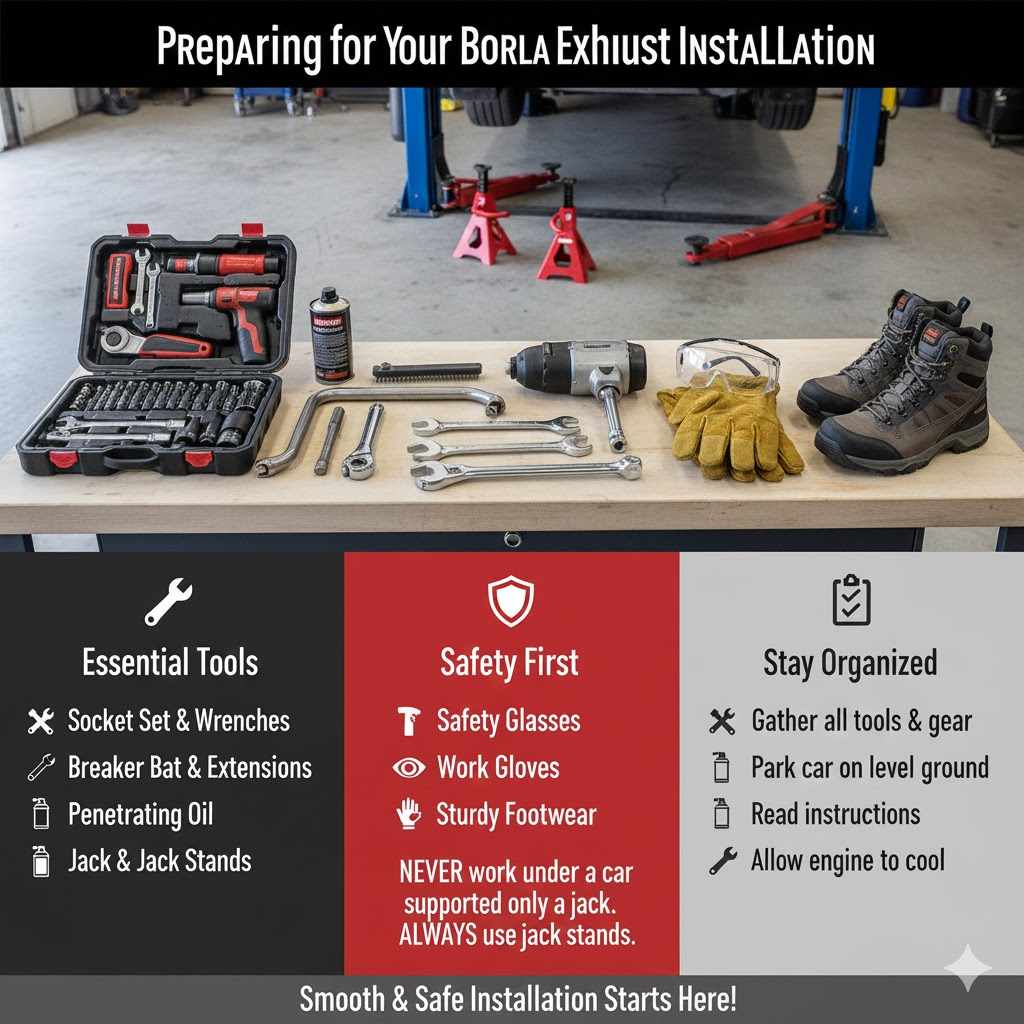
Gathering Tools and Safety Gear
Before you start, getting the right tools and safety gear is super important. Having everything ready means you can work smoothly and safely. This section covers the essentials you’ll need to tackle the exhaust removal job without any problems.
Essential Tools for Exhaust Removal
You’ll need a good set of wrenches and sockets. Make sure they fit the bolts on your exhaust system. A breaker bar can help loosen stubborn bolts.
You might also need a torque wrench to put things back together correctly later, even if you’re just removing it now. A wire brush is handy for cleaning rust off bolts before you try to turn them.
Socket Set and Wrenches
A comprehensive socket set with various sizes, including deep sockets, is crucial. Metric sizes are common for most vehicle exhaust systems. Ratchet handles and extensions will help you reach tight spots.
Having a good set of combination wrenches is also useful for nuts that are in awkward positions. Ensure the tools are made of strong steel to prevent them from breaking or stripping bolts.
Breaker Bar and Extensions
Exhaust bolts can get very tight due to heat cycles and rust. A breaker bar, which is a long, strong handle without a ratcheting mechanism, provides extra leverage. This is often necessary to break the initial seal on corroded bolts.
Extensions for your sockets allow you to reach bolts that are hidden or recessed.
Penetrating Oil
Rust and corrosion are common enemies of exhaust bolts. A good penetrating oil, like WD-40 or a more specialized rust penetrant, is essential. Spray it generously on all the bolts and nuts you’ll be loosening, and let it soak in for at least 15-30 minutes, or even longer if possible.
Reapplying it can also help.
Jack and Jack Stands
You’ll need to lift your vehicle to access the exhaust system. A sturdy car jack is necessary for this. However, never work under a vehicle supported only by a jack.
Always use reliable jack stands to support the car safely. Place them on strong points of the frame.
Safety First Always
Working under a car can be dangerous if you’re not careful. Always use jack stands to support your vehicle. Never rely solely on the jack.
Wear safety glasses to protect your eyes from falling debris. Gloves are also a good idea to protect your hands from sharp edges and grease.
Safety Glasses
Eye protection is non-negotiable when working on cars. Debris, rust, or even a slipping tool can cause serious eye injury. Make sure your safety glasses fit snugly and offer good peripheral vision.
They should be impact-resistant.
Work Gloves
Exhaust components can have sharp edges, and the system can be coated in grime and soot. Work gloves protect your hands from cuts, scrapes, and grease. Nitrile or leather gloves offer good protection.
Make sure they don’t reduce your grip on tools.
Sturdy Footwear
Wear closed-toe shoes that offer good traction. This protects your feet from falling tools or parts and provides a stable base if you need to step on something. Avoid sandals or open-toed shoes.
Preparing Your Vehicle for Exhaust Removal
Getting your car ready makes the actual removal much smoother. This includes making sure the exhaust is cool and the car is safely lifted. Proper preparation is key to a safe and efficient job.
Cooling Down the Exhaust System
Exhaust systems get incredibly hot when a car is running. You must let the car cool down completely. Waiting a few hours after driving, or ideally overnight, ensures the exhaust pipes, catalytic converter, and muffler are cool to the touch.
Touching hot exhaust parts can cause severe burns.
Why Cooling is Essential
The metal components of an exhaust system absorb a lot of heat. When the engine is on, exhaust gases can reach temperatures of over 1000 degrees Fahrenheit (538 degrees Celsius). Even after the engine is off, the metal retains heat for a long time.
Prematurely touching these parts can lead to immediate and painful burns. Allowing adequate cooling time is the most critical first step in safe exhaust removal.
Checking Temperature
You can gently feel parts of the exhaust system with the back of your hand, from a safe distance initially. If it feels warm, it’s definitely not cool enough. Wait longer.
There are no shortcuts here; patience is vital to avoid injury. Consider using heat-resistant gloves for an extra layer of protection when first approaching the system, even if it’s been off for a while.
Safely Lifting and Supporting the Vehicle
You need to get under the car to work on the exhaust. Using a jack to lift the car is only the first step. You must then use sturdy jack stands to hold the car up.
Never work under a car supported only by a jack; they can fail without warning.
Using a Jack Properly
Place your jack under the vehicle’s designated jacking point. Consult your owner’s manual if you’re unsure where these are. Lift the vehicle slowly and steadily until it’s high enough to place jack stands underneath.
Ensure the jack is stable and not at an angle.
Positioning Jack Stands
Once the car is lifted, place jack stands under strong structural points of the vehicle’s frame. Again, your owner’s manual will show these. Ensure the jack stands are at the same height and are fully engaged.
Slowly lower the car onto the jack stands. Give the car a gentle push to ensure it’s stable before going underneath.
Wheel Chocks
For added safety, place wheel chocks behind the wheels that remain on the ground. This prevents the car from rolling, even if the parking brake is engaged. This is an extra layer of security that many DIY mechanics overlook.
The Step-by-Step Process for Exhaust Removal
Now that you’re prepared, let’s get to the actual removal. We’ll go through each step methodically, making sure you know what to do at each stage.
Locating and Loosening Exhaust Hangers and Clamps
Exhaust systems are held in place by hangers and clamps. These are usually rubber or metal components that support the weight and allow for some movement. You’ll need to find all of them and loosen or detach them carefully.
Identifying Hanger Locations
Walk the length of your exhaust system, from the engine manifold back to the tailpipe. You’ll find rubber isolators or metal brackets attached to the car’s chassis, with arms extending to connect to the exhaust pipes. Performance exhausts might have different or fewer hangers than stock systems, so pay close attention to how yours is mounted.
Removing Clamps
Many exhaust sections are joined by clamps. These are usually U-shaped bolts or band clamps. Use your socket set to loosen the nuts or bolts on these clamps.
If they are rusted tight, apply penetrating oil and let it sit. Some clamps might be one-time use, so be prepared to replace them if they break.
Detaching Hangers
For rubber hangers, you can often slide the exhaust pipe out of the rubber loop. Sometimes, a bit of lubricant like soapy water can help. For metal hangers, you might need to unbolt them from the chassis or the exhaust pipe itself.
Keep track of any bolts or nuts you remove.
Disconnecting the Exhaust from the Engine and Other Components
The exhaust starts at the engine and connects to various parts like the catalytic converter and muffler. You’ll need to unbolt these connections. This is often where the most stubborn bolts are found.
Manifold or Header Bolts
The exhaust system begins at the engine’s exhaust manifold or aftermarket headers. These are bolted directly to the engine head. These bolts are often exposed to high heat and can seize up.
Again, penetrating oil and a breaker bar are your friends here. Sometimes, working from top to bottom is easier for these.
Catalytic Converter Connection
The catalytic converter is a key part of the exhaust. It might be bolted to the exhaust manifold or a downpipe. Sometimes, it’s a slip-fit connection secured by a clamp.
Inspect how yours is attached and unbolt accordingly. If your performance exhaust includes a cat-delete pipe, you’ll be removing the factory converter.
Muffler and Mid-Pipe Connections
Further back, the mid-pipe connects to the muffler. These are typically joined by clamps or flanges with bolts. Ensure you have access to all fasteners.
If your system is a cat-back design, you’ll be disconnecting after the catalytic converter.
Removing the Exhaust System Sections
Once everything is disconnected, you can start pulling the exhaust sections off. It’s usually best to work from the back of the car forward, or vice-versa, depending on what’s easiest for your specific vehicle and exhaust setup. Have a helper if possible, as exhaust systems can be heavy and awkward to handle.
Working Section by Section
Carefully slide or lower each section of the exhaust system away from the car. If the system comes apart in multiple pieces, remove them one at a time. Be mindful of where the pipes are pointing to avoid scratching your car’s underbody or other components.
If a piece is stuck, don’t force it violently; re-check for hidden bolts or hangers.
Assistance is Recommended
Having a second person can make a huge difference. One person can support the weight of the exhaust section while the other unbolts the last connections or guides it away. This reduces the risk of dropping the heavy component and causing damage or injury.
Storage of Removed Parts
Once removed, place the exhaust system components in a safe place. If you plan to reinstall them later or sell them, store them where they won’t be damaged. Consider using old blankets or mats to prevent scratches and protect them from the elements.
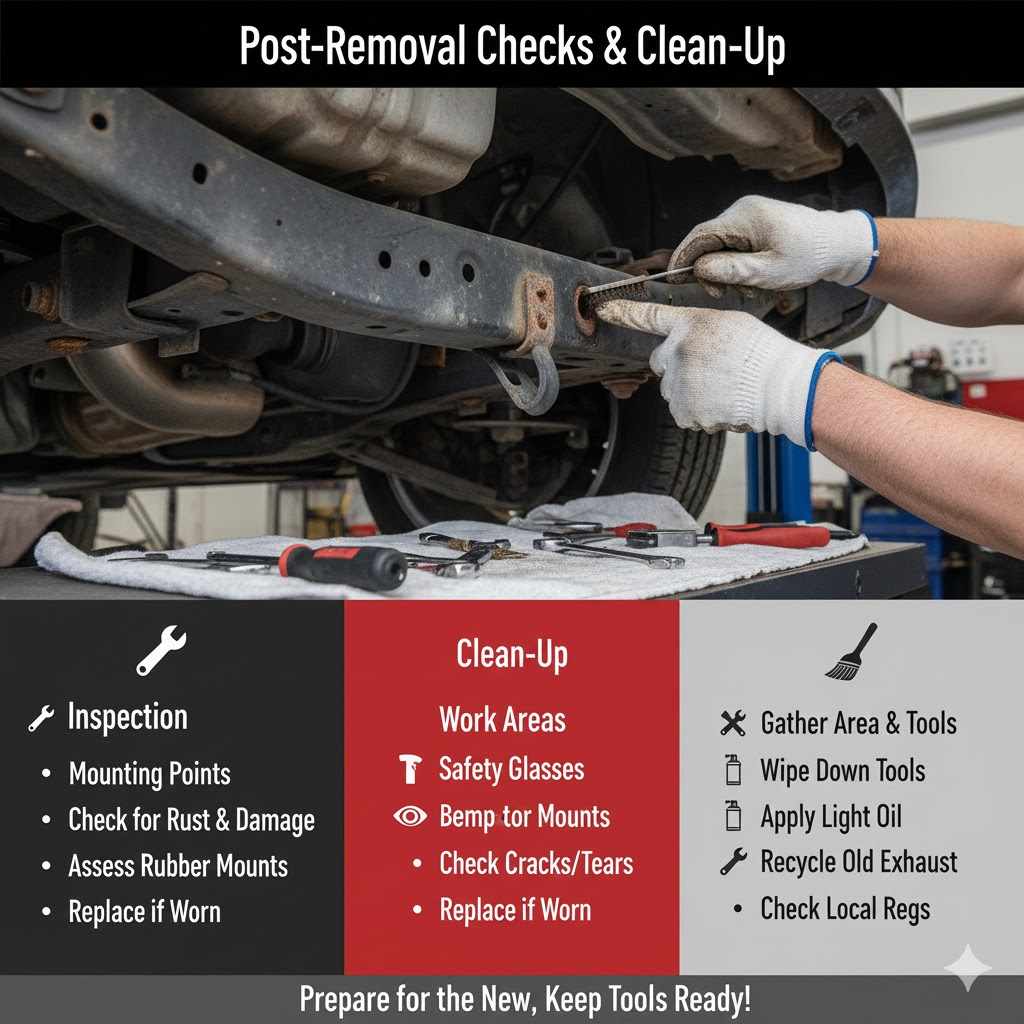
Post-Removal Checks and Clean-Up
After the exhaust is off, there are still a few important things to do. Checking the mounting points and cleaning up ensures a good job and prepares for any next steps.
Inspecting Mounting Points and Hangers
Look at where the exhaust was attached to the car. Check the hangers and brackets for any signs of damage or excessive rust. If you see any issues, this is the perfect time to address them before reinstalling a new system or leaving the car as is.
Checking for Rust and Damage
Exhaust hangers and the surrounding chassis points are prone to rust. Inspect these areas closely for significant corrosion that could compromise structural integrity. Surface rust can often be treated, but deeper rust might require repair.
Assessing Rubber Mounts
If your hangers use rubber isolators, check them for cracks, tears, or signs of deterioration. Worn-out rubber mounts can cause excessive vibration or even allow the exhaust to sag. Replace them if they look compromised.
Cleaning Up the Work Area and Tools
Tidy up your workspace. Clean your tools so they’re ready for the next project. Dispose of any waste materials properly.
A clean workspace is a safer workspace.
Tool Maintenance
Wipe down your wrenches and sockets to remove grease and grime. Apply a light coat of oil to prevent rust, especially on metal tools. This helps them last longer and perform better.
Disposal of Old Parts
If you’re replacing the exhaust system, you’ll need to dispose of the old one. Many auto parts stores or recycling centers accept old exhaust systems. Check local regulations for proper disposal methods.
Frequently Asked Questions
Question: Do I need a special tool to remove an exhaust?
Answer: While not strictly special tools, a good socket set, breaker bar for leverage, and penetrating oil are essential for dealing with potentially rusted bolts.
Question: How long does it usually take to remove a performance exhaust?
Answer: For someone with some experience, removing a performance exhaust can take anywhere from one to three hours. Beginners might take longer.
Question: Can I remove an exhaust system by myself?
Answer: Yes, it’s possible, but having a helper makes the job much easier and safer, especially when handling heavy exhaust sections.
Question: What should I do if bolts are seized and won’t budge?
Answer: Apply more penetrating oil and let it soak longer. Use a breaker bar for more leverage. Sometimes, gently heating the bolt (not the surrounding area excessively) with a torch can help break it free, but this requires caution and expertise.
Question: Is it safe to drive without an exhaust system?
Answer: No, it is not safe or legal to drive without an exhaust system. It will be extremely loud, and the exhaust fumes are toxic and can enter the cabin.
Wrap Up
Removing a performance exhaust safely involves preparation, the right tools, and careful execution. By following these steps, you can successfully detach your exhaust system. Always prioritize safety and take your time to avoid damage or injury.