How to Change 1967 VW Exhaust Tips
Lots of people love working on their old Volkswagen cars. Sometimes, though, a job like How to Change 1967 VW Exhaust Tips can seem a little tricky if you haven’t done it before. You might wonder if you have the right tools or if it’s too hard.
Don’t worry, it’s totally doable! We’re going to walk through it step-by-step so you can get your VW sounding and looking great. Get ready for some simple instructions that will make this task easy to handle.
Your Guide How to Change 1967 VW Exhaust Tips
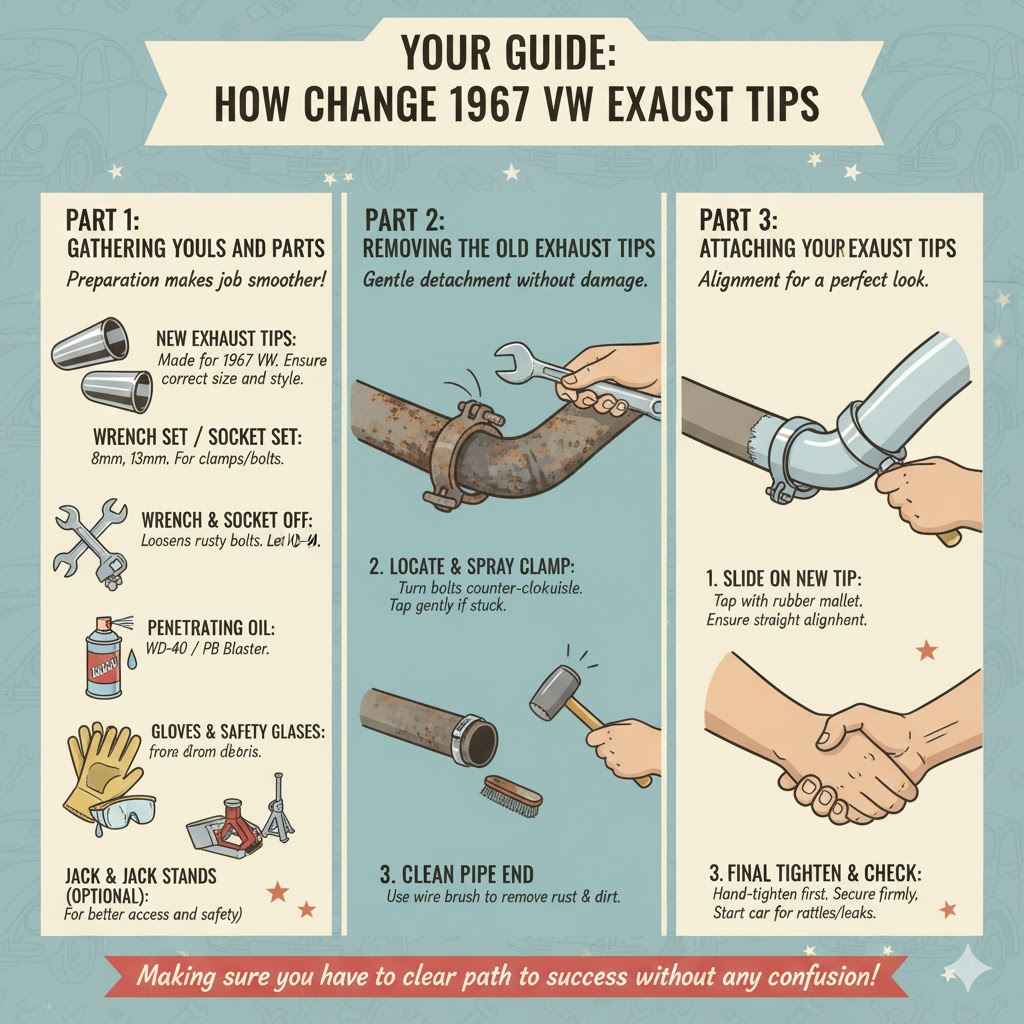
This section will show you the straightforward way to swap out the exhaust tips on your 1967 Volkswagen. We’ll cover what you need before you start, how to safely get the old tips off, and how to put the new ones on so they fit perfectly. It’s all about making sure you have a clear path to success without any confusion.
You’ll learn the essential parts and why they matter for a good result.
Gathering Your Tools and Parts
Before you begin anything, it’s smart to have all your tools and new exhaust tips ready. This saves you from stopping in the middle of the job to find something. Having everything in one spot makes the process much smoother.
It’s like getting your kitchen ready before you start cooking; everything is where you need it.
- New Exhaust Tips: Make sure you buy tips that are made for a 1967 VW. They should be the right size and shape to fit your car’s exhaust pipes. Some might be a slip-on style, while others may require clamping or even welding. It’s best to check what fits your specific model. For a 1967 VW, you often find tips designed to mimic the original look or slightly sportier versions that bolt right on.
- Wrench Set or Socket Set: You’ll likely need wrenches or sockets to remove any clamps or bolts holding the old tips in place. Common sizes might be 8mm, 10mm, or 13mm, but it’s good to have a range available.
- Penetrating Oil: Old exhaust systems can get rusty. Spraying a penetrating oil, like WD-40 or PB Blaster, on any bolts or clamps beforehand can make them much easier to loosen. Let it soak for a bit.
- Gloves and Safety Glasses: Protect your hands from grease and sharp edges. Safety glasses are a must to keep your eyes safe from any falling debris or rust.
- Jack and Jack Stands (Optional but Recommended): If your car is low or you need better access, a jack and jack stands are helpful. Always use jack stands to support the car safely; never work under a car supported only by a jack.
- Wire Brush: Once the old tips are off, you might want to clean up the exhaust pipe where the new tips will go. A wire brush can remove rust and dirt.
Having these items ready means you’re prepared for the job. It reduces frustration and helps you finish faster. It’s better to have one extra tool than to need one and not have it.
Removing the Old Exhaust Tips
Taking off the old tips is usually the simplest part. The goal is to gently detach them without damaging the exhaust pipes. Most 1967 VW exhaust tips are held on with a clamp.
Some older models might have them directly attached, but for most, a clamp is the fastener.
First, locate the clamp that secures the exhaust tip to the exhaust pipe. It’s usually right where the tip begins to flare out. If you’re using a jack, make sure the car is stable on jack stands before getting underneath.
Spray some penetrating oil on the clamp’s bolts or nuts. Let it sit for a few minutes to work its way into the rust. Then, use your wrench or socket to loosen and remove the bolts.
You might need to turn them counter-clockwise. Sometimes, the clamp itself might be rusted onto the tip or pipe. In such cases, you might need to carefully cut the clamp off with a hacksaw or a rotary tool if it won’t budge.
Be careful not to cut into the exhaust pipe itself.
Once the clamp is loose or removed, try to wiggle the exhaust tip off the pipe. If it’s stuck, a gentle tap with a rubber mallet or the handle of your wrench might help. Avoid hitting it too hard, as you don’t want to bend the exhaust pipe.
If the tip is rusted onto the pipe, you might need to work it back and forth more. Sometimes, rotating it while pulling can help break the rust seal. Remember, patience is key here.
Forcing it too much could lead to bigger problems.
After the old tip is off, set it aside. You can inspect the end of your exhaust pipe for any damage or excessive rust.
Attaching Your New Exhaust Tips
Putting on the new tips is the reverse of taking off the old ones, but with a bit more care to get them aligned just right. You want them to look straight and even.
First, clean the end of your exhaust pipe. Use a wire brush to remove any rust, dirt, or old gunk. A clean surface helps the new tip fit better and makes a tighter seal.
Make sure there are no sharp edges left that could cut you.
Now, slide the new exhaust tip onto the end of the exhaust pipe. If it’s a tight fit, you can gently tap it into place with a rubber mallet. Make sure it’s pushed on as far as it should go.
Check the alignment from the back and sides to ensure it looks straight. You want it to extend evenly from the bumper or body of the car.
If your new tips use a clamp, place the clamp over the spot where the tip meets the pipe. Tighten the bolts on the clamp evenly. Don’t overtighten them right away.
Snug them up first, then step back and check the alignment again. Make final adjustments as needed. Once you’re happy with how it looks, tighten the clamp bolts firmly.
You want them secure so the tip doesn’t vibrate or come loose, but avoid crushing the pipe.
Some newer exhaust tips might have a bolt that goes directly through the tip and into a pre-drilled hole in the exhaust pipe. If yours has this, align the tip and then screw in the provided bolt. Again, tighten it securely.
If you encounter any resistance, double-check that the tip is the correct one for your 1967 VW. Sometimes, slight modifications might be needed, but for most replacement tips, it should be a straightforward fit.
After you have both tips attached, give them a good shake to ensure they are secure. Start the car and listen for any unusual rattling or exhaust leaks around the new tips. A proper fit means a nice, clean look and sound for your classic VW.
Understanding Exhaust System Components
This part explains the different bits that make up your car’s exhaust system and why they are important. Knowing what each part does helps you fix things better. It also shows why changing the tips is just one small piece of a bigger picture.
We will look at the main parts that work together to get exhaust gases out of your engine safely.
The Role of the Exhaust Manifold
The exhaust manifold is one of the first parts of the exhaust system. It’s a set of pipes that bolts directly to the engine’s cylinder head. Its job is to collect hot exhaust gases from each cylinder and funnel them into a single pipe.
Think of it like a traffic controller for exhaust fumes, gathering them from many lanes into one highway.
These manifolds are usually made of cast iron or stainless steel because they have to withstand very high temperatures. Over time, exhaust manifolds can develop cracks, especially from heating and cooling cycles. A cracked manifold can cause exhaust leaks, leading to a louder exhaust sound, a loss of engine power, and sometimes even a burning smell.
For a 1967 VW, the engine design influences the type of exhaust manifold used. Many older VWs use a unique setup where the manifold is integrated differently than in modern cars. This is why parts compatibility is so important when working on these classic vehicles.
Any issues here can affect the entire exhaust flow.
Keeping the exhaust manifold in good shape is vital for engine performance and health. If you notice ticking noises when the engine is cold or a smell of exhaust fumes, the manifold might be the culprit. Replacing a cracked manifold can be a more involved job than changing exhaust tips.
The Function of the Muffler
The muffler is a key component for controlling the sound of your exhaust. Its main purpose is to reduce the loud popping and roaring noises that come from the engine. Inside the muffler are chambers and baffles that quiet down the exhaust gases as they pass through.
It works by forcing the sound waves to bounce around and cancel each other out.
A healthy muffler makes your car quieter and more pleasant to drive. If your muffler is damaged or rusted through, you’ll likely notice a much louder exhaust note. Sometimes, a failing muffler can also affect engine performance, as it might create a restriction in the exhaust flow.
This can make your engine work harder and use more fuel.
For many 1967 VW models, the muffler is a single unit that might also incorporate the tailpipe section. This means that if you’re replacing the muffler, you might also be replacing the tips as part of the same part. It’s important to check how the exhaust system is configured for your specific car.
When a muffler starts to go bad, it’s often due to rust. You might see holes in the casing or hear rattling noises from internal parts breaking loose. Replacing a muffler is a common repair and directly impacts the sound and performance of your vehicle.
The condition of the muffler is directly related to the sound your car makes. A quiet ride usually means a well-functioning muffler. If you want your 1967 VW to sound just right, paying attention to the muffler is essential.
Understanding Exhaust Pipes and Hangers
Exhaust pipes are the tubes that carry the exhaust gases from the engine through the muffler and out the back of the car. They are typically made of steel, often coated to prevent rust. The main exhaust pipe connects the exhaust manifold to the muffler.
From the muffler, smaller pipes, often called tailpipes, lead to the tips.
These pipes are held in place by exhaust hangers. Hangers are usually made of rubber or metal straps that attach the pipes to the car’s frame or body. Rubber hangers are common because they absorb vibrations from the engine and exhaust system, preventing them from transferring to the car’s chassis.
This reduces noise and prevents metal fatigue.
When exhaust hangers break or wear out, the exhaust pipes can sag or hang too low. This can cause the exhaust system to scrape on the ground, especially when going over bumps. It can also lead to the exhaust system rattling or banging against the underside of the car.
Replacing broken hangers is a relatively simple repair that makes a big difference in how your exhaust system is supported.
For a 1967 VW, the layout of the exhaust pipes and hangers is specific to the model. You might have one main pipe running under the car, or a dual-pipe system. Ensuring all hangers are present and in good condition is crucial for keeping the exhaust system properly aligned and securely attached.
A well-supported exhaust system will last longer and perform better. When inspecting your exhaust tips, take a moment to check the condition of the pipes and hangers leading up to them. This holistic view helps you catch potential problems before they become major issues.
The Purpose of Exhaust Tips
Exhaust tips are the final visible part of your car’s exhaust system. They are attached to the end of the tailpipes and stick out from the rear of the vehicle. While often thought of as purely decorative, exhaust tips can also play a minor role in directing exhaust gases away from the car’s body.
The main reason people change exhaust tips is for appearance. They can give a car a sportier, more aggressive, or simply cleaner look. Tips come in many shapes, sizes, and materials, such as chrome, stainless steel, or even carbon fiber.
For a classic car like a 1967 VW, choosing tips that complement its vintage style is important. Some owners opt for reproduction original tips, while others prefer a custom look.
Changing the exhaust tips is generally one of the easiest modifications you can make to your car. It doesn’t usually affect engine performance or sound, though very large or specially shaped tips can sometimes slightly alter the exhaust flow. However, for most standard tips, the impact is negligible.
The primary benefit is aesthetic enhancement.
When selecting new tips, ensure they are compatible with your existing exhaust pipes. Many are designed as slip-on styles that clamp into place. Others might require minor welding, though this is less common for simple tip replacements.
The ease of installation is a big plus for many DIY enthusiasts.
The tips are exposed to the elements and exhaust fumes, so they can get dirty, rusty, or damaged over time. Replacing them is a great way to refresh the look of your 1967 VW without a major overhaul.
Practical Tips for a Successful Swap
This part gives you extra advice to make sure your exhaust tip
Dealing with Stubborn Old Tips
Sometimes, the old exhaust tips just don’t want to come off. They can be rusted onto the tailpipe, making them a real pain. Don’t give up if the first try doesn’t work.
There are a few tricks you can use.
- More Penetrating Oil: If the first application didn’t do the trick, apply more penetrating oil and let it sit for a longer period, perhaps overnight. The longer it has to soak, the better it can break down rust.
- Gentle Heat: In some cases, applying a bit of heat to the clamp or the area where the tip meets the pipe can help. A heat gun or even a powerful hairdryer can expand the metal slightly, helping to break the rust bond. Be cautious not to overheat or damage surrounding components, especially rubber parts.
- Tapping and Wiggling: Combine the penetrating oil with consistent, gentle tapping with a rubber mallet around the base of the tip and the clamp. Then, try wiggling the tip again. Sometimes, a steady back-and-forth motion, while applying firm pulling pressure, is all it takes.
- Cutting the Old Tip (Last Resort): If the tip is completely seized and you’re replacing it anyway, you can carefully cut it off. Use a hacksaw or a metal-cutting reciprocating saw. Cut along the length of the tip, or cut the clamp itself if it’s the main problem. Make sure to cut away from yourself and be extremely careful not to cut into the actual tailpipe.
Remember, your goal is to remove the old tip without damaging the tailpipe it’s attached to. A damaged tailpipe would require a more complex repair. Patience and the right approach are your best tools here.
Ensuring a Secure Fit for New Tips
Getting the new tips on tight and straight is key. A loose tip can vibrate, make noise, and even fall off. You want them to look good and stay put.
- Proper Cleaning: Before sliding on the new tip, make sure the end of the tailpipe is perfectly clean. Use a wire brush to remove any rust, dirt, or old exhaust residue. A smooth surface allows the new tip to slide on fully and clamp securely.
- Correct Alignment: Once the tip is on, take a step back and look at it from different angles. Does it stick out evenly? Is it straight relative to the car’s body? You can adjust its position before fully tightening the clamp.
- Even Clamping Pressure: If you’re using a clamp, tighten the bolts evenly on both sides. This distributes the pressure and ensures the clamp grips the tip and pipe without deforming either. Don’t overtighten one side before the other.
- Test Drive Check: After installing, go for a short test drive. Listen for any rattling or unusual noises. Upon returning, check the tips to ensure they haven’t shifted. If they have, you may need to tighten the clamp a bit more or reposition them.
A secure fit not only looks better but also prevents potential damage from vibration and ensures your new tips last longer.
Checking for Exhaust Leaks
After installing your new exhaust tips, it’s a good idea to check for any exhaust leaks. Leaks can happen if the connection isn’t tight or if there was damage to the tailpipe. Leaks can cause your car to be louder, smell like exhaust fumes, and even reduce engine performance.
- Listen Carefully: Start the engine and listen closely around where the new tips are attached. You should hear a steady exhaust flow. Any hissing, puffing, or sputtering sounds might indicate a leak.
- Visual Inspection: While the engine is running (and cool enough to approach safely), look for any black soot marks around the connection point. Soot often indicates where exhaust gases are escaping.
- Smell Test: Be aware of any unusual exhaust fumes entering the cabin. While some fumes are normal from the exhaust system itself, a strong smell concentrated around the rear of the car could mean a leak.
- Using a Soap Solution (Advanced): For a more thorough check, you can spray a mixture of soap and water onto the connection point while the engine is running. If there are any leaks, you’ll see bubbles form. Be very careful when working around a running engine.
If you find a leak, you might need to re-tighten the clamp, ensure the tailpipe is not damaged, or consider using exhaust sealant if the connection is slightly imperfect. For 1967 VWs, ensuring the clamp is the correct size and properly tightened is usually enough to prevent leaks.
Comparing Exhaust Tip Styles
Choosing the right exhaust tips for your 1967 VW is not just about how they look but also how they fit your car’s personality. Different styles offer unique aesthetics. Let’s look at a few common options and what they bring to the table for your classic ride.
| Tip Style | Appearance | Installation | Considerations for 1967 VW |
|---|---|---|---|
| OEM Reproduction | Matches the original factory look. Subtle and classic. | Usually clamps on easily. Direct fit. | Maintains the authentic vintage appearance. Ideal for purists. |
| Rolled Edge Chrome | Slightly wider and shinier than stock. Adds a touch of elegance. | Typically clamps on. May require slight adjustment. | A popular choice for a subtle upgrade. Enhances the chrome trim. |
| Straight Cut Stainless Steel | Clean, modern look. Durable and resists rust well. | Clamps on or may use a set screw. Generally straightforward. | Offers a more contemporary feel. Good for a custom but understated look. |
| Angled Cut | Tips are cut at an angle for a sportier appearance. | Clamps on. Alignment is key to look good. | Can give a more aggressive stance. Ensure the angle complements the car’s lines. |
When picking, think about the overall look you want for your 1967 VW. Do you want to keep it factory original, or do you want a bit more flair? Stainless steel tips are a great choice because they are very durable and resistant to rust, which is a common issue with older cars.
Chrome tips can look fantastic, but they might require more care to keep them shiny and free of pitting. Remember to check the diameter of the tip to ensure it fits your existing tailpipe snugly. A good fit prevents rattling and ensures the tip stays in place.
For 1967 VWs, the size of the tips is also important. You don’t want them to look too big or too small compared to the rear of the car. It’s a balance that helps maintain the car’s classic proportions.
Statistics on Aftermarket Exhaust Modifications
The aftermarket for car parts is huge, and exhaust systems are a big part of that. Many car owners choose to modify their exhaust for various reasons, from sound to appearance. For classic cars like the 1967 VW, maintaining or subtly upgrading the exhaust is a common practice among enthusiasts.
According to industry reports, the global automotive exhaust system market is substantial, with aftermarket modifications being a significant segment. While specific data for vintage VW exhaust tips is niche, the trend shows a steady interest in personalizing vehicle aesthetics and performance. Many classic car owners spend between $500 and $2,000 annually on maintenance and modifications.
A portion of this budget often goes towards exterior enhancements like exhaust tips.
One survey indicated that around 35% of car owners have made some form of exhaust modification, with appearance being a primary driver for many. For owners of classic vehicles, preserving the car’s character while making small upgrades is often the goal. This makes simple parts like exhaust tips very popular.
The market for vintage car parts, including exhaust components for models like the 1967 VW, remains active. Enthusiasts often seek out high-quality reproduction parts or subtle aftermarket upgrades to maintain their vehicles’ value and appeal. This interest fuels the demand for parts like exhaust tips that offer a visible enhancement without altering the car’s fundamental character.

Frequently Asked Questions
Question: How long does it typically take to change exhaust tips on a 1967 VW
Answer: For most 1967 VW models, changing exhaust tips is a quick job. If you have all your tools ready and the old tips aren’t rusted on, it can take as little as 15 to 30 minutes per tip. If they are stuck, it might take a bit longer, but usually under an hour for both.
Question: Can I use universal exhaust tips on my 1967 VW
Answer: While universal tips can sometimes fit, it’s best to buy tips specifically designed for a 1967 VW or for the VW Beetle/Karmann Ghia exhaust system. This ensures a proper fit and avoids potential alignment issues or the need for extensive modification.
Question: Do exhaust tips affect the sound of my 1967 VW
Answer: For most standard exhaust tips, they have very little to no effect on the sound of your 1967 VW. The muffler is the main component that controls exhaust noise. Tips are primarily for appearance.
Question: What if my old exhaust tips are welded on
Answer: If your old tips are welded, you’ll need to cut them off. Use a cutting tool like a hacksaw or reciprocating saw carefully to cut through the weld. Once cut, you can then usually pry off the tip.
The new tips will likely be clamped on, or you may need to have them welded if that’s the style you choose.
Question: Do I need to change my exhaust pipes if I change the tips
Answer: No, you usually do not need to change your exhaust pipes just to change the tips. The tips attach to the end of the existing tailpipes. You only need to replace the pipes if they are rusted, damaged, or otherwise compromised.
Final Thoughts
Swapping exhaust tips on your 1967 VW is a straightforward task that makes a noticeable difference. With the right tools and a little patience, you can easily enhance your car’s look. Remember to clean the pipes well for a secure fit.
Enjoy your newly refreshed classic ride!