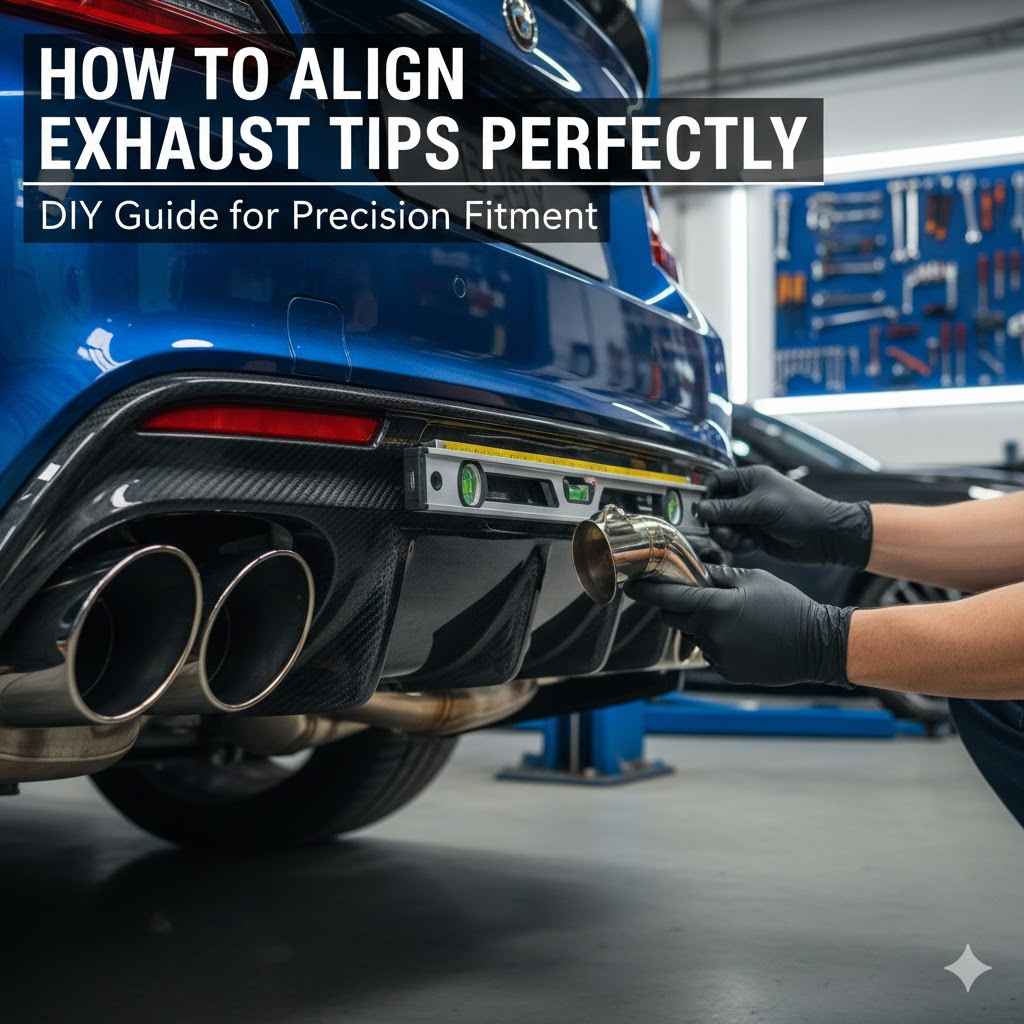
How to Align Exhaust Tips Perfectly
Getting your car’s exhaust tips to look just right can be tricky. Many people find it hard to make them sit perfectly even. This is especially true when you’re first starting out with car mods.
Don’t worry though! We’re going to show you exactly how to align exhaust tips perfectly with simple, easy steps. Stick around and we’ll get your car looking sharp in no time.
Perfectly Aligning Your Exhaust Tips
Achieving the ideal look for your car’s exhaust system is about more than just function; it’s about aesthetics. Perfectly aligned exhaust tips can significantly enhance the overall appearance of your vehicle, giving it a more polished and aggressive stance. For many car enthusiasts, especially those new to modification, this task might seem a bit challenging.
It involves careful adjustments to ensure symmetry and proper fitment. This section will guide you through the fundamental steps to achieve that flawless finish. We’ll break down the process into manageable parts so you can feel confident tackling it yourself.
Getting this right makes a big difference.
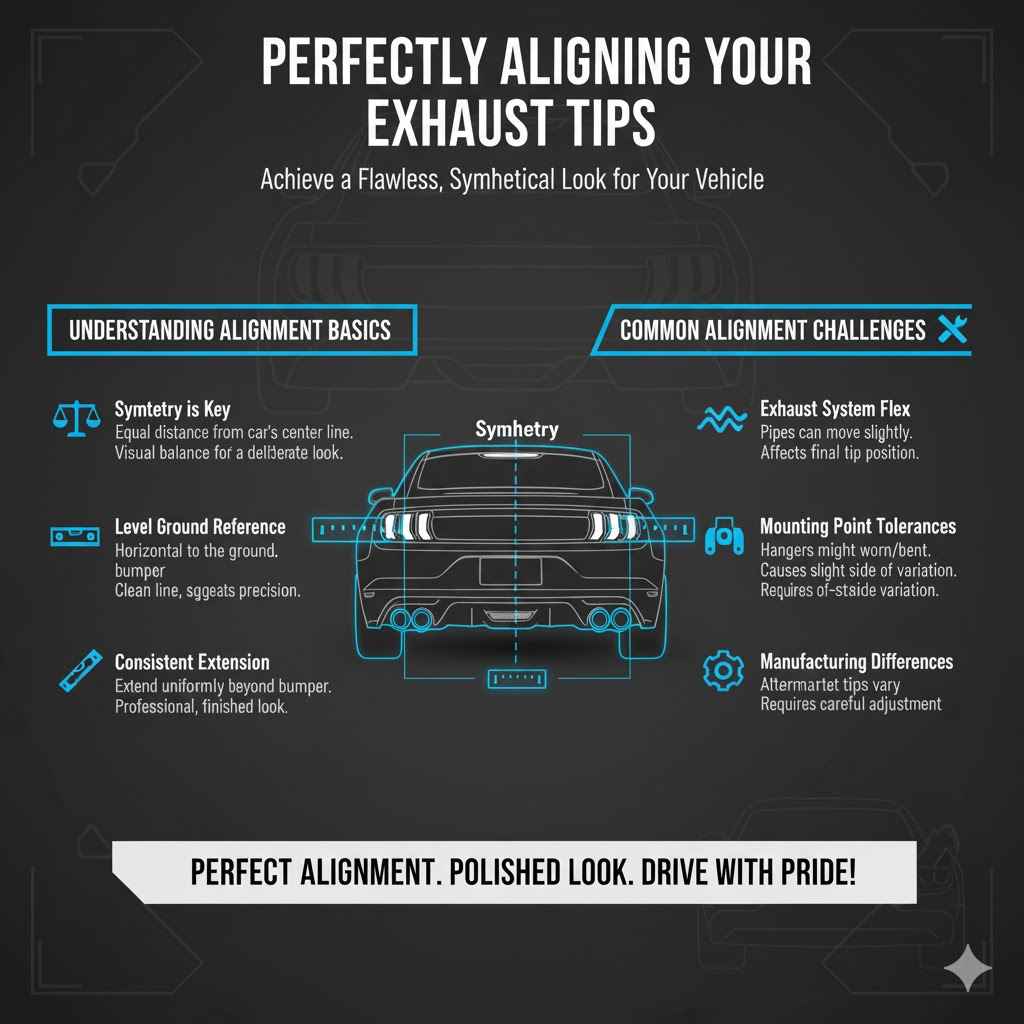
Understanding Exhaust Tip Alignment Basics
Before you start turning wrenches, it’s important to grasp what makes exhaust tips look “perfect.” Generally, this means they should be evenly spaced from each other, level with the ground, and sit flush within the bumper cutout or extend slightly past it in a consistent manner. A common goal is to have them appear balanced from both the rear and slightly angled views. Misalignment can make a car look unfinished or even damaged, detracting from its appeal.
- Symmetry is KeyHaving exhaust tips that are exactly the same distance from the car’s center line is crucial. This visual balance makes the rear of the car look deliberate and well-executed. Even a small difference can be noticeable to the keen eye.
- Imagine looking at a perfectly centered painting; the same principle applies here.
- Level Ground ReferenceExhaust tips should also be level with the ground. This means they shouldn’t dip down or point upwards unnaturally. A level tip creates a clean, horizontal line that complements the car’s design.
- It suggests precision and care in the modification.
- Consistent ExtensionThe distance exhaust tips extend beyond the bumper or exhaust cutouts matters. They should either be flush or extend a consistent amount. This uniformity ensures a professional look.
- Having one tip stick out much further than the other is a common sign of poor alignment.
There are several reasons why achieving this alignment can be more difficult than it sounds. The exhaust system itself can have some flex or play. Mounting points might not be perfectly rigid, and the angle of the exhaust pipes leading to the tips can vary slightly from side to side.
Even the manufacturing tolerances of aftermarket tips can play a role. For instance, some exhaust hangers might be worn or slightly bent, affecting the overall position of the entire exhaust system.
Steps for How to Align Exhaust Tips Perfectly
This section is where we get hands-on with the process of aligning your exhaust tips. We’ll cover everything from initial checks to making the final adjustments. Following these steps carefully will help you achieve a professional-looking result that you can be proud of.
It’s all about systematic adjustments and ensuring everything is secure before you finish.
Gathering Your Tools and Supplies
Having the right tools makes any job easier and safer. For aligning exhaust tips, you’ll want a few basic items. These are common tools that most DIY mechanics have in their garage.
Making sure you have everything ready before you start will save you time and frustration.
- Wrench SetYou’ll need a set of metric and standard wrenches. These are used to loosen and tighten any clamps or bolts that hold the exhaust tips in place. It’s good to have a range of sizes because different vehicles use different fasteners.
- Sometimes, a socket set with an extension can be very helpful for reaching tight spots.
- Measuring TapeA simple tape measure is essential for ensuring your tips are equidistant from the center of the car and from any bumpers or body panels. Accuracy here is what defines “perfect” alignment. You want to take measurements from consistent points on both sides.
- LevelA small spirit level will help you confirm that your exhaust tips are perfectly horizontal. You can place it on top of the tip to see if it’s sitting straight. This is a quick way to check for any unwanted tilt.
- Gloves and Safety GlassesAlways protect your hands and eyes. Exhaust components can be sharp, and working under a car can expose you to debris. Good quality work gloves and safety glasses are a must for any automotive work.
Initial Inspection and Loose Fitment
Before making any adjustments, it’s important to see how your current exhaust tips are sitting. You’ll need to loosen the clamps that hold the tips onto the exhaust pipes. Do not remove them completely, just enough so the tips can slide or rotate slightly.
This allows you to make adjustments without fully disconnecting anything.
- Check the existing position. Look at the tips from straight behind the car. Note any obvious differences in spacing or height.
- Loosen the clamp bolts. Use your wrench to loosen the bolts on the clamps that secure the exhaust tips. Turn them just enough so the tips feel loose.
- Gently wiggle the tips. See how much movement you have. This tells you the range of motion you can work with.
This initial loose fitment is the starting point. It lets you see the flexibility you have to reposition the tips. If the tips are very difficult to move even after loosening the clamps, you might have rust or a bent pipe, which requires further attention.
Measuring for Perfect Symmetry
Now it’s time to use that measuring tape. The goal here is to get the distance from the outer edge of the tip to the edge of the bumper cutout (or the car’s center line) to be exactly the same on both sides. This is a critical step for achieving the desired look.
- Measure from the car’s center line. Find the middle point of your car’s rear. Measure the distance from this center line to the outer edge of each exhaust tip. Make sure these measurements match.
- Measure from the bumper cutouts. Alternatively, if your car has specific cutouts for the tips, measure the gap between the edge of the tip and the edge of the cutout on both sides. These gaps should be equal.
It’s common to find slight differences at this stage. Don’t be discouraged; this is what you are correcting. Small adjustments can make a big difference in appearance.
Always measure from the same points on each side to ensure accuracy. If your car has dual exhaust, you’ll also want to check the distance between the two tips.
Adjusting Depth and Height
Once you have the side-to-side symmetry sorted, you’ll focus on how far the tips extend and their height. This ensures they sit flush or at a consistent protrusion.
- Slide tips in or out. Gently push or pull the exhaust tips on their respective pipes to adjust how far they extend. Aim for them to be flush with the bumper or a consistent distance out.
- Check for levelness. Use your spirit level on top of each tip. Adjust the angle by rotating the tip on the pipe until it is perfectly horizontal.
- Re-measure and verify. After each adjustment, re-measure the distances and check for levelness. Repeat until everything looks balanced and symmetrical from all angles.
Sometimes, adjusting one aspect affects another. For example, pushing a tip further in might also slightly change its height. This is why a process of small adjustments and re-checking is important.
Patience is key here.
Tightening and Final Checks
Once you are happy with the position of your exhaust tips, it’s time to secure them permanently. This involves tightening all the clamps and bolts you loosened earlier. Make sure they are snug but don’t overtighten, as this can damage the clamps or pipes.
- Tighten the clamps securely. Use your wrench to firmly tighten the bolts on the exhaust tip clamps. Ensure they are gripping the exhaust pipes without slipping.
- Inspect all connections. Double-check that all bolts and clamps are tightened. Give the tips a gentle shake to ensure they are firmly attached and won’t move during driving.
- Perform a final visual inspection. Step back and look at the car from various angles, especially from directly behind. Ensure the tips look perfectly aligned, symmetrical, and level.
Starting the engine briefly can help settle the exhaust system, so it’s a good idea to check alignment again after a short run. Listen for any unusual rattles or vibrations. If everything sounds and looks good, you’ve successfully aligned your exhaust tips.
Common Challenges and Solutions
Even with clear steps, some issues can pop up when trying to align exhaust tips. Understanding these common problems and knowing how to solve them will save you from getting stuck. Many of these challenges have simple fixes that don’t require special tools or skills.
Exhaust System Sag or Movement
One of the most frequent problems is that the entire exhaust system might sag or move when you try to adjust the tips. This happens because the exhaust hangers, which hold the system up, might be worn, stretched, or damaged. If one side is sagging more than the other, your tip alignment will be off no matter how you adjust the tips themselves.
- Inspect Exhaust HangersLook at the rubber hangers supporting your exhaust pipes. Are they cracked, stretched, or broken? If so, they need to be replaced.
- New hangers will restore the correct ride height of the exhaust system.
- Check Hanger BracketsThe metal brackets that attach the rubber hangers to the car’s frame can also rust or bend. Ensure these are solid and correctly positioned. Sometimes, a slight bend in a bracket can cause unevenness.
- Use Temporary SupportsIf you can’t immediately replace hangers, you might use temporary supports like adjustable exhaust hangers or even sturdy wire to hold the system in the correct position while you align the tips.
The optimal solution is always to repair or replace faulty hangers. This ensures the exhaust system sits at its intended height and location, providing a stable base for tip alignment. A properly supported exhaust system is the foundation for perfectly aligned tips.
Tips Not Sliding or Rotating Freely
Sometimes, exhaust tips get stuck onto the exhaust pipes due to rust or carbon buildup. This prevents you from sliding or rotating them to achieve the desired alignment. Forcing them can cause damage.
- Apply Penetrating OilSpray a generous amount of penetrating oil (like WD-40 or a similar product) around the connection point where the tip meets the pipe. Let it soak for at least 15-30 minutes, or even overnight for stubborn cases.
- Gentle TappingAfter the oil has soaked in, try gently tapping the tip with a rubber mallet or a block of wood and a hammer. Work your way around the connection. This vibration can help break the rust seal.
- Controlled TwistingOnce it starts to loosen, try to twist the tip back and forth while gently pulling. Avoid using excessive force, which could bend or break the pipe or the tip.
- Cleaning the ConnectionIf the tips become free, clean the inside of the tip and the outside of the exhaust pipe. Use a wire brush to remove any rust, carbon, or old sealant. This will make future adjustments easier.
Cleaning the surfaces is crucial for a good fit and preventing future sticking. When re-installing, you might consider applying a light coat of anti-seize compound to the pipe to make removal easier next time.
Uneven Pipe Lengths
In some cases, especially with aftermarket exhaust systems, the pipes leading to the tips might have slightly different lengths. This means that even if the tips are mounted correctly on their respective pipes, they won’t appear aligned due to the underlying pipe difference.
- Custom Pipe FabricationThe most effective solution here is to have the exhaust pipes modified by a professional exhaust shop. They can cut and re-weld the pipes to ensure they are of equal length and positioned correctly. This offers a permanent fix for perfect alignment.
- Using Adjustable HangersIn some situations, adjustable exhaust hangers can be used to fine-tune the position of the exhaust system. By adjusting the hangers, you can try to compensate for minor differences in pipe length, bringing the tips into better alignment.
- Tip Spacers or AdaptersFor very minor differences, specialized tip spacers or adapters might be available. These can bridge the gap or add length to one side to make the tips appear even. This is a less common solution and depends on the specific exhaust setup.
While modifying pipes requires professional help, it offers the best long-term solution for achieving factory-perfect alignment when pipe lengths are the issue.
Advanced Techniques and Considerations
Once you’ve mastered the basic steps, there are a few advanced tips and considerations that can elevate your exhaust tip alignment from good to exceptional. These involve understanding material properties and how to get that showroom finish.
Understanding Different Tip Mounting Styles
Exhaust tips attach in various ways, and knowing your style helps with adjustments. Some tips clamp directly onto the exhaust pipe, while others slip over and are secured with bolts or welding.
- Clamp-On TipsThese are the most common and easiest to adjust. They use a band clamp that tightens around the exhaust pipe. Loosening the clamp allows for sliding and rotation.
- Ensuring the clamp is tight is crucial for them to stay in place.
- Bolt-On TipsSome tips have a flange that bolts to the end of the exhaust pipe. This offers a very secure fit but less adjustability for rotation. Alignment often depends on the factory angle of the pipe.
- Welded TipsThese are permanently attached by welding. While offering the most robust connection, they require professional welding to adjust their position. For DIYers, this means pre-alignment is critical before welding.
For clamp-on styles, the ability to rotate the tip on the pipe is your primary tool for achieving perfect height and angle. For other styles, adjustments usually involve modifying the pipe or hangers underneath.
Using Anti-Seize for Easier Adjustments
To prevent future problems with exhaust tips becoming stuck, use anti-seize compound. This is a lubricant designed to prevent corrosion and seizing of metal parts, especially those exposed to heat.
- ApplicationWhen you have the tips aligned and are ready to tighten, apply a small amount of anti-seize compound to the exhaust pipe where the tip will slide over. You can also apply it to the clamp threads.
- BenefitsThis ensures that the next time you need to adjust your tips, they will slide off much more easily. It also helps prevent rust from forming at the connection point. It’s a small step that pays off significantly in the long run.
Anti-seize is readily available at auto parts stores and is an inexpensive way to make future maintenance easier. It’s especially useful in areas with road salt or high humidity.
When to Seek Professional Help
While many people can achieve perfect exhaust tip alignment themselves, there are times when professional help is the best option. If you encounter significant rust, bent pipes, or complex custom exhaust systems, a professional can save you time and prevent potential damage.
- Extensive Rust or DamageIf the exhaust pipes or hangers are badly rusted, corroded, or physically damaged, a DIY repair might not be sufficient or safe. A professional shop has the tools and expertise to repair or replace damaged sections properly.
- Custom Exhaust SystemsCustom-built or high-performance exhaust systems often have unique mounting points and pipe configurations. Aligning tips on these can be more complex, and a specialist can ensure proper fitment without compromising the system’s performance.
- Welding RequirementsIf your tips require welding for installation or adjustment, this is a job best left to experienced professionals. Proper welding ensures a secure and safe attachment.
For most standard vehicles, the DIY steps outlined in this guide are sufficient. However, knowing your limits and when to call in the pros is part of being a smart car enthusiast.
Real-Life Examples and Scenarios
Seeing how others have tackled exhaust tip alignment can be very helpful. Here are a few examples illustrating common situations and their outcomes. These scenarios show how the principles we’ve discussed apply in practice.
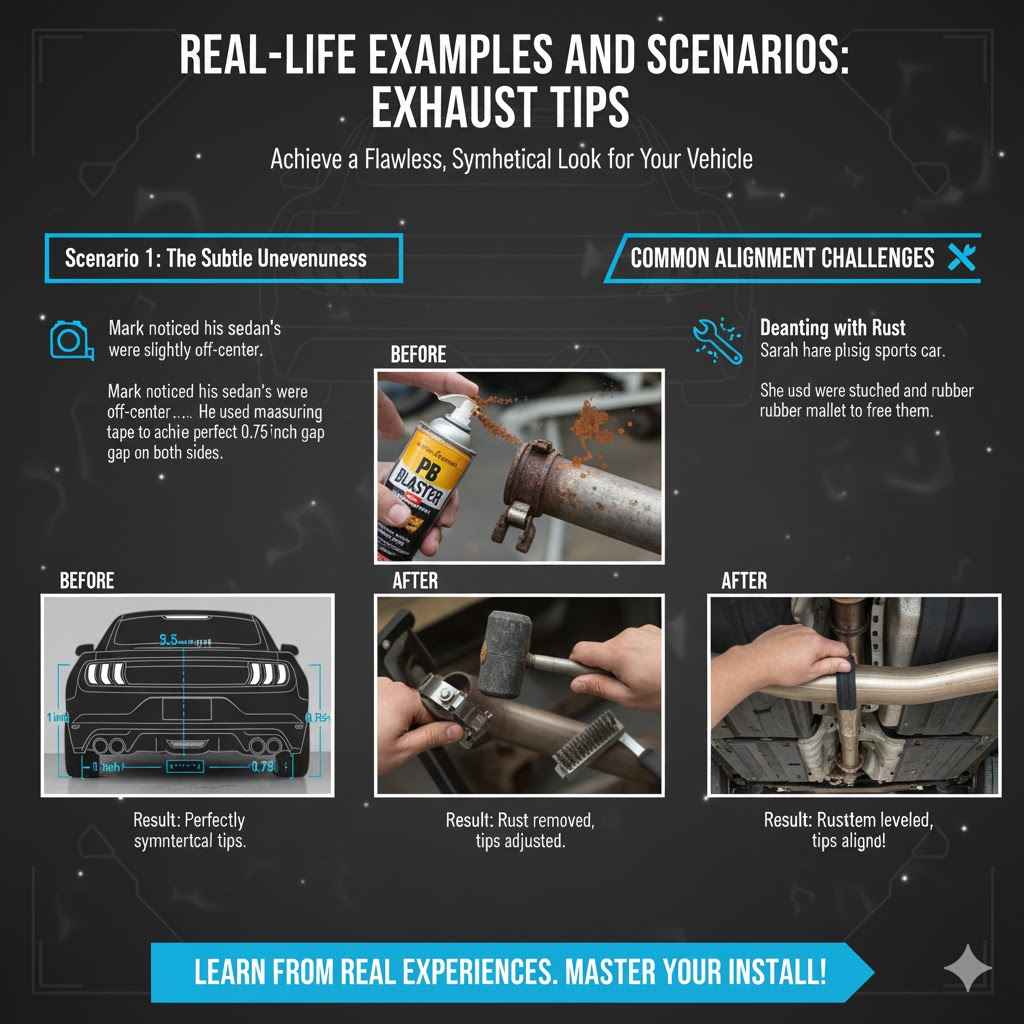
Scenario 1 The Subtle Unevenness
Mark noticed that the exhaust tips on his sedan looked slightly off-center from a distance. One tip seemed to protrude a bit further than the other. He decided to tackle this himself.
- He first checked the clamps and found them to be tight.
- Using a measuring tape, he measured the gap between each tip and the bumper cutout. He found one side had a 1-inch gap, and the other had a 0.75-inch gap.
- He loosened the clamp on the tip that was further out and carefully slid it inward until the gap was 0.75 inches on both sides.
- He then checked the height with a level and found them to be perfectly even.
- Finally, he re-tightened both clamps firmly and performed a visual check from behind the car. The result was perfectly symmetrical tips, greatly improving the car’s rear-end appearance.
This simple adjustment took about 30 minutes and cost nothing but a little time. Mark was thrilled with the professional look achieved.
Scenario 2 Dealing with Rust
Sarah had a classic sports car, and she wanted to polish its look. When she tried to adjust the exhaust tips, they wouldn’t budge. She suspected rust.
- She sprayed penetrating oil generously around the connection points and let it sit overnight.
- The next day, she gently tapped the tips with a rubber mallet, working her way around.
- After some effort, one tip started to rotate. She carefully worked it back and forth until it was loose.
- She cleaned both the pipe and the inside of the tip with a wire brush.
- She repeated the process for the other tip. Once both were loose and clean, she applied anti-seize compound before aligning them evenly and re-tightening the clamps.
This scenario highlights the importance of dealing with rust. By using penetrating oil and gentle methods, Sarah successfully freed her tips and achieved a perfect alignment. This prevented her from needing to replace parts or seek professional help for a stuck tip.
Scenario 3 Exhaust Hanger Issues
David noticed his exhaust tips weren’t just uneven; the entire rear section of his exhaust seemed to hang lower on one side. This made any tip adjustment pointless.
- He got under the car and inspected the rubber exhaust hangers.
- He discovered that the rubber hanger on the driver’s side had stretched significantly, causing the exhaust pipe to sag.
- He purchased new, correct-sized exhaust hangers for his vehicle.
- With the car safely supported on jack stands, he carefully removed the old, stretched hanger and installed the new one.
- He then re-checked the exhaust system’s position, which now sat level. With the system stable, he could easily align the tips perfectly using the standard measurement and adjustment process.
This shows that sometimes the problem isn’t with the tips themselves but with the support system holding the exhaust. Replacing worn hangers is a straightforward fix that restores the entire system’s position, making tip alignment achievable.
Frequently Asked Questions
Question: How much should exhaust tips stick out from the bumper
Answer: There’s no single rule, but a common and pleasing look is for the tips to sit flush with the bumper or extend out by about half an inch to an inch. The key is consistency on both sides.
Question: Can I adjust exhaust tips without lifting the car
Answer: For most cars, you can perform basic adjustments by reaching under the vehicle. However, for a thorough alignment and to safely inspect hangers, lifting the car with jack stands is recommended.
Question: What if my exhaust tips are welded on
Answer: If your tips are welded, you’ll need a professional welding service to adjust their position. DIY adjustment isn’t possible without cutting and re-welding.
Question: How often should I check my exhaust tip alignment
Answer: It’s a good idea to check your exhaust tip alignment periodically, perhaps every few months or after any work is done on the exhaust system. This ensures they remain perfectly aligned.
Question: Can misalignment affect exhaust performance
Answer: Minor cosmetic misalignment typically does not affect exhaust performance. However, significant sagging or obstruction of the tips could potentially impact flow, though this is rare for typical alignment issues.
Summary
Achieving perfectly aligned exhaust tips is a rewarding DIY project. By understanding the basics of symmetry and levelness, gathering the right tools, and following simple step-by-step adjustments, you can significantly enhance your car’s appearance. Addressing common issues like system sag or stuck tips with practical solutions ensures a successful outcome.
With patience and attention to detail, you’ll get that polished look you’re aiming for.