Could Heater Shield Be Made Out Of Metal: Essential Secrets
Yes, a heat shield can absolutely be made out of metal. In fact, most factory and high-performance aftermarket heat shields are made from specific metals like aluminum or stainless steel. These materials are chosen for their excellent durability and ability to reflect intense heat away from critical car components, making them ideal for the job.
Have you ever heard that annoying, tinny rattle coming from under your car? It often sounds like a can full of loose screws, especially when you start the engine or idle at a stoplight. More often than not, that frustrating noise is a loose or rusted-out heat shield. It’s a common problem that can make your car sound older and more worn out than it really is.
Many people feel intimidated by exhaust work, thinking it’s too complex or requires expensive tools. But what if I told you that fixing this issue is not only possible but also a rewarding project you can do yourself? You don’t need to be a master mechanic to create a durable, custom solution.
In this guide, I’ll walk you through everything you need to know. We’ll explore why metal is the perfect material for a heat shield and I’ll show you, step-by-step, how to make your own. Let’s get that rattle silenced for good!
What Exactly Is a Heat Shield and Why Is It So Important?
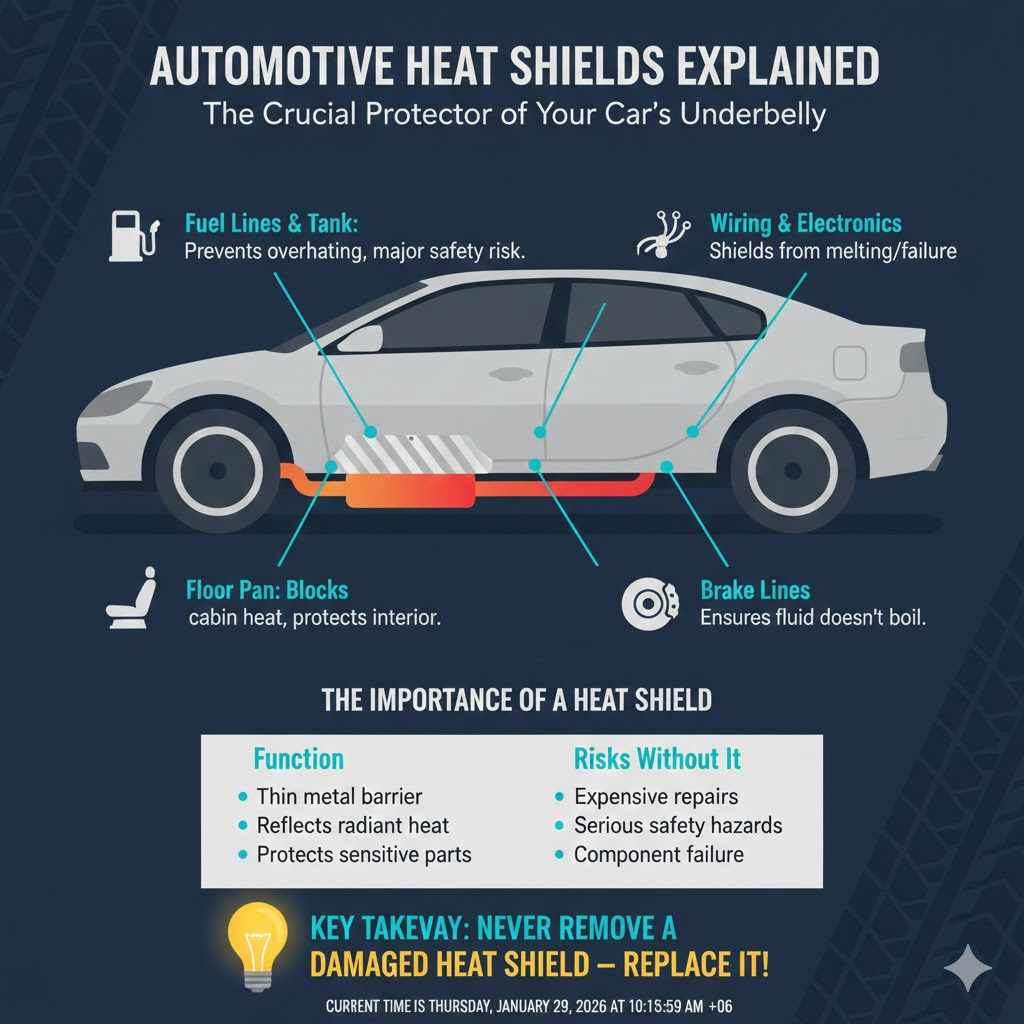
Think of a heat shield as a bodyguard for your car’s underbelly. Your exhaust system, which runs from the engine to the tailpipe, gets incredibly hot—we’re talking hundreds of degrees. This intense heat can be dangerous for other parts of your vehicle.
The heat shield is a thin barrier, usually made of metal, that sits between the hot exhaust pipes and other sensitive components. Its main job is to reflect that radiant heat away, protecting things like:
- Fuel Lines and Fuel Tank: Prevents fuel from getting too hot, which is a major safety risk.
- Floor Pan: Stops the heat from transferring into the cabin, keeping you comfortable and protecting the carpet and interior components.
- Wiring and Electronics: Shields delicate wires and sensors from melting or failing due to heat exposure.
- Brake Lines: Ensures your brake fluid doesn’t boil, which could lead to brake failure.
Without a functioning heat shield, you risk damaging critical parts of your car, which can lead to expensive repairs and serious safety hazards. That’s why you should never just remove a damaged one and forget about it.
What Are Factory Heat Shields Usually Made Of?
Car manufacturers need to balance cost, weight, and effectiveness. Because of this, they use a few common materials for the heat shields that come with your car from the factory.
Typically, these are made from thin, stamped sheets of metal or composite materials. Here’s a quick breakdown:
- Aluminized Steel: This is a very common choice. It’s regular steel coated with an aluminum-silicon alloy. The steel provides strength, while the aluminum coating offers corrosion resistance and good heat reflection. However, over time, rust can creep in where the coating gets scratched or worn away.
- Aluminum: Pure aluminum is lightweight and excellent at dissipating heat. It doesn’t rust like steel, but it can be softer and more prone to damage from road debris. You’ll often find it on higher-performance or luxury vehicles.
- Composite or Layered Shields: Some modern cars use multi-layer shields, which might have a ceramic fiber core sandwiched between two thin layers of metal. These are extremely effective at blocking heat but can be more fragile and expensive to replace.
The main issue with many factory shields is that they are made from very thin material to save weight and cost. Over years of exposure to water, salt, and vibrations, they eventually rust or crack, leading to the dreaded rattle.
Yes, You Can (and Should) Make a Heat Shield Out of Metal
So, we come to the big question: can you just make a new one out of a sheet of metal? The answer is a resounding yes! Creating your own metal heat shield is not only a great way to fix the problem permanently but also an opportunity to make an upgrade.
A custom-made shield from a quality piece of metal will often be more durable and longer-lasting than a standard, thin replacement part. By choosing the right material, you can create a shield that won’t rust away in a few years and will provide excellent thermal protection for your vehicle.
The key is selecting the right type of metal for the job. You need something that reflects heat well, is easy to work with, and can withstand the harsh environment underneath your car.
Choosing the Right Metal for Your DIY Heat Shield
Not all metals are created equal when it comes to making a heat shield. You want a material that balances heat reflectivity, durability, workability, and cost. Here are the top contenders for a DIY project.
| Metal Type | Heat Reflection | Durability & Corrosion Resistance | Ease of Working | Cost |
|---|---|---|---|---|
| Aluminum (e.g., 3003 or 5052 grade) | Excellent | Excellent (does not rust) | Easy to cut and bend by hand. Very lightweight. | Moderate |
| Stainless Steel (e.g., 304 grade) | Good | Superior (highly resistant to rust and corrosion) | More difficult to cut and bend. Requires stronger tools. | Higher |
| Galvanized Steel | Fair | Good (zinc coating prevents rust, but can burn off at very high temps) | Fairly easy to work with, but tougher than aluminum. | Low |
My Recommendation for Beginners: For your first DIY heat shield, I strongly recommend using sheet aluminum. It’s incredibly easy to cut with basic tin snips, you can bend it by hand to get the right shape, and its heat-reflecting properties are top-notch. A thickness of around 0.032″ to 0.040″ is perfect—sturdy enough to hold its shape but thin enough to work with easily.
Essential Tools and Materials You’ll Need
You don’t need a fully equipped professional garage for this project. With a few basic tools, you can get the job done right in your driveway.
Materials:
- A sheet of metal: Aluminum (0.032″-0.040″ thick) is recommended. You can find this at home improvement stores or metal suppliers. A 12″x24″ sheet is often enough for most shields.
- Cardboard or poster board: For creating a template.
- Stainless steel hose clamps or bolts/nuts: To mount your new shield. Avoid regular steel as it will rust quickly.
- High-temperature primer and paint (optional): If you want to paint your shield for extra protection or a custom look.
Tools:
- Safety Glasses and Gloves: Non-negotiable! Metal edges are sharp.
- Jack and Jack Stands: To safely lift and secure your vehicle. Never work under a car supported only by a jack.
- Wrenches or a Socket Set: To remove the old heat shield remnants.
- Marker or Sharpie: For tracing your template onto the metal.
- Tin Snips (Aviation Snips): For cutting the sheet metal. A good pair will make the job much easier.
- Drill and Metal Drill Bits: To create mounting holes.
- Pliers or a Small Hammer: For making small bends or adjustments.
Step-by-Step Guide to Making Your Metal Heat Shield
Ready to get started? Follow these steps carefully, and you’ll have a new, rattle-free heat shield in no time.
Step 1: Safety First!
Before you even think about getting under the car, safety is your top priority.
- Park your car on a flat, level surface.
- Make sure the engine and exhaust are completely cool to the touch. An exhaust system can cause severe burns.
- Use a jack to lift the car and immediately secure it with jack stands. Give the car a good shake to ensure it’s stable before you go underneath.
- Always wear your safety glasses and gloves. Cutting metal creates sharp edges and small fragments can fly off. For more information on proper protective gear, you can consult resources from the Occupational Safety and Health Administration (OSHA).
Step 2: Remove the Old Shield and Create a Template
Get under the car and locate the damaged heat shield. It will likely be held on by a few bolts or clamps. Use your socket set to remove them. If the bolts are rusted solid, you may need some penetrating oil to loosen them. If the shield has mostly disintegrated, remove any loose pieces.
Next, you’ll create a template.
- If you have the old shield, trace its outline onto a piece of cardboard. Mark the locations of the mounting holes.
- If the old shield is gone, hold the cardboard up in the area you need to protect. Bend and trim it to fit around the exhaust pipe, leaving about a one-inch air gap between the pipe and the shield. This air gap is critical for proper heat insulation.
- Mark where the original mounting points are on your new template.
Step 3: Cut Your Metal Sheet
Lay your new sheet of aluminum on a flat work surface. Place your cardboard template on top of it and carefully trace the outline with a marker.
Using your tin snips, slowly and carefully cut along the lines you traced. Take your time to make clean cuts. It’s better to make several small snips than one large, difficult one. Remember, the edges will be very sharp, so keep your gloves on!
Step 4: Shape the Metal Shield
Your heat shield likely needs some curves or bends to fit correctly. This is where aluminum’s flexibility comes in handy.
Using your hands, you can gently bend the metal sheet to match the contours of your template. For sharper bends, you can place the metal on the edge of a workbench and carefully press down. If you need to make small adjustments, you can use a rubber mallet or a hammer with a block of wood to avoid denting the metal.
Step 5: Drill the Mounting Holes
Place your template back over the cut metal piece. Use your marker to mark the exact spots for the mounting holes.
Place a piece of scrap wood under the metal sheet to protect your work surface. Using a drill and a metal-appropriate drill bit, carefully drill the holes where you marked them. Start with a smaller pilot hole and then move to the final size for a cleaner result.
Step 6: Install Your New Metal Heat Shield
It’s time for the final step! Take your new, custom-made shield back under the car.
Align the holes on the shield with the mounting points on the vehicle’s frame. Secure it in place using new stainless steel bolts or heavy-duty hose clamps. Make sure it’s snug and doesn’t vibrate. Double-check that you have that crucial one-inch air gap between the shield and the exhaust pipe.
Once it’s installed, lower your car off the jack stands. Start the engine and listen. The rattle should be completely gone, replaced by the satisfying hum of your engine. Congratulations, you did it!
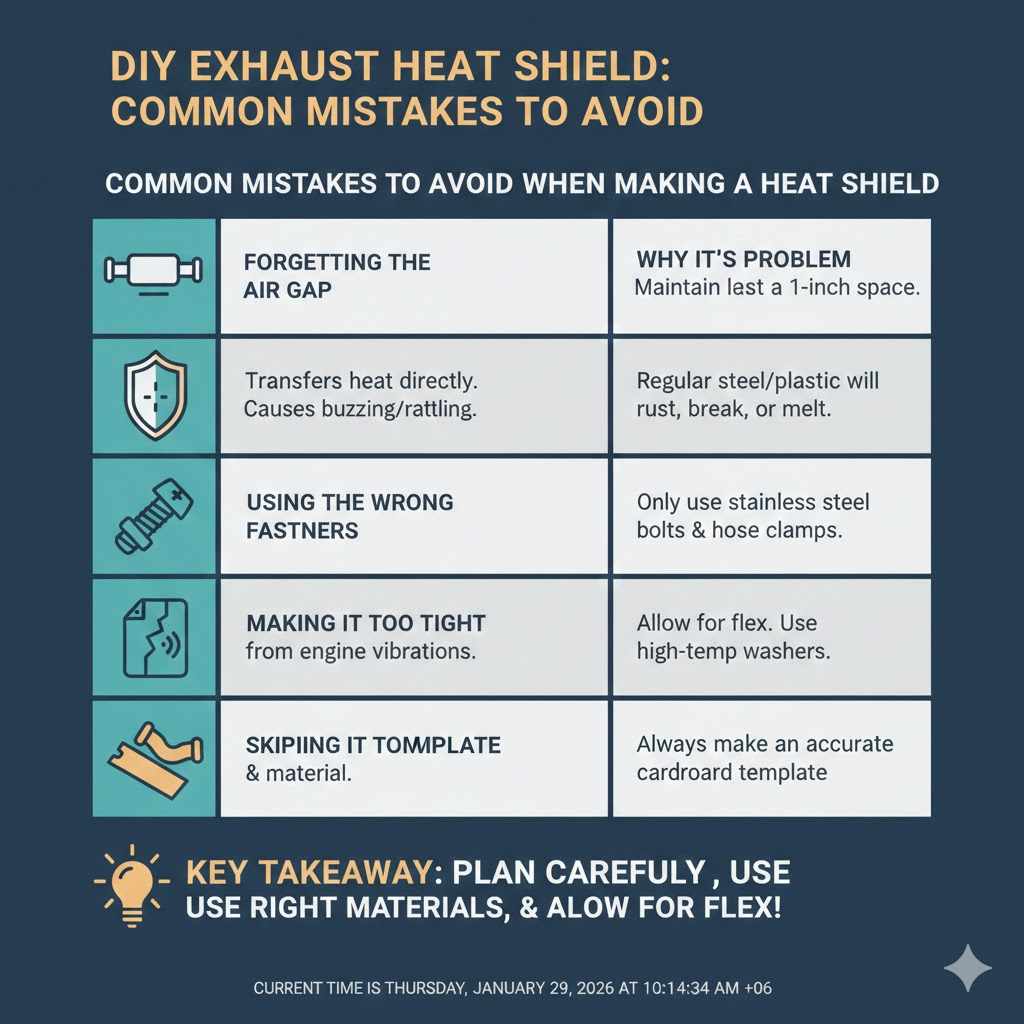
Common Mistakes to Avoid When Making a Heat Shield
This project is very beginner-friendly, but there are a few common pitfalls to watch out for. Avoiding these will ensure your project is a success.
| Common Mistake | Why It’s a Problem | How to Avoid It |
|---|---|---|
| Forgetting the Air Gap | If the shield touches the exhaust, it will transfer heat directly instead of reflecting it. It can also cause a new buzzing or rattling noise. | Always bend and shape your shield to maintain at least a 1-inch space between it and the hot pipe. |
| Using the Wrong Fasteners | Regular steel bolts or zip ties will rust, break, or melt under the high heat, causing your new shield to fall off. | Only use stainless steel bolts, nuts, and large hose clamps for mounting. You can find them at any reputable hardware or automotive fastener supplier. |
| Making It Too Tight | An overly rigid shield with no flex can crack from engine vibrations over time. | Don’t overtighten the bolts completely. Make them snug, but allow for a tiny bit of movement. Using rubber or high-temp washers can also help absorb vibrations. |
| Skipping the Template | Trying to “eyeball” the shape and hole locations will lead to a poor fit and a lot of wasted time and material. | Always take the extra 10 minutes to make an accurate cardboard template. Measure twice, cut once! |
Frequently Asked Questions (FAQ)
1. What is the best metal for a DIY heat shield?
For most beginners, sheet aluminum is the best choice. It’s lightweight, easy to cut and shape with basic tools, and is excellent at reflecting heat. For maximum durability in harsh, salty climates, stainless steel is a fantastic (though tougher to work with) alternative.
2. How thick should the metal be?
A thickness between 0.032 inches (about 1/32″) and 0.050 inches (about 1/20″) is ideal. This range provides enough rigidity to prevent flapping and rattling, but is still thin enough to be easily cut and bent by hand.
3. Do I really need a heat shield on my car?
Absolutely, yes. Heat shields are not optional cosmetic parts; they are critical safety components. They protect your fuel tank, brake lines, wiring, and the car’s cabin from extreme exhaust temperatures, preventing fires and component failure.
4. Can I just remove my old heat shield and not replace it?
You should never do this. Removing a heat shield without replacing it exposes vital parts of your car to dangerous levels of heat. This can lead to very expensive damage and creates a significant fire hazard. Always replace a damaged or missing shield.
5. How much does it cost to make a metal heat shield yourself?
The cost is very low compared to buying a replacement part or paying a mechanic. A small sheet of aluminum might cost $15-$30, and a few stainless steel clamps or bolts will only be a few dollars. For under $40, you can create a permanent fix.
6. Is it hard to make a metal heat shield?
Not at all! As long as you can safely lift your car and use basic hand tools like tin snips and a drill, this is a very manageable project. The key is to be patient, prioritize safety, and follow the steps carefully, especially when making your template.
7. Can I use something other than metal?
For a rigid shield near the exhaust, metal is the only safe and durable DIY option. There are flexible, adhesive-backed heat barrier products, but these are typically used inside the engine bay or on firewalls, not for direct shielding of an exhaust pipe underneath the car.
Conclusion: A Quiet Ride and a Job Well Done
That persistent rattling from under your car doesn’t have to be a constant annoyance or an expensive trip to the repair shop. As we’ve seen, the answer to “could a heat shield be made out of metal?” is a definite yes, and it’s a project that is well within your reach.
By choosing a durable material like aluminum, gathering a few basic tools, and following the steps with care, you can craft a custom solution that is often better than the original factory part. You’ll not only save money but also gain the valuable experience and confidence that comes from working on your own vehicle.
So, the next time you hear that familiar rattle, don’t ignore it. See it as an opportunity. Take pride in knowing you have the skills to fix it yourself, ensuring your car is safer, quieter, and better protected for the many miles ahead.