Do Flex Pipes Go Over Pipes? Your Guide Explained
If you’re wondering, Do Flex Pipes Go Over Pipes? Explained is a common question, especially for those new to plumbing. It can feel confusing to know the right way to install these pipes. This guide will walk you through everything, making it simple to grasp. We’ll give you a straightforward, step-by-step solution to this often-asked question. Let’s get started!
What Are Flex Pipes and Their Uses?
Flex pipes, or flexible pipes, are plumbing components that are made from flexible materials like stainless steel or corrugated plastic. They’re designed to bend and twist without kinking or breaking. This flexibility is a major advantage when working in tight spaces or around obstacles. Think of them as the adaptable workhorses of your plumbing system. Their main job is to connect fixtures to water supply lines or drainage systems where rigid pipes might be challenging to install.
Materials and Construction of Flex Pipes
Flex pipes are built to last and to perform well in various conditions. The materials used, and how they’re made, are key to their function. Stainless steel flex pipes offer durability and resistance to corrosion, while plastic flex pipes are often favored for their ease of use and affordability. Both types must comply with safety standards to guarantee the pipe is safe and won’t leak.
Stainless Steel Flex Pipes: These are a popular option because of their strength and resistance to rust. They are often used in areas where durability is most important, like under sinks or in the supply lines to water heaters. These flex pipes can handle high water pressure and temperature fluctuations.
Stainless steel flex pipes are constructed from corrugated stainless steel, making them flexible. The corrugations allow the pipe to bend and twist without losing its integrity. The material is also resistant to corrosion, making it a good choice for both hot and cold water applications.
Plastic Flex Pipes: These pipes are typically made from materials like PVC or CPVC. They’re lighter and easier to work with. Plastic flex pipes are common for drainage and are often used in situations where flexibility and quick installation are priorities.
Plastic flex pipes use their inherent flexibility and are created by extrusion. Extrusion is a manufacturing process that shapes the plastic into the desired form by pushing it through a mold. This process allows manufacturers to produce long lengths of flex pipe with consistent dimensions and properties.
Corrugated Design: Both stainless steel and plastic flex pipes often feature a corrugated design. This design is what makes them flexible. The ridges and valleys allow the pipe to bend without causing the pipe to buckle or break.
The corrugated design, also known as the bellows design, adds to the flex pipe’s ability to move without the need for additional fittings. This design also provides additional strength, so it can handle pressure and temperature fluctuations. This design makes flex pipes suitable for various plumbing applications, including areas where space is limited.
Flex Pipe Sizes and Fittings
Flex pipes come in a variety of sizes to match different plumbing needs. Standard sizes range from small diameter pipes for supply lines to larger sizes for drain lines. You’ll also need the right fittings to connect the flex pipes to other plumbing components like faucets or drains. These fittings are specially designed to create a leak-proof seal and ensure everything works correctly. Selecting the right size and fittings is important for a successful installation.
Common Flex Pipe Sizes: Flex pipes come in several sizes. For water supply lines, you might find sizes like 3/8-inch, 1/2-inch, and 3/4-inch, matching the sizes of standard water pipes. Drain lines can vary.
Choosing the right size is important. Using too small a pipe can restrict water flow, while using too large a pipe may be unnecessary and cost more. Always check the specifications for your fixtures and the plumbing codes in your area.
Types of Fittings: Fittings are essential for connecting flex pipes. Common types include compression fittings, which create a seal by compressing a sleeve around the pipe, and threaded fittings, which screw into place.
Fittings are selected based on the type of pipe and the connection needed. Compression fittings are good choices because they don’t require soldering or glue, making the installation process easier. Threaded fittings are reliable for permanent connections. Using the proper fittings is important for preventing leaks.
Fitting Compatibility: When choosing fittings, make sure they are compatible with the flex pipe. Stainless steel flex pipes usually require stainless steel fittings. Plastic flex pipes require fittings made from a compatible plastic.
Mixing incompatible materials can lead to leaks or even pipe failure. Always check the pipe and fitting manufacturer’s recommendations. Proper fitting selection guarantees the water system works safely and lasts for many years.

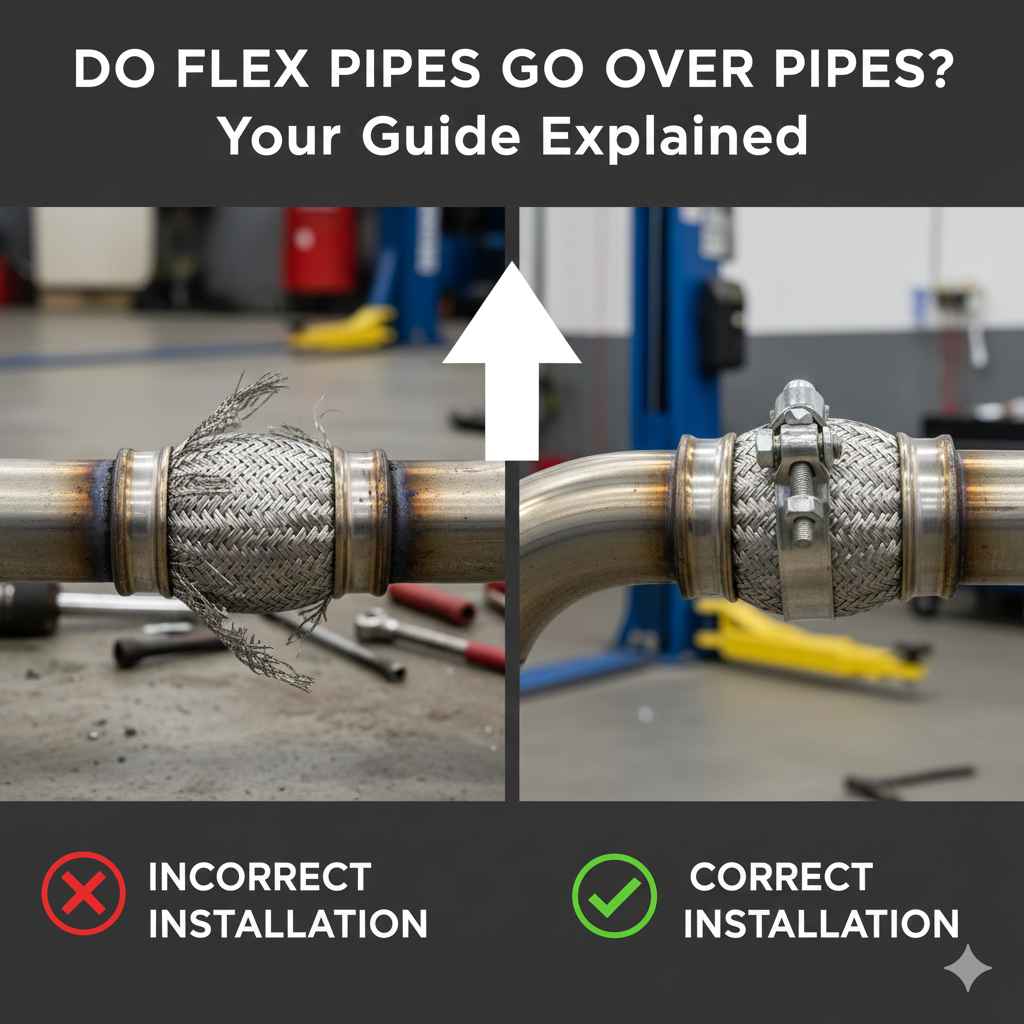
Understanding the Basics: Do Flex Pipes Go Over Pipes?
The question of Do Flex Pipes Go Over Pipes? Explained is often centered around a common plumbing scenario. In general, it is not recommended that you directly run a flex pipe over another existing rigid pipe. Flex pipes are designed to provide flexibility, and they should be routed in a way that avoids sharp bends or compression. Direct contact can cause wear and potentially lead to leaks. The best practice is to route flex pipes in a way that minimizes contact with other pipes or surfaces.
Why Avoid Direct Contact
Avoiding direct contact between flex pipes and other pipes is mostly about the long-term performance and safety of the plumbing system. Direct contact can create stress points on the flex pipe, especially if it’s constantly vibrating or rubbing against another surface. This stress can weaken the pipe and, over time, lead to leaks. Preventing these issues involves careful planning and making sure that flex pipes are installed with enough space and support.
Wear and Tear: Continuous contact between a flex pipe and another pipe can cause abrasion. Flex pipes are designed to move, but if they’re constantly rubbing against something, the outer layer can wear down. This wear can become a problem.
Wear can also occur due to vibration, which is a common occurrence in many homes. The constant rubbing can weaken the pipe’s structure, eventually causing it to fail. To prevent wear, always provide support and separation.
Potential for Leaks: Any damage to the pipe’s outer layer creates an entry point for water. A small leak might start as a drip, but can quickly escalate into a larger problem.
Leaks can cause water damage. They can damage your home’s structure. Preventing leaks is important for maintaining the integrity of your plumbing and avoiding costly repairs. Regular inspections can help catch these problems early.
Avoiding Kinks: Flex pipes should never be kinked. Kinks restrict water flow and can cause the pipe to burst.
Routing flex pipes over another pipe can sometimes create sharp bends, leading to kinks. Avoid sharp bends by planning the pipe layout. Use supports to keep the flex pipe in place. Doing this will avoid any kinks that could affect water pressure.
Recommended Practices for Routing Flex Pipes
When installing flex pipes, following a few best practices will help ensure a reliable plumbing system. It is wise to consider the path the pipe will take, and to ensure the pipe has enough room. Providing support and preventing sharp bends are also key. These practices help make sure that flex pipes function properly and last for many years. Proper installation reduces the chance of leaks, improves water flow, and keeps your plumbing safe and efficient.
Provide Support: Always provide support for flex pipes. Use pipe straps or clamps to hold the pipe in place. The right support prevents the pipe from sagging and reduces the stress.
Support is especially important in long runs of flex pipe, where gravity can cause the pipe to droop. Supports should be spaced appropriately. Check the manufacturer’s recommendations for proper spacing. Supports are not only helpful for stability but also prevent the pipe from coming into contact with other surfaces.
Avoid Sharp Bends: Flex pipes can bend, but avoid sharp angles. Sharp bends can restrict water flow and damage the pipe. Use gentle curves to route the pipe around obstacles.
Sharp bends weaken the pipe, causing kinks. A gentle curve distributes the stress more evenly and keeps the water flow consistent. If a sharp bend is unavoidable, consider using two fittings and a short piece of rigid pipe to change the direction instead.
Maintain Spacing: Make sure there is enough space around the flex pipe. Don’t compress it against other pipes or surfaces. This space allows the pipe to move slightly.
Allowing space reduces friction and wear. Keep flex pipes away from hot surfaces or direct sunlight, which can cause them to deteriorate. Always plan the layout of your plumbing with adequate spacing for each component.
Detailed Installation Steps: How to Properly Install Flex Pipes
Installing flex pipes properly involves a series of steps to ensure a leak-free and functional system. From preparing the area to connecting the pipes, each step is important. By following these instructions carefully, you can successfully install flex pipes and avoid many common problems. Taking your time, measuring accurately, and double-checking your work will contribute to a great result.
Preparation for Installation
The first step in any plumbing project is the preparation. This means gathering your tools, shutting off the water supply, and clearing the space. Proper preparation will simplify the installation process and make it safer. Making sure you have everything ready before you start also saves time and avoids interruptions. Careful planning is always essential.
Gather Necessary Tools and Materials: Before starting, collect all the necessary tools and materials. You’ll need a pipe cutter, adjustable wrench, pipe tape or sealant, and the correct flex pipes and fittings.
Make a list and double-check everything before you begin. Having everything at your fingertips prevents delays and allows you to work more efficiently. Make sure you use the appropriate fittings and sealant for the type of pipe you are using.
Shut Off the Water Supply: Turn off the water supply before you start working on any plumbing. This usually means turning off the main water valve to your home. Make sure the valve is completely shut and then open a faucet to relieve any pressure in the lines.
Turning off the water prevents flooding and makes the work safer. It’s a key step. After shutting off the water, it is also good practice to check that the water has stopped flowing. You can do this by briefly opening a nearby faucet to make sure.
Clear the Work Area: Prepare the area where you’ll be working. Clear any obstructions, such as tools, furniture, or other plumbing components. This will make it easier to move around and prevent accidents.
A tidy work area keeps you focused. It reduces the chance of tripping or knocking over something. Make sure you have enough light, so you can see what you are doing. Proper lighting ensures that you don’t miss any leaks.
Connecting Flex Pipes to Fixtures
Connecting flex pipes to fixtures requires a precise fit and secure connections. Use the appropriate fittings and techniques to ensure that the connections are watertight. Taking your time during this step and double-checking your work can save you from leaks and water damage. Properly connecting pipes to fixtures will guarantee that your plumbing system functions correctly and will last for many years.
Measure and Cut the Pipe: Accurately measure the length of the flex pipe you need. Cut the pipe with a pipe cutter or saw. Make sure the cut is straight and clean.
Accurate measurements are important for a good fit. Cutting the pipe squarely ensures a proper seal with the fittings. You should also deburr the cut edges to remove any sharp edges that can damage the fittings.
Apply Pipe Tape or Sealant: For threaded connections, wrap pipe tape around the threads. This creates a watertight seal. Apply the tape in the direction that the fitting will be tightened, so the tape won’t unwrap as you tighten.
Pipe tape, also known as Teflon tape, is crucial for preventing leaks. Make sure you wrap the threads properly, covering all the threads. For some types of fittings, you may need to use a pipe sealant instead of tape. Always consult the fitting manufacturer’s instructions.
Tighten Fittings Securely: Screw the fittings onto the fixture and flex pipe connections. Use an adjustable wrench to tighten the fittings. Tighten them firmly, but don’t overtighten, which can damage the fitting.
Tighten the fittings until they are snug and secure. Over-tightening can crack or deform the fittings, resulting in leaks. Be careful not to cross-thread the fittings when starting the connection. Check the manufacturer’s instructions for recommended torque.
Testing and Troubleshooting
Once you’ve made all the connections, it’s time to test your work. This involves turning the water back on and checking for leaks. Testing will help you confirm that the installation is successful. If you find leaks, identifying and fixing them is essential to protecting your home. A thorough test will ensure that your plumbing system is functional and leak-free.
Turn the Water Back On: Slowly turn the main water valve back on. Check all connections as the water pressure rises. This will help you identify any leaks early on.
Turning the water back on slowly prevents sudden pressure surges that could damage the pipes or fittings. Inspect all connections carefully as the water fills the pipes. Listen for any hissing sounds, which may indicate a leak.
Inspect for Leaks: Carefully inspect all the connections for any signs of leaks. Look for water droplets, damp spots, or any other signs of moisture around the fittings.
Check the flex pipe for any signs of water damage, such as bulging, cracking, or discoloration. Use a dry paper towel or cloth to wipe around the fittings. This can help you identify any small leaks. If you find a leak, turn off the water and tighten the fitting.
Troubleshooting Leaks: If you find a leak, first turn off the water supply. Try tightening the fitting slightly. If that doesn’t work, you might need to disassemble the connection, apply more pipe tape or sealant, and then reassemble it.
Sometimes, the fitting may be damaged. If the leak persists, consider replacing the fitting. Always ensure that the fittings are compatible with the type of pipe being used. Consult a professional plumber if you are unable to fix the leak.
Do Flex Pipes Go Over Pipes? Real-World Examples
Seeing real-world scenarios can make the concepts surrounding flex pipe installation more clear. These examples illustrate how flex pipes can be used in different plumbing situations, and what to keep in mind when routing pipes. These examples show both successful installations and potential problems, offering practical insights that you can use when working on your own projects.
Scenario 1: Under-Sink Installation. Imagine you are installing a new faucet under the kitchen sink. The water supply lines are coming from the wall, but they are not lined up perfectly with the faucet connections. Flex pipes are ideal in this situation. A plumber would measure the distance between the shut-off valves and the faucet connections, cut the flex pipes to the correct length, and connect them using the appropriate fittings. Because of the limited space and the need for some flexibility to make the connection, flex pipes are ideal.
In this situation, the plumber will need to ensure the flex pipes don’t come into contact with the drain pipes or any sharp edges. The flex pipes will also be secured to prevent any sagging. This is one of the more common situations that many homeowners face.
Scenario 2: Water Heater Installation. When installing a new water heater, the water supply lines often need to be connected. The existing pipes may not perfectly align with the water heater’s inlets and outlets. Flex pipes can make the installation much easier. The plumber connects the flex pipes to the existing supply lines and the water heater. The key here is proper measurements to avoid kinking.
In this case, it is important to avoid kinking. Any sharp bends will restrict water flow and reduce the water heater’s effectiveness. The flex pipes need to be routed to maintain a smooth flow and avoid any contact with hot surfaces or the exhaust vent. Support straps are also useful to prevent sagging.
Scenario 3: Toilet Installation. Installing a toilet typically requires a flex pipe to connect the toilet to the water supply line. The existing water supply valve may be in a different location than the toilet’s fill valve. A flex pipe offers the necessary flexibility to make the connection.
In this case, the flex pipe has to be long enough to reach from the shut-off valve to the toilet. The plumber would make sure that the flex pipe is routed in a way that avoids sharp bends or compression. The pipe also should have enough room so that it does not come into contact with the floor. This prevents wear and tear, and also ensures that it does not kink.
| Feature | Flex Pipe Benefits | Considerations |
|---|---|---|
| Flexibility | Easy to bend around obstacles | Avoid sharp bends to prevent kinks |
| Installation | Quick and easy connections | Requires proper fittings and sealing |
| Material | Corrosion resistance, durability | Potential for wear and tear if in direct contact |
| Applications | Suitable for tight spaces, connecting fixtures | Must not be used in all situations; check local codes |
Frequently Asked Questions
Question: Can I use flex pipes for hot water lines?
Answer: Yes, flex pipes are suitable for both hot and cold water lines, provided the materials are rated for the water temperature. Make sure the flex pipe you choose is made from a material designed to withstand high temperatures.
Question: Do I need special tools to install flex pipes?
Answer: For most flex pipe installations, you’ll need a pipe cutter, an adjustable wrench, and pipe tape or sealant. A pipe cutter helps you make clean cuts, while the wrench is needed for tightening fittings.
Question: How long do flex pipes last?
Answer: The lifespan of a flex pipe depends on the material, installation quality, and water conditions. Generally, flex pipes can last for many years if installed correctly and not subjected to excessive stress or wear.
Question: Can I run a flex pipe through a wall?
Answer: While it’s possible to run a flex pipe through a wall, it is often better to use rigid pipes for the section inside the wall. Flex pipes can be prone to damage inside the wall, making future repairs difficult.
Question: What’s the difference between compression fittings and threaded fittings?
Answer: Compression fittings create a seal by compressing a sleeve around the pipe, whereas threaded fittings screw directly onto the pipe and fixture. Compression fittings are easy to install, but threaded fittings are typically more robust.
Final Thoughts
When asking Do Flex Pipes Go Over Pipes? Explained it’s important to understand the best approach for proper plumbing. The general practice is to avoid direct contact between flex pipes and other pipes to prevent issues, like wear or leaks. Installing flex pipes correctly involves careful planning, selecting the right materials, and following installation steps. From ensuring a leak-proof connection to selecting the right tools, each part of the process is important for reliable plumbing. Armed with this knowledge, you are better equipped to handle plumbing tasks.
Always remember to check your local plumbing codes. You should also consider getting assistance from a qualified plumber if you have any doubts. By taking these precautions, you can be sure of a functional plumbing system. With the right techniques and a little attention, you can manage your plumbing needs with confidence.