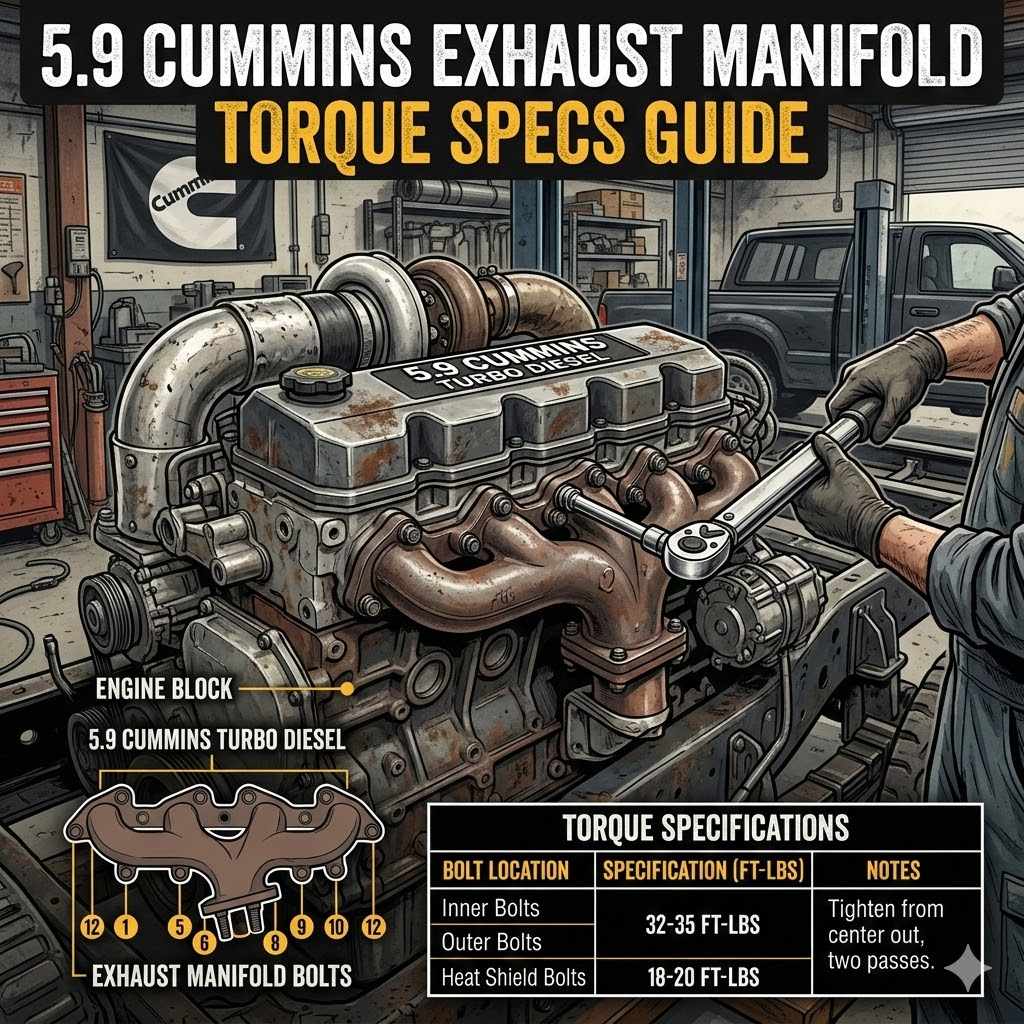
5.9 Cummins Exhaust Manifold Torque Specs Guide
Getting the right tightness for your 5.9 Cummins exhaust manifold bolts can feel tricky, especially if you’re new to this. You want to make sure everything seals up tight to prevent leaks, but over-tightening can cause big problems. It’s a common spot where folks get a bit unsure.
This guide is here to make it super simple. We’ll walk you through exactly what you need to do, step by step, so you can get it done right the first time. Let’s look at how to get those torque specs just right.
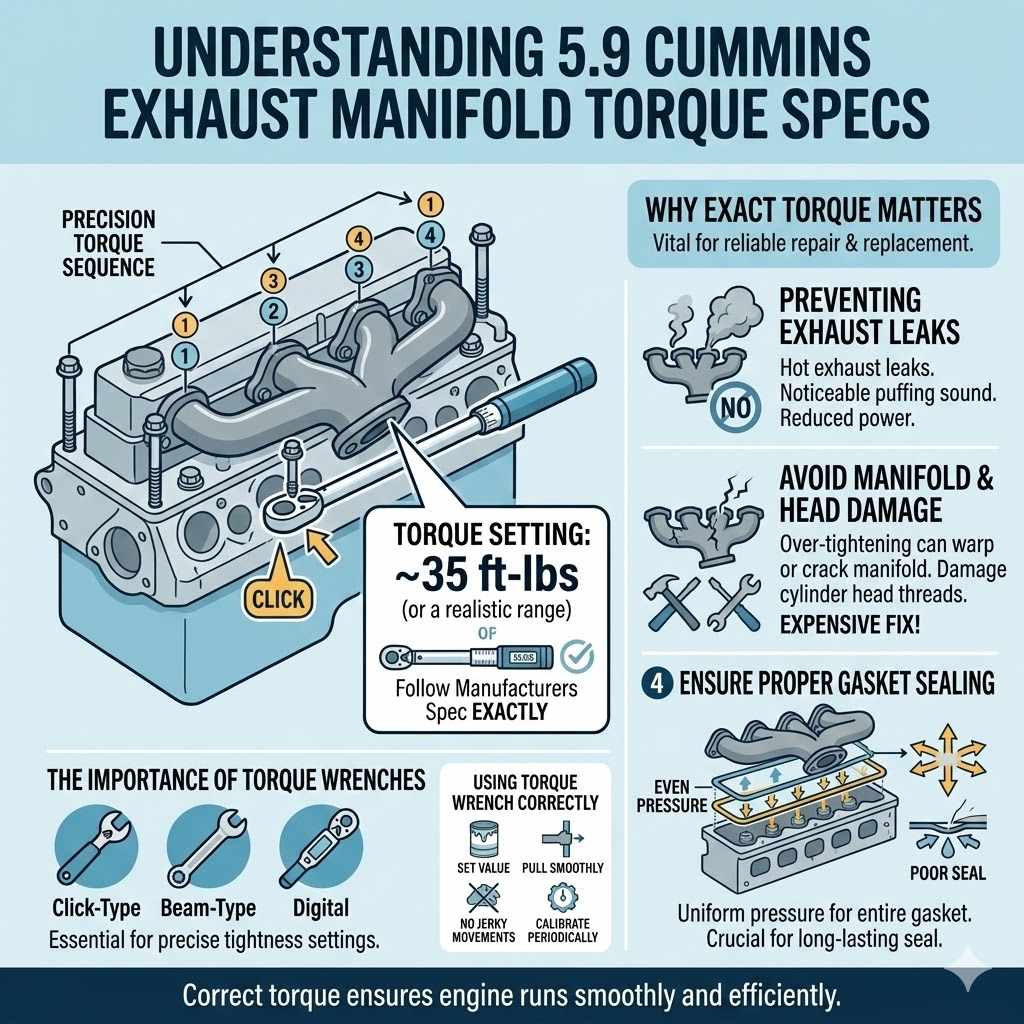
Understanding 5.9 Cummins Exhaust Manifold Torque Specs
This section explains why exact torque specifications are vital for your 5.9 Cummins exhaust manifold. Getting the bolt tightness just right is key to preventing exhaust leaks, which can cause performance issues and noise. It also helps prevent damage to the manifold and cylinder head.
We will cover the standard torque values and the importance of following them precisely for a reliable repair or replacement. This knowledge helps ensure your engine runs smoothly and efficiently.
Why Exact Torque Matters
The exhaust manifold bolts on a 5.9 Cummins engine need to be tightened to very specific values. This is not a job where “tight enough” will do. If you do not tighten them correctly, you can run into several problems.
These issues can range from minor annoyances like exhaust leaks to major engine damage. Understanding why each spec is important helps you appreciate the process.
Preventing Exhaust Leaks
Exhaust leaks are a common issue when manifold bolts aren’t torqued correctly. A leak means hot exhaust gases escape where they shouldn’t. This can lead to a noticeable puffing sound from your engine.
It also means less power because the exhaust gases aren’t directed properly out of the engine. Leaks can also damage surrounding components due to the intense heat.
Avoiding Manifold and Head Damage
Over-tightening the bolts can actually warp or even crack the exhaust manifold itself. It can also damage the threads in the cylinder head. This is much more expensive to fix than just torquing bolts correctly.
The metal in these parts expands and contracts with heat, so they need to be held with the right amount of pressure, not excessive force.
Ensuring Proper Gasket Sealing
The gasket between the manifold and the cylinder head needs even pressure to seal correctly. If some bolts are too loose and others too tight, the gasket won’t seal uniformly. This creates weak spots where leaks can start.
Even pressure across the entire gasket is crucial for a long-lasting seal.
The Importance of Torque Wrenches
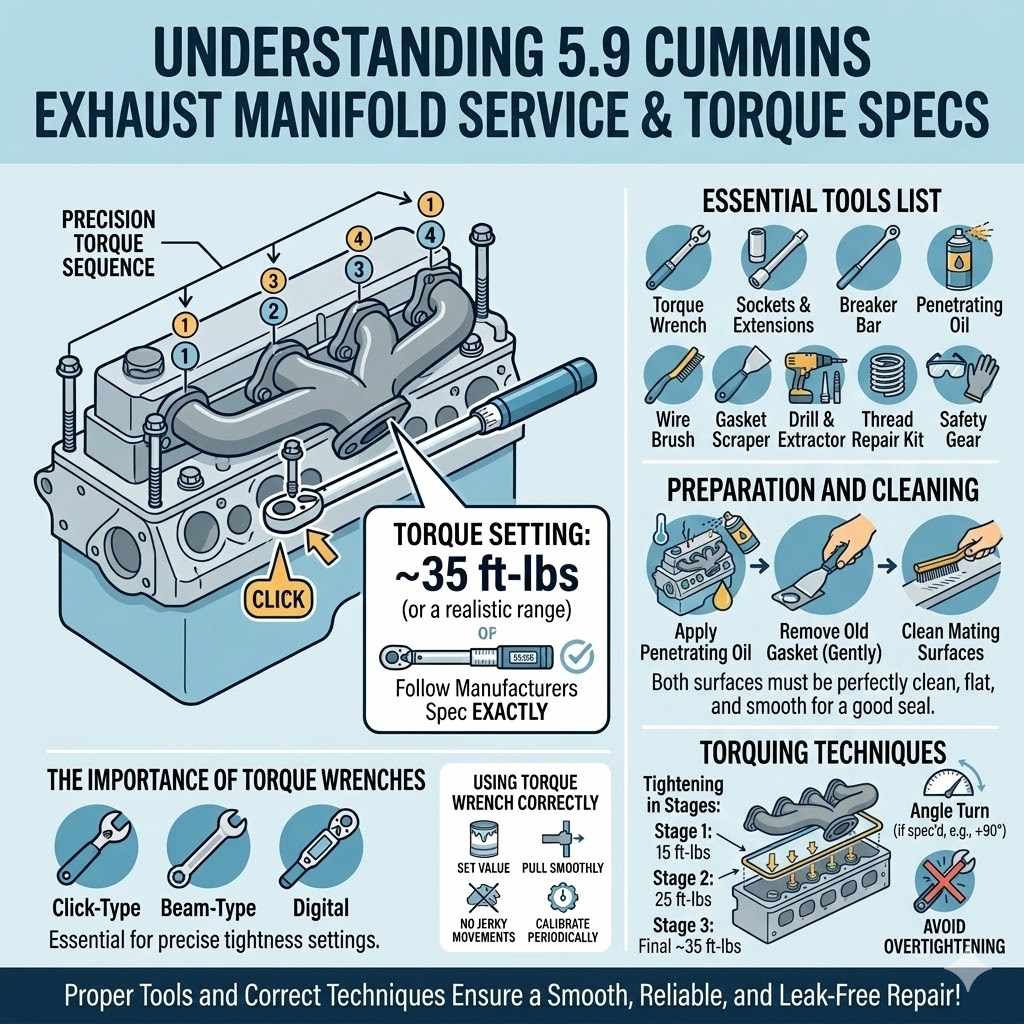
To achieve these precise tightness settings, you absolutely need a torque wrench. This tool allows you to measure the exact amount of rotational force applied to a bolt. Guessing or using standard wrenches will not give you the accuracy needed.
A good torque wrench is an investment in the longevity and performance of your engine.
There are a few types of torque wrenches. A click-type wrench is common; when you reach the set torque, it makes a distinct click. Beam-type wrenches have a needle that moves along a scale to show the torque being applied.
Digital torque wrenches offer electronic readouts and are often very precise. For exhaust manifold work, a wrench that can accurately measure in the range of 20-50 foot-pounds is usually sufficient.
Using a torque wrench correctly is also important. You need to set it to the desired torque value. Then, pull the wrench smoothly and steadily until it clicks or indicates the set torque.
Avoid jerky movements. Also, make sure the wrench is calibrated periodically to ensure its accuracy.
5.9 Cummins Exhaust Manifold Torque Specs and Procedures
This section provides the actual torque specifications for the 5.9 Cummins exhaust manifold and details the proper tightening sequence. Following the correct sequence is just as important as the torque values themselves. We will break down the steps clearly so you can perform the job with confidence.
This information is essential for anyone working on their 5.9 Cummins engine.
Standard Torque Values
For most 5.9 Cummins engines, the exhaust manifold bolts are tightened in stages. The final torque specification is typically around 35-45 foot-pounds (ft-lbs). However, it is crucial to verify the exact specification for your specific engine model year and any modifications.
Always consult your engine’s service manual for the most accurate information.
The tightening process usually involves multiple passes. You start with a lower torque value and gradually increase it. This ensures the manifold and gasket seat evenly.
A common practice is to tighten in three stages:
- Stage 1: Initial Tightening
Begin by tightening all bolts to a lower value, often around 15 ft-lbs. This Snugs everything down and starts the seating process. - Stage 2: Intermediate Tightening
Increase the torque to an intermediate setting, typically around 25-30 ft-lbs. This further seats the manifold and gasket. - Stage 3: Final Tightening
The final pass brings the bolts up to the specified torque, usually 35-45 ft-lbs. This ensures a secure and leak-free seal.
It is also common for some specifications to call for a final tightening followed by a specific turn angle. For instance, after reaching the final torque, you might be asked to turn each bolt an additional 90 degrees. This provides extra clamping force and ensures a long-lasting seal.
Always check your service manual for these specific instructions.
The Correct Tightening Sequence
Tightening the bolts in the right order is critical. This ensures even pressure distribution and prevents stress fractures. For the 5.9 Cummins, a common sequence starts from the center and works outwards.
This is similar to how you might tighten lug nuts on a wheel.
Here is a typical tightening pattern. Imagine the bolts arranged around the manifold. You would start with the bolts closest to the center of the engine and move progressively towards the ends.
This pattern helps the manifold and gasket compress evenly.
A common sequence involves working in a crisscross or spiral pattern, starting from the middle. For an engine with, say, 12 bolts, you might follow a sequence like this:
- Tighten bolt 1 (center) to the first stage torque.
- Tighten bolt 2 (next to center, opposite side) to the first stage torque.
- Continue this pattern, working outwards in a symmetrical fashion for all bolts to the first stage torque.
- Repeat the entire sequence for the second stage torque.
- Finally, repeat the sequence again for the final torque specification.
The exact pattern can vary slightly based on the manifold design and year of the engine. Always refer to your specific service manual for the definitive tightening sequence. Incorrect sequence can lead to uneven stress, leaks, and potential damage.
Checking for Leaks After Installation
Once you have tightened all the bolts to the correct specifications and followed the sequence, it is important to check for any exhaust leaks. Start the engine and listen carefully for any unusual sounds, especially puffing or hissing noises coming from the exhaust manifold area. You can also sometimes see soot deposits around leaky gaskets or bolt holes.
A common method to check for leaks is to use a shop rag or a piece of cardboard (carefully, as it can get hot) to wave around the manifold area while the engine is running. You might feel a slight puff of air if there is a leak. However, be very cautious around hot engine components.
Some mechanics prefer to use a smoke machine that introduces a bit of smoke into the exhaust system; any leaks will then be visible as the smoke escapes.
If you do find a leak, do not immediately crank down on the bolts more than the specified torque. Instead, re-check the torque on all bolts, especially around the area of the leak. It is possible that one or more bolts have loosened slightly.
If the leak persists after re-torquing, you might need to remove the manifold and inspect the gasket and mating surfaces for damage or debris.
Common Problems and Solutions with 5.9 Cummins Exhaust Manifolds
Addressing common issues is a vital part of maintaining your 5.9 Cummins exhaust manifold. This section covers frequent problems owners face, like warped manifolds, broken bolts, and gasket failures. We’ll also provide practical solutions to help you fix these issues effectively.
Knowing these problems and their fixes saves time and money.
Warped Exhaust Manifolds
One of the most common problems with exhaust manifolds, including those on the 5.9 Cummins, is warping. This happens when the manifold is subjected to extreme and uneven heat cycles. It can also occur if the manifold is stressed during installation or if it’s not properly supported.
A warped manifold will not seal properly against the cylinder head, even with a new gasket and correct torque settings.
Signs of a warped manifold include persistent exhaust leaks, a noticeable ticking or puffing sound from the engine, and sometimes a loss of engine power. You might also see black sooty residue around the mating surface where the manifold meets the cylinder head. This residue is a clear indicator of an exhaust leak.
The solution for a warped manifold is usually
When installing a new manifold, it is important to follow the correct torque sequence and specifications precisely. Also, ensure that the manifold is properly seated against the cylinder head before tightening the bolts. Do not force the manifold into place; if it doesn’t seat easily, check for obstructions or bends in the manifold itself.
Some aftermarket manifolds may also require specific installation procedures.
One common mistake is overtightening bolts on one side of the manifold while the other side is still loose. This can induce stress and lead to warping even on a new manifold. Always work in stages and follow the recommended pattern.
This is where understanding the 5.9 Cummins Exhaust Manifold Torque Specs Guide becomes crucial for preventing future issues.
Broken or Stripped Bolts
Broken or stripped bolts are another frequent headache. Bolts can break during removal if they are rusted or seized. Stripped threads in the cylinder head or on the bolt itself make it impossible to tighten properly, leading to leaks.
If a bolt breaks flush or below the surface, removal can be challenging. You might need to drill out the old bolt and then use a bolt extractor or re-tap the threads. This requires precision and the right tools to avoid further damage to the cylinder head.
For stripped threads, a common solution is to use a thread repair kit, such as a Heli-Coil or a Time-Sert. These kits involve drilling out the damaged hole, tapping it for a new insert, and then installing the insert, which restores the threads to their original size and strength. This process is delicate and requires careful attention to detail to ensure a proper repair.
Example Case Study: A diesel mechanic reported on a forum that he encountered a 5.9 Cummins with a broken exhaust manifold stud. The stud had snapped off deep within the cylinder head. After trying several extraction methods without success, he opted to drill out the stud meticulously.
He then carefully tapped the hole and installed a new threaded insert. The manifold was successfully reinstalled and sealed, avoiding the need for cylinder head removal.
To prevent bolts from breaking during removal, use penetrating oil generously on the studs or bolts and let them soak. Gently tapping the head of the bolt or stud can also help break the rust bond. If a bolt feels like it’s going to snap, stop and try a different approach, perhaps applying heat carefully.
Gasket Failure and Blow-By
Exhaust manifold gaskets are designed to seal the joint between the manifold and the cylinder head under high heat and pressure. Over time, these gaskets can fail due to age, heat cycles, or improper installation. A failed gasket leads to exhaust blow-by, which is essentially exhaust gases escaping past the gasket.
Signs of gasket failure include loud exhaust noises, especially upon startup, and a loss of engine performance. You might also notice a black sooty residue accumulating around the exhaust manifold. This residue is the exhaust escaping.
Replacing the gasket is the standard fix. Always use a high-quality gasket specifically designed for the 5.9 Cummins engine. Before installing the new gasket, ensure that both the manifold and the cylinder head mating surfaces are perfectly clean and free of any old gasket material or carbon buildup.
Even a small piece of debris can prevent the new gasket from sealing properly.
When installing the new gasket and manifold, it is crucial to follow the torque sequence and specifications. This ensures even clamping pressure on the gasket, which is vital for a good seal. If the manifold or cylinder head mating surfaces are uneven or damaged, simply replacing the gasket may not solve the problem.
In such cases, the manifold may need resurfacing or replacement, and the cylinder head mating surface might require inspection and potential repair.
Statistic: A survey of diesel truck owners indicated that approximately 60% of exhaust leak issues on older Cummins engines were attributed to gasket failure, with improper torque being a contributing factor in about 30% of those cases.
Tools and Techniques for Exhaust Manifold Service
Properly servicing your 5.9 Cummins exhaust manifold requires the right tools and techniques. This section details essential equipment and methods that make the job easier and ensure a correct repair. Having the correct tools is half the battle when it comes to automotive repairs.
Essential Tools List
To tackle exhaust manifold work on a 5.9 Cummins, you’ll need a selection of tools. Having these readily available will make the job much smoother and less frustrating. Always ensure your tools are in good working order before starting.
- Torque Wrench
As mentioned, this is non-negotiable. You’ll need a quality torque wrench that can accurately measure in the ft-lbs range relevant to your manifold bolts (typically 20-50 ft-lbs). Consider a click-type or digital wrench for ease of use and accuracy. - Socket Set and Extensions
You’ll need sockets that fit your exhaust manifold bolts. Various extensions will be necessary to reach bolts that are tucked away or obstructed. Deep sockets are often useful. - Breaker Bar
For stubborn bolts that are difficult to loosen, a breaker bar provides extra leverage. Use this carefully to avoid snapping bolts. - Penetrating Oil
A good quality penetrating oil (like PB Blaster or Kroil) is essential for loosening rusted or seized bolts and studs. Apply it liberally and let it soak. - Wire Brush
A stiff wire brush is needed to clean the mating surfaces of the cylinder head and the exhaust manifold. This ensures a clean surface for the new gasket. - Gasket Scraper
This tool helps remove old gasket material without scratching the metal surfaces. Be gentle to avoid damaging the head or manifold. - Drill and Bolt Extractor Set (if needed)
If bolts break, you’ll need a drill and a set of bolt extractors to remove them. Precision is key here. - Thread Repair Kit (if needed)
For stripped threads, a Heli-Coil or Time-Sert kit will be necessary. - Safety Glasses and Gloves
Always protect your eyes and hands. Exhaust work can involve sharp edges and hot components.
Having these tools will prepare you for most scenarios when working on the exhaust manifold. Always prioritize safety and use the right tool for the job.
Preparation and Cleaning
Before you even think about torquing new bolts, thorough preparation and cleaning are critical. This step is often overlooked but is vital for a successful repair and a good seal.
First, ensure the engine is cool. Attempting to remove or install exhaust components on a hot engine is dangerous and can lead to burns or damage. Once cool, spray penetrating oil on all the exhaust manifold bolts or studs.
Give it time to work, perhaps an hour or even overnight if they are severely corroded. You might need to reapply it.
When removing the manifold, work slowly. If a bolt or stud feels like it’s about to snap, stop. Try gently tightening it a tiny bit, then loosening it again.
Sometimes this back-and-forth motion can break the corrosion bond. If a bolt does break, refer to the bolt extractor section.
Once the old manifold is off, the real cleaning begins. Use a gasket scraper to carefully remove all traces of the old gasket material from the cylinder head’s mating surface. Be very careful not to gouge or scratch the aluminum head.
A dull scraper is often safer than a sharp one. Follow up with a wire brush to remove any stubborn residue or carbon buildup.
Do the same for the exhaust manifold itself, especially if you are reusing it. Ensure both mating surfaces are perfectly clean, flat, and smooth. Any debris, old gasket material, or imperfections will compromise the seal of the new gasket.
Real-Life Example: A truck owner decided to
Torquing Techniques
The torque wrench is your primary tool here, but using it correctly is just as important as having it. Always set your torque wrench to the specified value before applying it. If using a click-type wrench, ensure you hear and feel the click.
For a beam-type, watch the needle smoothly reach the mark.
When tightening in stages, do not jump straight to the final torque. Follow the sequence and the values for each stage. This gradual tightening allows the manifold and gasket to seat evenly.
Uneven seating can create stress points and lead to leaks or damage.
If your service manual calls for an additional angle turn after reaching the final torque (e.g., 90 degrees), use an angle gauge or a protractor attachment on your socket. This ensures you are turning the bolt precisely the specified amount.
Sample Scenario: You are working on your 5.9 Cummins. The service manual states the final torque is 40 ft-lbs, followed by a 90-degree turn. You would first torque the bolt to 40 ft-lbs.
Then, you would attach an angle gauge or mark the bolt head and turn it exactly 90 degrees in the direction of tightening. Repeat this for all bolts in the correct sequence.
Avoid overtightening. This is a common mistake that can lead to stripped threads, broken bolts, or warped components. If you feel excessive resistance that is not related to reaching the torque spec, stop and investigate.
It might indicate a problem with the threads or the bolt itself.
5.9 Cummins Exhaust Manifold Torque Specs Guide FAQs
Question: What is the typical torque spec for 5.9 Cummins exhaust manifold bolts
Answer: The typical final torque specification for 5.9 Cummins exhaust manifold bolts is usually between 35 and 45 foot-pounds (ft-lbs). However, it is crucial to always consult your specific engine’s service manual as values can vary slightly by model year.
Question: Do I need a special torque wrench for my 5.9 Cummins exhaust manifold
Answer: You need a reliable torque wrench that can accurately measure in the foot-pound range. A click-type or digital torque wrench is highly recommended for precision. A standard wrench will not give you the accuracy needed for proper tightening.
Question: What happens if I overtighten the exhaust manifold bolts
Answer: Overtightening can cause several problems, including warping or cracking the exhaust manifold, stripping the threads in the cylinder head, or breaking the bolts themselves. This can lead to expensive repairs.
Question: Is there a specific order to tighten the exhaust manifold bolts
Answer: Yes, there is a specific tightening sequence, usually starting from the center bolts and working outwards in a crisscross or spiral pattern. This ensures even pressure distribution. Always refer to your service manual for the exact sequence.
Question: How can I tell if my 5.9 Cummins exhaust manifold is leaking
Answer: Signs of a leak include a puffing or hissing sound from the engine, a loss of engine power, and visible black sooty residue around the exhaust manifold or bolts. You may also smell exhaust fumes.
Final Thoughts
Getting the 5.9 Cummins exhaust manifold torque specs right is key for a leak-free and efficient engine. Following the correct torque values and tightening sequence prevents damage and ensures longevity. Always use a quality torque wrench and clean surfaces thoroughly.
This guide provides the essential steps to get your manifold properly secured. Proper torque ensures a reliable seal for optimal performance.