
Do Mobile Resonators Have To Be Vertical? Proven Best Tips
No, mobile resonators do not have to be vertical. While a slight angle can help drain moisture and prevent rust, the best orientation—vertical, horizontal, or angled—depends entirely on your vehicle’s available space, ground clearance, and ensuring a secure, leak-free fit. Performance is not affected by the orientation itself.
Ever crawled under your car and wondered about that small, canister-like part in your exhaust system? That’s your resonator. And if you’re thinking about replacing or upgrading it, you might have a big question: does it have to stand straight up and down?
It’s a common point of confusion for many car owners. You see them mounted in all sorts of ways on different vehicles, which only adds to the mystery. Don’t worry, you’re in the right place. I’m Monowar Shohag, and I’m here to clear things up. We’ll walk through this together, step by step, so you can feel confident about your exhaust system. Let’s dive in and find the best way to mount your resonator for great sound and long-lasting performance.
First, What Exactly Is a Resonator?
Before we talk about how to position it, let’s quickly cover what a resonator does. Think of it as a fine-tuner for your car’s exhaust sound. Your engine produces sound waves at many different frequencies. Some of these frequencies are unpleasant, creating a “drone” or “rasp,” especially at certain speeds (like highway cruising).
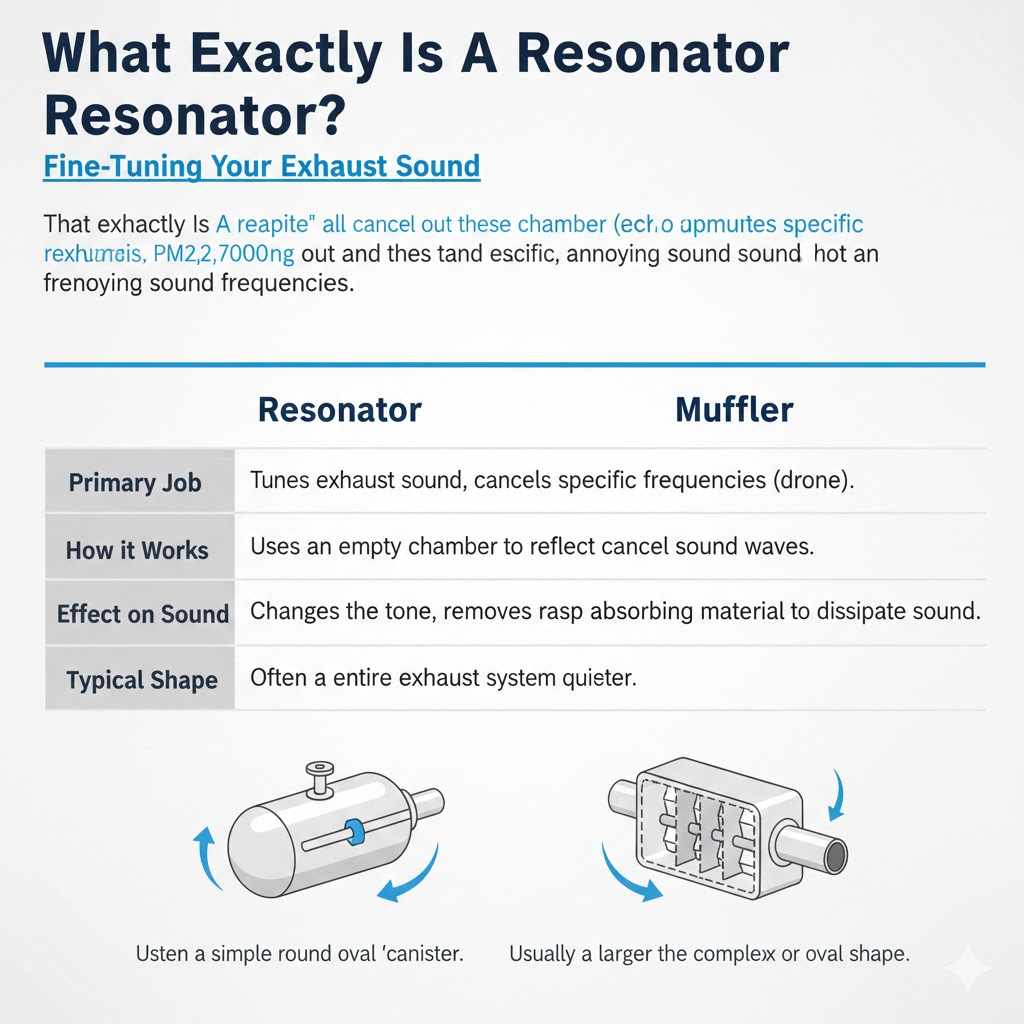
A resonator is essentially an echo chamber designed to cancel out these specific, annoying sound frequencies. It doesn’t muffle the overall sound like a muffler does; instead, it refines it, making the exhaust note smoother and more pleasant. It tackles the quality of the sound, while the muffler handles the volume.
Resonator vs. Muffler: A Quick Comparison
It’s easy to mix these two up, but they have very different jobs. Here’s a simple breakdown to help you remember:
| Feature | Resonator | Muffler |
|---|---|---|
| Primary Job | Tunes exhaust sound, cancels specific frequencies (drone). | Reduces overall exhaust volume (makes it quieter). |
| How it Works | Uses an empty chamber to reflect and cancel sound waves. | Uses baffles, chambers, and sound-absorbing material to dissipate sound. |
| Effect on Sound | Changes the tone, removes rasp and drone. | Makes the entire exhaust system quieter. |
| Typical Shape | Often a simple round or oval “canister.” | Usually a larger, more complex box or oval shape. |
The Big Question: Does Orientation Really Matter?
Here’s the simple, direct answer: for performance and sound, no, the orientation of a resonator does not matter. Whether you mount it vertically, horizontally, or at a 45-degree angle, it will do its job of canceling sound frequencies just the same. The sound waves don’t care which way the resonator is pointing.
However, orientation is very important for two practical reasons: fitment and durability. The goal is to install the resonator so that it fits securely under your car without hitting anything and lasts as long as possible. Let’s explore why the way you mount it can make a big difference.
Why Resonator Placement and Angle Are Crucial
While the physics of sound-canceling isn’t affected by orientation, the physical health of your exhaust system certainly is. Here are the key factors to consider when deciding how to mount your resonator.
1. Condensation and Drainage
This is the most important reason to think about angle. Your exhaust system produces a lot of water vapor as a byproduct of combustion. When the car cools down, this vapor condenses into water droplets inside your exhaust pipes and resonator. If this water pools inside the resonator, it can lead to premature rust and corrosion from the inside out.
- Ideal Mounting: The best practice is to mount the resonator with a slight downward angle (even just a few degrees) toward the rear of the car. This encourages any collected moisture to drain out through the tailpipe.
- Vertical Mounting: A truly vertical mount can be great for drainage, as gravity will pull all moisture straight down and out. However, this is rarely possible due to space constraints under most vehicles.
- Horizontal Mounting: A completely flat, horizontal mount is the most likely to trap water. If you must mount it this way, ensure the rest of your exhaust system has a proper slope to promote drainage. Some mechanics will even drill a tiny “weep hole” at the lowest point of a horizontally mounted resonator to let water escape, but this should be done with caution as it can create a small exhaust leak.
2. Ground Clearance
Your exhaust system hangs underneath your car, making it vulnerable to speed bumps, potholes, and steep driveways. The orientation of your resonator directly impacts your ground clearance.
Mounting a resonator vertically on a car that is low to the ground is a recipe for disaster. It will likely scrape on everything, leading to damage, leaks, or even tearing the resonator right off. For most cars, especially those that have been lowered, a horizontal installation is the only practical option. Always tuck the resonator up as high as possible into the exhaust tunnel to protect it.
3. Available Space and Fitment
The underside of every car is a complex puzzle of frame rails, suspension components, driveshafts, and fuel lines. The “best” orientation for your resonator is often dictated by the space available.
You need to find a location and angle that allows the resonator to sit comfortably without:
- Touching or vibrating against the car’s body or frame (this will cause annoying noises and wear).
- Being too close to sensitive components like fuel lines, brake lines, or wiring.
- Creating awkward or sharp bends in the exhaust pipe, which can restrict airflow.
The goal is to create smooth, clean lines for the exhaust gas to follow. Sometimes a slight angle is needed to navigate around a crossmember or a differential.
A Step-by-Step Guide to Installing Your Resonator Correctly
Feeling ready to tackle this yourself? Great! With the right tools and a bit of patience, you can do this. Just remember to prioritize safety above all else.
Step 1: Safety First!
Never work under a car supported only by a jack. This is extremely dangerous. Before you start, make sure you have everything you need to be safe.
- Lift the Vehicle: Use a reliable car jack to lift your vehicle, and immediately secure it with sturdy jack stands on a flat, level surface. The Occupational Safety and Health Administration (OSHA) provides excellent guidelines on vehicle repair safety.
- Wear Protection: Always wear safety glasses to protect your eyes from rust, dirt, and metal shavings. A good pair of work gloves will save your hands from cuts and burns.
- Let it Cool: Your exhaust system gets incredibly hot. Make sure the car has been off for several hours and the exhaust is completely cool to the touch before you begin.
Step 2: Gather Your Tools and Parts
Having everything you need on hand will make the job go much smoother. Here’s a typical list:
- New Resonator
- Wrench Set or Socket Set
- Exhaust Pipe Cutter or a Reciprocating Saw with a metal-cutting blade
- Measuring Tape
- Safety Glasses and Gloves
- Jack and Jack Stands
- Exhaust Clamps (if not welding)
- Exhaust Hanger Removal Pliers (optional, but very helpful)
- Penetrating Oil (for rusty bolts)
Step 3: Plan Your Placement
Slide under your car and find the straight section of exhaust pipe where you want to install the resonator. This is usually between the catalytic converter and the muffler.
- Hold it in Place: Hold the new resonator up to the pipe to visualize its position.
- Check for Clearance: Check all around the resonator. Do you have at least an inch of space between it and the car’s body, frame, and any other components?
- Determine the Angle: Figure out the best orientation—horizontal, vertical, or angled—that gives you the most clearance and promotes drainage. Remember, a slight downward slope toward the back is ideal.
- Measure and Mark: Measure the body of the resonator (not including the inlet/outlet pipes). Transfer this measurement to the exhaust pipe and mark your two cut lines clearly with a marker. Double-check your measurements before you cut!
Step 4: Cut the Exhaust Pipe
This is the point of no return, so be confident in your marks. A dedicated exhaust pipe cutter will give you the cleanest cut, but a reciprocating saw works well too.
Cut slowly and carefully, trying to make the cut as straight as possible. Once the section is removed, use a file or deburring tool to clean up the edges of the remaining pipe. This will ensure a snug, leak-free fit.
Step 5: Fit and Secure the Resonator
Now it’s time to put your new part in place.
- Slide it On: If your resonator is a slip-fit design, slide it over the cut ends of the exhaust pipe. You may need to wiggle it a bit to get it seated properly.
- Position Correctly: Make sure the resonator is oriented in the position you planned. Check your clearances again.
- Clamp it Down: Slide your exhaust clamps over the connections and tighten them down securely. The goal is to make the connection airtight. Tighten the bolts evenly, alternating between them to ensure even pressure. Don’t overtighten and strip the bolts.
- Welding (for pros): If you have welding skills, tack welding the resonator in place first is a good idea. Once you’re happy with the position, you can run a full bead around the joints for a permanent, leak-proof seal. For beginners, high-quality clamps are perfectly fine.
Step 6: Check for Leaks
An exhaust leak can be noisy, hurt performance, and be dangerous if fumes get into the cabin. Here’s a simple way to check your work:
- Start the Car: Turn the engine on.
- Listen and Feel: Carefully run your hand (without touching the hot pipe) around the new connections. Can you feel any puffs of air? Can you hear any hissing sounds?
- The Soapy Water Test: For a more precise check, mix some dish soap and water in a spray bottle. Spray the mixture all over the new joints. If you see bubbles forming and growing, you have a leak. Turn off the car, let it cool, and tighten the clamps further or adjust the fit.
Once you’re leak-free, carefully lower your car off the jack stands. You’re done! Go for a test drive and enjoy the improved sound of your exhaust.
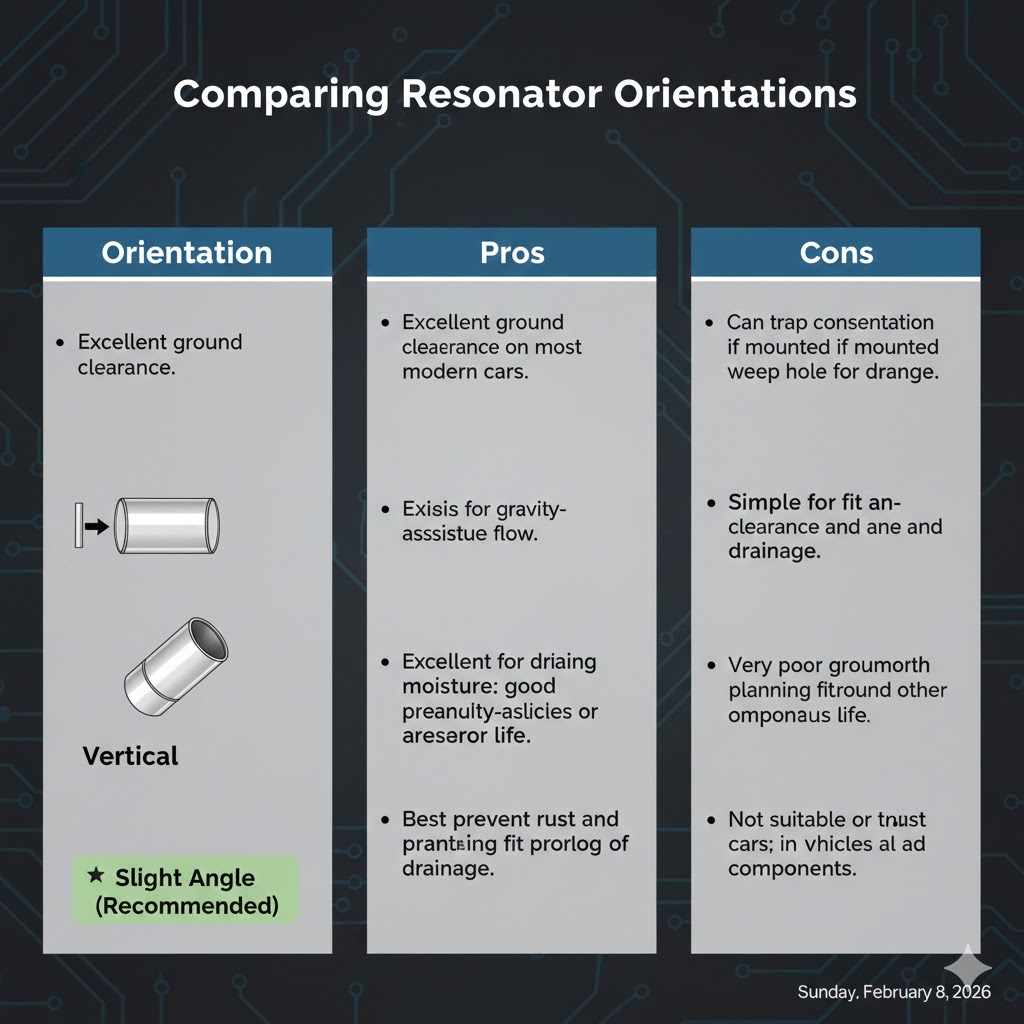
Comparing Resonator Orientations
To make it even clearer, here is a table summarizing the pros and cons of different mounting orientations.
| Orientation | Pros | Cons |
|---|---|---|
| Horizontal | – Excellent ground clearance. – Easiest to fit on most modern cars. | – Can trap condensation if mounted perfectly flat. – May require a small weep hole for drainage. |
| Vertical | – Excellent for draining moisture. – Simple, gravity-assisted flow. | – Very poor ground clearance. – Not practical for most cars; only suitable for trucks or vehicles with a lot of space. |
| Slight Angle (Recommended) | – Best of both worlds: good clearance and good drainage. – Helps prevent rust and prolongs resonator life. | – May require more careful planning to fit around other components. |
Frequently Asked Questions (FAQ)
1. Can I install a resonator myself?
Absolutely! If you have basic hand tools, a safe way to lift your vehicle (jack stands are a must), and can follow instructions carefully, this is a very achievable DIY project. For beginners, using clamps is much easier than welding.
2. What’s the difference between a resonator and a muffler again?
Think of it this way: a resonator tunes the sound, removing annoying drones and raspiness. A muffler reduces the volume, making the car quieter overall. Most cars have both to create a sound that is both pleasant and legally quiet.
3. Does the direction of the resonator matter (inlet/outlet)?
For most universal resonators, no. They are typically “straight-through” designs, meaning they are bidirectional and work the same way regardless of which end faces the engine. However, some specific or high-performance resonators might be directional. Always check the product’s instructions or look for arrows printed on the body of the resonator.
4. Will a resonator make my car louder or quieter?
This is a common misconception. A resonator’s main job isn’t to change volume, but tone. Adding a resonator to a system that doesn’t have one (like a “straight-piped” exhaust) will likely make the car feel quieter because it removes the harshest, loudest frequencies. Replacing a stock resonator with a high-performance one might slightly change the volume, but its main effect will be on the sound’s character.
5. How long do resonators last?
A good quality resonator should last for many years, often 5 to 10 years or more. The biggest enemy is rust, which is caused by moisture and road salt. Proper installation with a slight drainage angle can significantly extend its life.
6. Is it okay if my resonator is slightly angled?
Yes, it’s more than okay—it’s often ideal! A slight downward angle toward the tailpipe is the best way to help moisture drain out, preventing rust from forming inside. As long as it’s not hitting anything, an angle is beneficial.
7. Can I just remove my resonator?
You can, and this is often called a “resonator delete.” Doing so will likely make your exhaust sound raspier, tinnier, and introduce a drone at certain RPMs. Some people like this aggressive sound, but many find the drone annoying during daily driving. It won’t harm your engine, but it will change the sound dramatically.
Conclusion: Fitment is King
So, do mobile resonators have to be vertical? The answer is a clear no. The most important rule when installing a resonator is to make it fit safely and securely within the space available. Performance and sound quality are not determined by its orientation.
Your focus should be on achieving good ground clearance to avoid damage and ensuring a slight downward angle to let moisture escape, which will protect your investment from rust. By planning your placement, measuring carefully, and checking for leaks, you can confidently install a resonator that will refine your car’s sound and last for years to come. Take your time, prioritize safety, and enjoy the satisfaction of a job well done.