How to Connect Headers to Exhaust Pipe
There are many ways to connect headers to an exhaust pipe. One way is to weld the header flange directly to the exhaust pipe. This is a very strong connection, but it can be difficult to do if you don’t have access to a welder.
Another way is to use header bolts and exhaust gaskets to bolt the header flange to the exhaust pipe. This is not as strong of a connection as welding, but it is much easier to do and doesn’t require any special equipment.
- Cut the length of the exhaust pipe to the desired size using a pipe cutter If you’re in need of a reliable pipe cutter, consider this Tailpipe Cutter 3/4 to 3 Inch, Carbon Steel Chain Exhaust Pipe Cutter Tool. It’s designed specifically for cutting exhaust pipes and copper pipes.
- Place the exhaust pipe over the header collector and mark where it needs to be cut
- Cut the exhaust pipe at the mark using a pipe cutter
- Place a silicone coupler over each end of the exhaust pipe and fit it onto the header collector For a high-quality silicone coupler, consider this ETL INDUSTRIES ID 4″ to 5″, Length 3″ Silicone Reducer Straight Coupler Hose. It’s 4-ply reinforced for durability and can fit a variety of setups.
- Tighten bolts on either side of the silicone couplers to secure them in place
For another perspective on connecting headers to the exhaust system, including a discussion on using a “Clamp Connector”, check out this forum thread on Ford Mustang Forums.
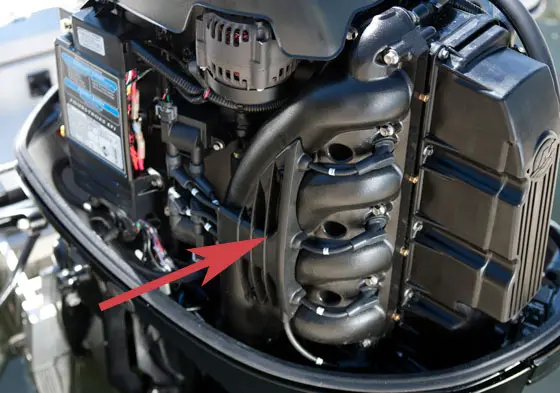
Header collector. Get a better seal!
Do Headers Connect to the Exhaust?
Yes, headers connect to the exhaust. The purpose of a header is to collect the exhaust gases from each cylinder and funnel them into the main exhaust pipe. Headers are typically made of stainless steel or another type of heat-resistant metal.
How to Install Exhaust Headers?
Before we get into the nitty-gritty of how to install exhaust headers, let’s take a step back and understand what they are and why you might want to consider installing them. Exhaust headers are aftermarket car parts that replace factory-installed exhaust manifolds. They are designed to improve engine performance by increasing exhaust flow and reducing back pressure.
For a practical example, consider these Exhaust Headers Stainless Steel 1-5/8″ for 2011-2017 F150 F-150 XL XLT 5.0L Coyote V8 DOHC. They are designed to improve engine performance by increasing exhaust flow and reducing back pressure.
In some cases, they can also lead to a small increase in fuel economy. If you’re interested in improving your car’s performance, then installing exhaust headers is a good place to start. The process is relatively straightforward, but there are a few things you need to keep in mind before getting started.
Here’s a quick overview of what you need to do: 1) Disconnect the negative battery cable to prevent any accidental electrocutions. 2) Remove the old exhaust manifold bolts and gaskets using a socket wrench or impact gun.
When replacing the old exhaust manifold bolts and gaskets, consider using this Dorman 03413B Exhaust Manifold Hardware Kit. It’s compatible with select models and ensures a secure fit.
Be careful not to damage the threaded holes when removing the bolts. 3) Install the new header gaskets provided with your kit (or use reusable silicone gaskets if available). Make sure they’re seated correctly before proceeding.
Some header kits come with new studs or bolts; if so, use these instead of reusing the old hardware.
What Pipe Connects to the Headers?
The pipe connects to the headers via a process known as welding. This is done by heating up the pipe and then inserting it into the header. The heat creates a seal between the two pieces, which prevents leaks.
What Header is Better 4 2 1 Or 4 1?
There are a few schools of thought when it comes to headers on a website. Some people believe that having one header across the top of the site is best, while others think that having multiple headers (known as “hierarchical headers”) is better. There really isn’t a definitive answer as to which is better, and it ultimately comes down to personal preference.
That being said, let’s take a look at both options to see what might work best for your website. If you opt for a single header across the top of your site, it will create a more unified look. This can be helpful if you want visitors to immediately know that they’re on your site and not get distracted by other elements on the page.
A downside to this approach is that it can sometimes make your site feel less dynamic and exciting. On the other hand, hierarchical headers can give your site more visual interest and help guide visitors through your content. This can be especially helpful if you have a lot of information on your site – using multiple headers can help break things up and make them easier to digest.
However, too many headers can start to look cluttered and confusing, so it’s important to strike a balance.

Credit: www.musclecardiy.com
How to Install Headers on a 350
Are you looking to install headers on your 350? If so, this guide is for you. Headers can be a great addition to any engine, and they can really help improve performance.
However, they can also be a bit challenging to install. But don’t worry, we’ll walk you through the process step by step. Before we get started, there are a few things you’ll need:
– A set of headers (obviously) – New gaskets (the old ones will probably be toast after removing the old headers) – Some header bolts (these are usually different than regular engine bolts)
– Anti-seize compound – This will help prevent the header bolts from seizing up when you go to remove them later on – A torque wrench – You’ll need this to properly tighten the header bolts – An impact gun – This will make removal and installation much easier Now that you have everything you need, let’s get started. The first step is to remove the old headers.
This can be a bit tricky, as they’re usually pretty tight in there. We recommend using an impact gun to loosen them up before trying to remove them by hand. Once they’re loose, carefully pull them out being careful not to damage anything in the process.
With the old headers out of the way, it’s time to clean up the mating surfaces with some sandpaper or a wire brush. This will help ensure a good seal when you install the new headers. Next, it’s time to apply some anti-seize compound to the header bolts.
For a reliable anti-seize compound, consider this Loctite 500995 Copper Anti-Seize Lubricant. It’s designed for high-temperature environments and offers good electrical conductivity.
This stuff is important, as it will help prevent these bolts from seizing up later on. Just put a small amount on each bolt before threading it into place. Now it’s time for installation. Start by putting one side of each header in place, then threading in all of the bolts loosely.
Once both sides are installed, start tightening down all of the bolts gradually, working your way around evenly until they’re all snugged down. Be sure not to over-tighten these, as that could cause damage to the headers or even break some of the bo its. Once everything is tightened down properly, reconnect any wires or pipes that were removed during disassembly and you’re e do ne!
For insights on how to connect headers without flanges to the exhaust, you can refer to this forum thread on Yellow Bullet Forums.
Headers, Install near Me
Headers are an important part of any website. They help to define the structure of your site and can be used to improve search engine optimization (SEO). Headers can be installed by a web developer or you can install them yourself if you have a little bit of technical know-how.
If you’re not sure how to install headers, don’t worry – there are plenty of resources available online that can walk you through the process step-by-step. You can also find many reputable companies that offer heater installation services. Just do a quick search for “header installers near me” and you’ll be presented with a list of options in your area.
Headers Install Cost
Header installation generally costs between $200 and $500, depending on the type of header you select. If you have a professional installer do the work for you, expect to pay closer to the higher end of that range. Do-it-yourselfers can save some money by doing the work themselves, but it’s important to note that headers require special tools and expertise to install correctly.
Improper installation can lead to engine damage, so unless you’re confident in your abilities, it’s best to leave this job to the professionals.
Conclusion
There are a few ways to connect headers to an exhaust pipe, but the most common and effective method is welding. This will create a stronger connection that will be less likely to break or come apart over time. If you don’t have access to a welder, you can try using exhaust clamps or U-bolts, but these are not as reliable and may need to be replaced more often.
Whichever method you choose, make sure the connections are tight and secure before starting your engine.